Pages

Thursday, December 13, 2012

National Boards

I've decided to work for my National Board of Professional Teaching Standards Certification. Commonly called "National Boards." It is a LOT of work. A colleague of mine has hers as a "generalist," and equates it to getting a masters degree except teachers complete their National Boards in 3-15 months. I have contemplated participating in National Boards for about six years and decided now is the time. I was upset to find out that the Federal Subsidy through the Wisconsin Department of Education may not be available next year, so in order to be eligible for it I have to have my portfolio complete by March 31st. If you're not familiar with National Boards, here's the highlights of it for an "Art Early/Middle Childhood" Certification (ages 3-12). 

Process: 
There are four portfolio entries and six essay questions that must be taken at an assessment center.
The first portfolio entry consists of a storyboard of ten photographs proving the teacher met certain standards and goals. The teacher must write up what they did, how it met the stated goals, and how it effected student learning. The write up is a ten page maximum, with an additional submittal of assessment practices up to five pages. The second two portfolio entries each have different standards for the teacher to prove and require video of the teacher teaching, assessment materials, and another write up of ten pages maximum. The fourth and final  entry is a ten page maximum write up of the teacher's accomplishments in including family and community in their work. 

Benefits: 
In Wisconsin, we have two different types of teaching licenses. There is a "Professional Educator License" which is valid for five years and a "Master Educator License" which is valid for ten years. With the acquisition of a NB Certification, a teacher can apply to become a Master Educator. This is nice because to renew a license teachers have to either take six graduate level classes or complete a PDP (Professional Development Plan) that is accepted by the state and pay a fee for the renewal (about $100 currently). 

Currently, Wisconsin offers a grant of $2,500 per year that the certification is valid (ten years).

If a teacher completes all ten aspects of the process and does not get certified they earn three graduate credits. If they do get certified they earn an additional six (total of nine) graduate credits. These can be issued through the college of their choice (upon approval) and applied to district payroll advances.

Validation of quality teaching

Draw backs:
It costs $2,565 to attempt certification. Depending on what you teach and where you live, there may be scholarships available to help with this and the benefits certainly outweigh the cost, but what teacher has an extra two grand laying around? Certainly not me, which is why I'm rushing to complete this before the subsidy is (possibly) gone next year. This subsidy is half the cost, which will help a lot. 

So, that is what I am working on now. I am partway through the fourth entry (the community involvement entry) as that one does not require much more than writing. I will start recording  my teaching tomorrow. I have lessons picked out for the second and third entry and am just a little stumped on what to do for the first one. I have an idea, and plan on exploring that one more this weekend. With each class only meeting every six school days, I have to get rolling on this NOW!

Wednesday, October 24, 2012

Statue of Liberty


One of our third grade classes was ready to have their Statues of Liberty spray painted last week. Here are some photos of the progress.


Gelatin Printmaking

When I came across this blog post on Pinterest, I was a bit intrigued. Admittidly, it took me over a year to get back to it and thoroughly check it out. I am in love with this process! There is a product called Gelli Art that mimics the gelatin printmaking technique, but I have too small of a budget to invest in those. Enter gelatin. Notice I didn't say Jell-O. I used Knox Gelatin, which I found at WalMart in a box with four packages in it. I used two cups of boiling water and all four packets of gelatin to create one cookie sheet of gelatin to play with. When I do this with students, I plan on using disposible tins that I already have on hand. They are brownie pan sized. After mixing the gelatin, I poured it into the pan and let is sit overnight. The next morning I had a flexible, rubbery surface for printmaking.

I like the lesson that is found on the blog post linked above, so I decided to try that one. Luckily, in Wisconsin in October, there are plenty of leaves to be found! I inked the gelatin with black ink and layed the leaves out on the gelatin, vein side down. Time for the first print. This one will give students an image focusing on the negative space.

Negative image, next to the printing pan.

Next, I removed the leaves. Most of the ink around the leaves was removed with the first print, but the leaves blocked off an areas with a great vein pattern. Once the leaves are removed, I created the second print. I LOVE these! They are simply stunning!

Pulling the second print.

Side by side; negative and positive space.


Negative space.

Positive space.
I plan on having the students mount these side by side. We will look at some Andy Warhol prints and talk about dyptichs. I love that there are so many concepts in this one, simple project! Students will be learning printmaking, negative/positive space, Pop Art, and dyptichs!

Tuesday, October 23, 2012

Post-It Mural


I thought about saving this post until our Post-It mural is complete, but that won't be until April and I figured perhaps someone out there may also be inspired by this idea, so here's where we are right now:

I have been completely inspired by a blog post that I came across while searching for images for a presentation on Andy Warhol. Despite finding the video on YouTube, I cannot get it to load into Blogger, so you can find the post, with a time lapse video of the Post-It note mural they created here. I am so inspired, that I have decided to create my own Post-It notes mural with my students! Their image was Pop Art, and it works really well for this techniques, so I decided to stick with Pop Art.   Pop Art is one of my favorite styles, so it's amazing it's taken me this long to decide to have an art show with a Pop Art theme.

To begin, my student teacher and I chose an image. We decided we wanted to go with something from Roy Lichtenstein, as I thought his comic book style would not only interest the students, but also work well with the pixelation we needed to create. While searching, we came across his painting, "Sunrise," and we agreed that that's the one. Mrs. Leland (my student teacher) pulled the image into PhotoShop and used a filter to make it appear in squares. Each square represented one Post-It note. Because we are doing this with elementary students, we decided to transfer that image into Excel to make the squares more obvious to the kids.

Transferring the image into Excel. Each square is one Post-It note.

Finished the transfer! It took me about 3 1/2 hours and is eight pages to print!

It's going to be AMAZING!

Close up of the Excel spreadsheet.
Our plan is to tape roll paper together to make a canvas large enough to accomidate our image. Together, we'll draw out the squares on the large paper. We have an atrium, which is where it will be hung for the art show. It is also where we will work on it. The plan thus far is to have grades 3-5 work on it once during their art classes. I have all of those classes before lunch, so the paper can be rolled up when the last class of the day is done with their contribution.

Wednesday, October 3, 2012

Artist of the Week

One of my students is in Artsonia's artist of the week contest for her Dot picture! Please go to this link and vote for her daily through Oct 6th. Her name is Karin, and she is in the PK-3 age group. Thanks!


http://www.artsonia.com/aotw/vote/0/19892813

Monday, October 1, 2012

Big Reveal


No one guessed correctly! We are making mini Statue of Liberty figures. This one is still missing the tissue paper fire in the torch, but you get the gist of it. These will be on display along with some drawings of American Gothic for the 2nd and 3rd grade art show/music concert in November.

Thursday, September 27, 2012

Color Terms


 Last spring I decided the space over my windows needed to be more colorful. I thought about putting the CID kids' ink tiles up there but I wanted them to take the tiles home and I was afraid they'd be too heavy. Then I got the idea of putting construction paper in the color wheel order with color terms on it. I ordered one ream of many colors and they finally came in for me to complete my project. I put them up this morning. Here are my results:


Before

After


The Dot~Collaborative Work of Art

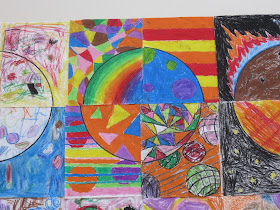
We have finally completed our whole school collaborative art project based on Peter Reynolds' book, The Dot. Unannounced to me when we began this project, there is an International Dot Day! With art only once every six school days for 45 minutes and school starting the first week of September, we didn't get it done in time to celebrate ON International Dot Day (Sept. 15th, the anniversary of it's publication), but all the kids had at least started it by then. The full work of art is completely stunning in person, and it is so much fun to watch the kids and adults alike stand in awe in front of it!


 There are a few combinations that really stand out to me. I find it interesting to listen to my colleagues. We each pick out different ones that really pop to each of us! Here are a few that I notice everytime I walk by.


This was the first project that I used a rubric for. I only used it with third-fifth grade, and it was a little confusing for some of the third graders. I plan on exploring rubrics much more this year, including picture rubrics for the younger grades to get them thinking about their art more. My rubric can be found here, if you are interested in it. However, if I do this again, I would move the writing portion to the top to get students thinking about the Elements of Design before they fill in the rubric. My student teacher and I have also discussed adding pictures of the Elements for the students to simply circle. I'm trying to add more writing though, so I'm undecided about that aspect.

The lower grades had one learning target: I can create with craftsmanship. The upper grades added in: I can use at least three of the Elements of Design in my artwork. The rubric requires them to recall with Elements they used (there are posters of them in my classroom for reference), and judge their own craftsmanship. Most kids were spot on, with a bunch being quite hard on themselves and just a couple trying to get a better grade than actually earned. The rubric certainly made grading much simpler!

Friday, September 14, 2012

Bravo Board Trophies


We made our trophies for the Bravo Board winners!The kids are totally psyched about it!

Thursday, September 13, 2012

Teaser


So, what do you think we're going to make?

Friday, September 7, 2012

The Dot~Collaborative Art

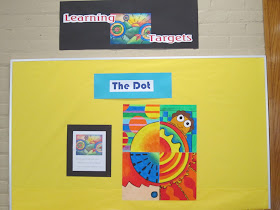
You may have noticed from my last post that I have changed a lot of my classroom around this year.  I moved classrooms last year and have purged a lot of "junk" and extra furniture. My main goal is to make sure that there is plenty of room for my students to create without a ton of clutter everywhere. It has been very freeing to get rid of so much stuff! The photo is of the bulletin board I am now using for my project samples and Learning Targets. It only has one project on it right now because the whole school is going to do the same project for the start of the year.


We began with an explaination of all the classroom management changes, which I reviewed in the last post (linked above, if you missed it!). Once the students expressed that all my expectations were clear to them we started the first project. First was a video animation of Peter Reynold's book, The Dot (except when the technology failed me, then it was a good old fashioned book reading. Complete with fifth graders sitting on the floor around me!) We discussed the lessons to be learned through the book; to try, believe in yourself, "make a mark and see where it takes you" and that these lessons are not only found in art. With the younger kids I then segued into the creation process but with the older kids we then talked about the Elements of Art. They watched this video on the Elements, and then we briefly talked about them. The younger kids have one Learning Target for this project: "Create a work of art using craftsmanship." The older kids also have that one, and also to "Use three or more of the Elements of Art in a work of art."

Kids were given a paper with a quarter of a circle photocopied on it. I had to make two versions because I didn't want to have to cut all the papers into squares. I have a post-it on the top of each pile where I am keeping track of which classes have used that version and how many kids are in the classes. I'll get them as close to even as I can and possibly add my samples in if needed to even it out when I display them. I also gave the students a ruler and circles to trace. I asked them to design first with their pencils and then fill in the shapes with oil pastels. Younger kids got a demo on some oil pastel techniques, and older kids had a verbal refresher of techniques they should already be used to using. Finally, they set to work. Some of them are really amazing! I will be sure to post the final work of art all hung together in our Atrium, as well as a link to their individual quarter dots on Artsonia!

This project was inspired by this Pinterest Pin.

Thursday, September 6, 2012

Happy New Year!

Here we are, at the beginning of a new school year! I have my first ever student teacher this fall, and things are going great so far. On the last (of three) inservice days I suddenly decided to change my entire classroom management system. Here's what we are doing this year, and I tried to site my sources by linking the titles of each picture, if you're interested.

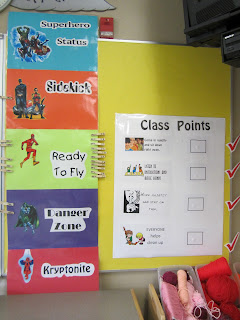
Class Points
 Each class period the kids can earn up to four points. The points are for:
1. Come in quietly and sit down right away.
2. Listen to instructions and raise hands.
3. Work quietly and stay on task.
4. EVERYONE helps clean up.

When they earn a point, I move a laminated check mark to the box next to the task.


Our schools use "Above the line", "Below the Line", and "Bottom Line" behavior terms. One of my schools added "Top Line" for the kids that are going above and beyond what is expected of them. I took these and translated them into Superhero terms. All of the classes started at "Ready to Fly," the middle category. If they earn three or four points from the previous system, their class clothes pin will move up one category. Two points and it will stay where it is. Zero or one point means it will move down a category. I also told them if they stay in the "Kryptonite" category for long I would have to talk with their classroom teacher to make a personal plan for their class to improve.


I love this one, so far. I have a spot for each of my table colors on our "Bravo Board." The first two tables that are cleaned up and sitting silently get a tally by their table color. At the end of our six day specialist cycle I will look at which table has the most tallies and that table will get a trophy on their table for the next cycle. The kids are really getting into this so far. I have to find/make a really cool trophy so they really want it! My student teacher had the great idea that they could somehow add onto it, but I haven't figured out how to manage that without the table fixating on that instead of the lesson I'm teaching.


All of my previous years of teaching I have used a "helper table." It works fine, but I liked the idea of getting all the tables involved. One of my schools has five tables and the other has six, so I just added a "day off" for the sixth table. Here's the breakdown of the jobs: 

1. Supply Coordinators: Pass out needed supplies
2. Table Folder Collectors: Pick the table folders up from each table and put them on their class shelf after the Bravo Board points have been awarded.
3. Volume Control Specialists: For this job, I really pump how important they are because their reminders could help them earn their class point for working quietly and staying on task. These kids are in charge of reminding the kids when they are getting too loud. If they do get too loud and I need to take away one of the "ART" letters, these kids move it for me so I can continue working with whomever I happen to be working with when they get loud.
4. Table Washers: I have wipes, and I also got a spray bottle and towels from the custodian. After the "Bravo Board" points are awarded, this table will wipe all of the tables. 
5. Sink/Floor Inspectors: I have the kids tell me the difference between an "inspector" and a "cleaner" to make sure they know they can't leave the mess for this table. They simply double check that nothing was missed, again, after the "Bravo Board" points are awarded. 

Jobs 2, 4, and 5 are after the points are awarded so that those tables have a fair shot at earning the Bravo points.

In/Out box


This was actually my idea (woah!). Last year I ordered a Classroom Keeper for my construction paper. The company actually sent two of them  when I asked for the quote and I had  not yet decided to order them. Actually, I didn't have enough money for them! Our awesome secretary saw the panic in my eyes and called the company, who told me to just keep them and I'd get credited for the amount! SCORE! I used one for the construction paper as planned, and ho hummed about what to do with the other one. I decided to make an In/Out box for completed artwork. Before now, the kids would just add it to an ever-growing pile and it would get to be too much. Now there are two shelves for each grade: and "In" for newly completed work and an "Out" for work I'm ready to pass back. I plan on keeping the classes divided within these shelves.

Thursday, May 24, 2012

Writing? In ART?

I did it! I graduated with my Master's a couple of weeks ago. Sorry to be so AWL all year, but I'm hoping to rectify that in the coming school year. 

I have my first ever student teacher in the fall. She came in so we could size each other up meet a couple of weeks ago. She seems nervous (of course) but also like she will be great once she settles into teaching. I just wish it was more than six weeks. With the kids on a six day cycle, she'll only see each class 4-5 times! I'm hoping with a student teacher I will be able to work on curriculum building, assessment, and technology. At least I was, until we specialists had a meeting with our principal a few weeks ago. She wanted to give us a heads up on the new Wisconsin State testing that is coming in two years. WKCE (Wisconsin Knowledge and Concepts Exam) is out, and a new system is coming. Apparently fifth graders are going to be expected to be able to sit down and type two pages in one sitting. Seriously, I know college kids that can't do that! Anyway, our principal wanted to let us know what is coming so that we can work on ways to integrate writing in our content areas. As I told her, that's easy in art if I had the time to do it, but with only 25 classes (assuming there's no field trips or snow days) a year, that's a pretty tall order. I have been working on writing integration since our meeting. She said a goal of once a trimester would be a good start for next year. Pinterest has helped me find a few good ideas. I'll share my plans now, in case any of you are also looking for more ideas, and I'll share the results and how it was taught once we do it with our students. 
1. FAKEBOOK: I LOVE this idea! I only have one wish: that I could create a school data base of these pages and the kids could link to each other's pages instead of just having "friends" listed. Perhaps in the future...My concern about this was that a lot of artists have done and said some pretty stupid things publicly that I wouldn't want my students discovering on my watch. Therefore, I am creating a class website on Google sites that has artist pages sorted by years, style, and artists. Each artist page has two works of art, a brief bio, quotes (if I can find any elementary appropriate ones!), and known acquaintances. Kids will use my site to choose an artist, create a Fakebook page and then do a project based on the artist of their choice. I just started working on this, so I only have a couple of artist pages done and none of them are published. When it is complete I will be sure to post the link so all of you can reference it too!
2. POST-IT CRITIQUE: This idea really inspires me. Kids can write a question, comment, or suggestion on a post-it and put it on another student's work of art. I'd certainly have to have strict guidelines about positive comments, but this could be amazing. I was perusing the Lakeshore catalog today and came across these magnetic clips that would be perfect for hanging the art on the white board. I happen to have my tables labeled in the same colors these clips come in. I'm going to order two sets (there's six kids to a table) and the kids will hang their artwork from a clip that matches their table color to make it easy to pass them back at the end of class. I'm thinking everyone puts their completed project up and we start another project. Then the kids go up one table at a time and put up three post-its. One question, one comment, and one suggestion.
3. I also want to start a sketchbook/journal with the kids. I was thinking of using jumbo index cards. The kids can design the cover the first day of class, and each index card can have a hole in the top corner. They'll be held together by a jumpring with a ribbon on it that matches the table color the student sits at for easy passing out. In addition to this idea of images, some days I can ask the kids to compare/contrast two works of art that are on the SmartBoard. I figure it's an easy way to get the kids focused right away when they come in the door, and keeps them occupied while the stragglers come in. With back-to-back classes it could also help with me needing to get out or put away supplies.
4. Finally, I saw this post on Pinterest about weaving with magazines and thought it would be fun to have the kids write a poem or story and weave it into a painting. This is very much in the development stages, and I've been focused on the website so I haven't given it much thought yet.

I'd definitely be interested in all of your writing integration ideas if you have any to share! I found it ironic that I've been working on all of this integration and this week a young student said I'm not a "real teacher." When I asked what he meant he said "Oh, I mean you don't teach the real stuff, like math and reading." I replied "Yes, I do. It's in every lesson, you're just having so much fun you didn't notice."


Wednesday, January 18, 2012

Willow Art Show Preview

I've spent my morning researching living artists, hoping to find inspiration for an art show inspired by them. All I have to say, is I am so sick of shock art! Seriously, maybe it's because I have two girls ages 3 and 2 and I don't really want to bring them to an art museum filled with genitalia or maybe I'm just getting old, but I am sick of it! It's old news, how about something creative and fun that can be introduced to elementary school children?

Ok, rant over.

Here's what I found that is inspiring AND age appropriate for my little cherubs. . .


Kindergarten will be making stone scupltures based off the work of Daryl Maddeaux. This will be so perfect, as one of the fourth grade teachers is working with several grants to create a raingarden in our "Cinder Lot" play area and this will be Kindergarten's contribution to that too. Special thanks to Princess Artypants for this post, which is where I got this idea.

First grade will create layered painting via Gerhard Richter. I'm thinking pallet knife/cardboard scraping the paint to get similar results.

Princess Artypants to the rescue again! When I referred back to her blog for the Kindergarten lesson I found this new post on the artwork of Edward Said Tingatinga. Beautiful! Although ES Tingatinga is no longer living, his sons and many other African artists continue producing artwork in his style. Way better than the pipecleaners-as-neon-signs project I was thinking of about Bruce Nauman!

Third grade photo collages a la David Hockney.

Fourth grade pour paintings inspired by Holton Rower.

Unlike all the other grades, who have yet to complete thier projects, fifth grade just finished using Romero Britto as inspiration for thier silk hoop batiks (link is to last year's music themed hoops).

As with many big events, it's possible that these ideas will be tweeked, revised, or even completely ditched prior to the big day.

Thursday, January 12, 2012

TP Snowflakes-Part 2

 I thought I had already posted the final snowflake projects, but apparently I just thought about posting them. We finished them off by painting them with white tempera paint and sprinkling some clear/white glitter on the wet paint. They are currently hanging from each other in long strings of snowflake in the window to our school office.