Thursday, September 30, 2010

What We're Doing

I feel bad that some people come here for inspiration and all I have been posting is what my CID kids are working on. That's simply because most of what we're working on has already been posting and I don't want to become redundant. Here's what we're up to:

KINDERGARTEN

They just finished their "Kindergarten Kandinsky" projects. We identified shapes and colors in Kandinsky's paintings, and then drew shapes with oil pastels. Next class we watercolored over them.
Learning Targets are:
I can. . .
  • recognize shapes in Kandinsky's art
  • use oil pastels to draw shapes
  • use good painting techniques

FIRST GRADE


First grade just finished making their "dot" drawings, which can be found here. I did find another book to use with it called Katie's Sunday Afternoon by James Meyhew. A little girl goes into some pointillist paintings in a museum. The kids really liked the story, and I like that it shows reproductions of Seurat, Pissarro, and Signoc.
SECOND GRADE


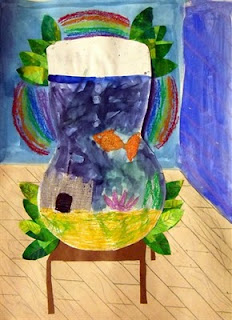
Second grade is working on their Henri Matisse Goldfish collages, which can be found here. We're making them a bit smaller this year to finish them quicker.
THIRD GRADE

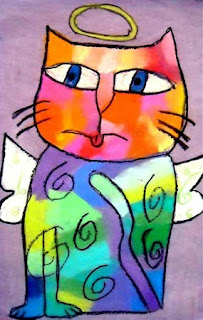
They are creating awesome Laurel Burch Cats, found here. If you're interested in doing it, feel free to use my Prezi, which is here.

FOURTH GRADE
Wow! Finally one I haven't already blogged about! My fourth graders started with "Name Fish." A pretty traditional lesson, I think. I start by telling them it's an IMAGINARY fish. They are asked to draw a fish, add thier name in bubble letters on the body, and use value in every section of the fish with colored pencils. Those are their Learning Targets too.

FIFTH GRADE
Fifth grade is working on Op Art and Rose Windows (at different schools).

Bubble Paintings

This cycle our CID project was Bubble Painting. Most of the kids did really well with it. We did have some sucking on the straw instead of blowing, but that usually didn't happen more than once! To do this, mix water, liquid soap, and food coloring in a bowl. We really like the neon food coloring for extra vibrant colors (found at WalMart). Students blow into the mixture with a straw until the bubbles are overflowing the bowl.

Then they simply lay their paper over the bubbles, popping the bubbles and leaving a print where the bubble popped. Layering the colors makes for a beautiful pastel image.


Evidence of a fun and successful art project!

A few completed masterpieces. To see them all, check Willow River's Artsonia site on the right.
(I uploaded them this morning, so they might not be up until tomorrow.)


Monday, September 27, 2010

Pinwheels for Peace

For our first project this year every student made a pinwheel for peace. This program fit perfectly into my district's graduate learner goals. Two of our main focuses are Global Literacy and Environmental Sustainability. PERFECT! Also, we have Learner Qualities of the Month, and September's is Caring. In art class, we talked about different forms of peace; from personal peace (being restful, relaxed), to a peaceful environment, all the way to global peace. I linked it to Caring by asking them "If every single person was caring all the time, would we have a peaceful school?" I saw a lot of "ah-ha" expressions at that one!

September 21st is the International Day of Peace. I asked the classroom teachers to bring their class outside on that day and "Plant" their pinwheels somewhere around the school. At one school we focused the pinwheels around the school sign and at the other we put them all the way around the school.
At the end of the day we had an all-school meeting (our name for an assembly) outside where we brought it all together. The school that planted them around the building created a parade around the school to check out all of the pinwheels, then walked around a second time to pick their pinwheel and take them home.

It turned out great. EVERY pinwheel worked!


I was a little nervous to do it with the kinders. The thought of giving them scissors on their very first visit to me made me cringe a little. It turned out great though! And now I know that all of them can handle scissors. If you're interested in participating in this project next year, you can print off the template at the Pinwheels for Peace website.

Saturday, September 25, 2010

It Stuck!

After school on Friday I was putting up a display in the hallway when one of the fourth grade teachers approached me and said that after art her class returned to her room and excitedly told her that she "is value!" She didn't understand, and asked "You mean I have value? I am valued?" Eventually they got her to understand that they had learned about value in art that day, and the sweater she was wearing showed value because it was dark blue on the bottom and light blue on the top. She was impressed that they taught her something she didn't know. I'm so proud :)

Friday, September 24, 2010

Organization

In my opinion, organization is the key to a successful elementary art program. I have taken ideas from many other art teachers and formed my own way of keeping everything organized. First, my tables are labeled by color, and each table has a folded piece of paper of the same color that I refer to as their "table folder." Secondly, each class has a "class folder," where we put all of the class' table folders. The class folders are then stored on a shelf designated for the class.

An example of "table folders."

"Class folders" simply have the grade and teacher's name on the outside of the folder.

I also like to have a spot for everything, and everything in it's spot. I am constantly reminding students to put things exactly where they belong, or we won't be able to find them when we need them later. I have labeled every cabinet, drawer, and container with photo labels so even the children that don't read yet can figure out where to put whatever supply they have.

I also have a helper table each class period. We work on a six day cycle, so I change the color of a piece of paper on my white board every Day 1. The paper represents which table is my helper table.

I have magnetic letters that spell "ART" on my whiteboard as well. When a class is off task, I will move a letter to the other side of the board. If all three letters are moved, they must be silent for the rest of that art period.

For every letter that remains in it's original spot for the whole art class, I color a square on my chart. When the colored blocks reach the dark line the students get a treat. Last year I let them sit wherever they wanted for a class, which is a great treat for them but completely messes up my organization! This year I have a bucket of candy, plastic rings, and pencil grips.


For better or worse, there is a Yakker Trakker in my room. I like the concept, but find that they settings are either too sensitive or not sensitive enough. If the light goes to red an alarm goes off and a magnetic letter is automatically moved. I make it clear, however that a letter can be moved without the alarm going off too.

Tuesday, September 14, 2010

Art Room Laugh


While reviewing warm and cool colors with my 5th graders, a girl rose her hand. Upon being called on she asked "If I take a blue crayon and light it on fire, melting it-would it be a warm color?"

Saturday, September 11, 2010

Jackson Pollock

Last year I started feeling like I really wanted to work with our special needs children in small groups. As I was developing these ideas and thoughts, one of the Special Ed teachers approached me and asked if I would be willing to take her class as a small group for specialized art classes. Hum, too much of a coincidence! Must be meant to be! We approached the principal, who was in full support of our ideas. As a result, I get to teach two classes of Autistic children every day 1. Yesterday was hands down the most rewarding day of teaching I can remember. We started by looking at painting by Jackson Pollock and doing marble painting in aluminum pans with primary colors. The kids did great. Even the lower level children were smiling and wiggling the pans.

Once they mastered the marbles in pans we started working bigger. Another teacher donated a hard plastic pool and I brought in some tennis balls to create the same effect on a larger scale. Throughout the course of the art class, students worked on both fine and gross motor skills.


I brought salad tongs for the kids to work their dexterity while taking the balls out of the paint to put in the pool, and spoons to roll the balls in the paint.

The younger kids worked in small groups to tilt the pool and create their masterpieces.


The older kids worked with a teacher and had a bit more control over their creations.

More of my Classroom

I have one bulletin board in my classroom (and one just outside of it). I use this board for the projects that all grades are working on. I find that the younger kids love looking forward to the projects the older kids are working on, and the older kids recall skills and terms that they learned previously when they see the younger kids working on them. This year I added my "Learning Tagets" near each project. Although not all of the kids can read them, it will also remind me to touch on those concepts during our discussions and assess learning on those items.

Learning Targets are written using "I Can" statements, which I find really easy to write, and the kids find easy to evaluate.

Here is the outside of my classroom door. My room was the stage when the school was a high school, so it has a frosted plexiglass window that I covered with the large poster.


This is the bulletin board outside of my room, which I am using as an "Artist of the Month" board. Our first artist is Fred Babb. I love his style and delcarations about art.


Monday, August 30, 2010

My Classroom

I have been enjoying other art teachers' blog that are showing their classrooms as we are all spending to much time getting them clean and organized for our students so I decided to show a few pictures of my classroom. This is my room at my home school, as my other classroom isn't as inspiring. I share that room with the music program, and we are both very careful not to overtake the other person's program.


From this picture, the main entrance of the room is on the right. My classroom is very unique, just like my school. The school was once the high school, then it was remodeled into a middle school and elementary school. Finally, it was remodeled into the elementary school it is now. Needless to say, we have some features that most elementary school do not have. Like an auditorium. My classroom used to be the stage. They put a wall where the curtains were and added sinks and shelving. In this entryway, I hope to create a mosaic out of recycled things with my kids above the sink. I also usually have paper feet taped to the floor in green, yellow, and red to help them not get too close to each other when waiting their turn for the sink.

From the first picture, if you take a left you would enter the main classroom area. I have five tables, which I have labeled with colors. Last year I tried just colored paper taped to the table and they were ruined by Christmas. I replaced them with drawn crayons on colored paper and they were ripped up by spring. This year I made paper mache crayons out of packing tubes, plastic cups, and the lid to the tube. I used roll paper instead of construction paper, hoping that it would take longer to fade (and the color is nicer). I found precut vinyl letters in a filing cabinet and used those to label each color and hung them from fishing line.

Above the shelves on both sides of the room I have a sheer black fabric with silver sparkles which really makes the room cozier. I added art that I created, mostly from college, samples of 3D projects, and miscellaneous items that could be used for still life work. I usually keep two of the shelves in the above photo empty for 3D storage, but got a HUGE donation of house paint and didn't have anywhere else to put it.


A closeup of one of the crayons above the student work tables.


In the front of the room I posted the Elements and Principles of Design. The yellow bulletin board is used to display the samples of projects each grade is currently working on. Every grade likes to see what the others are working on, and then the samples are always where I can refer to them if needed. The small pieces of colored paper in a binder clip on the white board are changed at the beginning of each day cycle (we work on a 6 day cycle) to represent which table is my helper table. They pass out the supplies for me. The magnetic letters spelling ART are my discipline program. When they are not focused I move a letter. Their goal is to keep as many letters as possible. For every letter they keep, they get a square colored on my chart (not pictured, I haven't made this year's yet!) and when they reach certain points on the chart they get a prize. Last year the prize was getting to sit wherever they want for one class period. I haven't decided if that will be the prize this year or not. If they loose all of their letters, they have to be silent for the rest of the class period.


I have picture labels on all of my supplies~well, the large containers. Then I have smaller containers of the same supply for each table which are stored next to the larger ones. Under the clock is the Willow River pledge and the district's learner qualities. We focus on one quality each month to reinforce positive attribute that students can show. September is "Caring," and I am going to help out with the first all-school meeting, introducing caring through the Pinwheels for Peace program!


I found this article on Whole Brain Teaching on The Teaching Palette last year, and I am still thinking about it! Must be a good idea if it's still resonating with me. I have revamped my rules (which I think were a little too much for the kids) to reflect the rules in the video and I'm going to give it a shot this year. I haven't decided if I'll be quite so active with the older kids or not, but I think K-3 will love it~and remember it!


The Teaching Palette is also hosting a showcase of art classroom organization. If you are interested in loading your classroom photos to their Flikr group click here before Sept. 25.