If you haven't tried Shutterfly, I highly suggest that you give their services a shot. Over the summer they held a promotion for a free 20 page hard cover photo book, so I opened an account. In addition to getting the book, I got 50 free prints for opening a new account! Their prints are so clear and high quality, I was very impressed and happy with them. Plus, they send a thumbnail printout of each of the images that was printed, which I have used in my work binders to cover them with pictures of my kids while I have to be away from them. It gives me a little smile everytime I see it. The books are phenomenal. I am so happy with them! I ended up getting two (I used my Huggies or Pampers (don't remember which) reward points to get a second free book!), and they are both great. They are hard cover, with a picture of my choosing on the cover. They have a program that automatically adds the pictures, or you can custom make each page to your liking.
Anyway, if you are in the market for an online photography service now is a great time to try Shutterfly. They are currently running a program just for bloggers! Sign up here, post a blog, post on FB or Twitter and get 50 FREE cards! I am hoping to get all of my Christmas cards done with this program!

Elementary Art Lesson Plans, Tips, and Tricks
Wednesday, November 17, 2010

Monday, November 15, 2010
Action Research
A while back I mentioned that I am in a grad school cohort. We met this past weekend, and had to solidify our plans for our Action Research project. The project is in place of a thesis that a typical graduate program would require. We do our first round of research next semester, examine the results over the summer, and modify our plan if needed. Next fall we do our second round of research in the classroom and complete a presentation of our results in the spring. Then we graduate! Yea! Anyway, I have had a really hard time determining what my topic of research should be. First I thought about comparing the learning styles of boys vs. girls. We have to do a literature review of ten relavant writen works, and all of the lit I found on it was debating the use of segregated schools~all boys and all girls. Not really applicaple, since my schools are not segregated, and won't ever be segregated.
So I changed my idea to working with my children with autism. But that is WAY too broad. I had to narrow it down, and I really struggled with this. What did I want to try with these children? How could I help them find greater success~preferably success that they can transfer into lifelong skills? Finally, I have settled on the Action Research question of "to what extent will implementing storyboards in small groups of children with autism impact student independence?" A mouthfull, right? Basically, I will be creating storyboards~or visual aides for the kids that show them step by step how to complete the projects and clean up after the project. The goals being that the higher functioning children can find independence and possibly start coming to art without an aide to help them, and the lower functioning kids being able to do more of the project on their own. Hopefully the lower functioning kids will be able to use the visual to grab their own supplies, or even need less hand-over-hand help. We'll see where it goes from there! I can see storyboards being used for the lower level grades too.
The other elementary art teachers and I have completed a grant requesting document cameras for our classrooms. If we get this grant, this project will be even easier, as I would be able to record myself creating my example and play it back as often as needed! I completed my first storyboard this morning, and will be trying it with the students this afternoon. I'm a little nervous, but really excited to see how they react!
Thursday, November 11, 2010
TR Mack
I found the artist, Tom McCracken of TR Mack Studios through a fellow art education blogger, Ms. Malone. I love his work of vibrant trees and villages that have many dots painted throughout. I was saddened to read that he died in March, 2010 so his Esty page is "on vacation." I plan on emailing his family that left the note on his Esty account and asking if they are planning on making a page devoted to his work and life. My students have really enjoyed looking at his work and are very curious about his life! We have just started his project, but they are all excited about it, and all the other grades that are coming in start class with "who gets to make those trees?!"
After looking at a sampling of TR Mack's paintings and prints, students use analagous colors to create a watercolor wash over the whole paper. I asked them to work the paint until they got rid of the lines and the colors flowed from one to another. Some did great at this, and some did well~but overall I was quite impressed!


The next class period we talked about how to draw a tree successfully. We looked again at TR Mack's examples and I showed them how you can find the letter Y in the branches, and there are never more thantwo branches at any split. I also showed them how to curve the branches if they wanted to make a tree with spiral branchs. Once the trees were drawn, I showed the kids how to use the tip of a flat brush to create a crisp line. They had predicted that we would use markers for the trees because my examples had such crisp lines! I expected the trees to take one class, but they are less than halfway done with them so next class will be finishing up the trees. Finally, they will use different sized dowels to print the circles in the background and between the tree branches.


Here is my in-progress and completed examples of this project. I can't wait to see them finished!
Thanks, Ms. Malone for the heads up on a wonderful artist!
Thursday, September 30, 2010
What We're Doing
I feel bad that some people come here for inspiration and all I have been posting is what my CID kids are working on. That's simply because most of what we're working on has already been posting and I don't want to become redundant. Here's what we're up to:
 They just finished their "Kindergarten Kandinsky" projects. We identified shapes and colors in Kandinsky's paintings, and then drew shapes with oil pastels. Next class we watercolored over them. Learning Targets are:
I can. . .

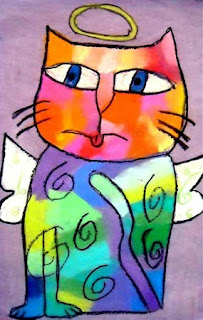 They are creating awesome Laurel Burch Cats, found here. If you're interested in doing it, feel free to use my Prezi, which is here.
 Wow! Finally one I haven't already blogged about! My fourth graders started with "Name Fish." A pretty traditional lesson, I think. I start by telling them it's an IMAGINARY fish. They are asked to draw a fish, add thier name in bubble letters on the body, and use value in every section of the fish with colored pencils. Those are their Learning Targets too.


KINDERGARTEN
 They just finished their "Kindergarten Kandinsky" projects. We identified shapes and colors in Kandinsky's paintings, and then drew shapes with oil pastels. Next class we watercolored over them.
 I can. . .
- recognize shapes in Kandinsky's art
- use oil pastels to draw shapes
- use good painting techniques
FIRST GRADE
First grade just finished making their "dot" drawings, which can be found here. I did find another book to use with it called Katie's Sunday Afternoon by James Meyhew. A little girl goes into some pointillist paintings in a museum. The kids really liked the story, and I like that it shows reproductions of Seurat, Pissarro, and Signoc.
SECOND GRADE
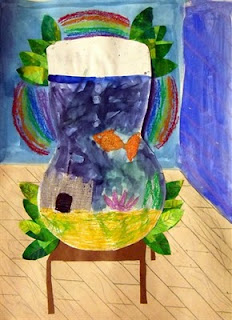
Second grade is working on their Henri Matisse Goldfish collages, which can be found here. We're making them a bit smaller this year to finish them quicker.
THIRD GRADE
They are creating awesome Laurel Burch Cats, found here. If you're interested in doing it, feel free to use my Prezi, which is here.FOURTH GRADE
 Wow! Finally one I haven't already blogged about! My fourth graders started with "Name Fish." A pretty traditional lesson, I think. I start by telling them it's an IMAGINARY fish. They are asked to draw a fish, add thier name in bubble letters on the body, and use value in every section of the fish with colored pencils. Those are their Learning Targets too.
FIFTH GRADE


Fifth grade is working on Op Art and Rose Windows (at different schools).
Bubble Paintings
This cycle our CID project was Bubble Painting. Most of the kids did really well with it. We did have some sucking on the straw instead of blowing, but that usually didn't happen more than once! To do this, mix water, liquid soap, and food coloring in a bowl. We really like the neon food coloring for extra vibrant colors (found at WalMart). Students blow into the mixture with a straw until the bubbles are overflowing the bowl.
 Then they simply lay their paper over the bubbles, popping the bubbles and leaving a print where the bubble popped. Layering the colors makes for a beautiful pastel image.
 Evidence of a fun and successful art project!
 A few completed masterpieces. To see them all, check Willow River's Artsonia site on the right.
 Then they simply lay their paper over the bubbles, popping the bubbles and leaving a print where the bubble popped. Layering the colors makes for a beautiful pastel image.
 Evidence of a fun and successful art project!
 A few completed masterpieces. To see them all, check Willow River's Artsonia site on the right.
(I uploaded them this morning, so they might not be up until tomorrow.)


Monday, September 27, 2010
Pinwheels for Peace
For our first project this year every student made a pinwheel for peace. This program fit perfectly into my district's graduate learner goals. Two of our main focuses are Global Literacy and Environmental Sustainability. PERFECT! Also, we have Learner Qualities of the Month, and September's is Caring. In art class, we talked about different forms of peace; from personal peace (being restful, relaxed), to a peaceful environment, all the way to global peace. I linked it to Caring by asking them "If every single person was caring all the time, would we have a peaceful school?" I saw a lot of "ah-ha" expressions at that one!
 September 21st is the International Day of Peace. I asked the classroom teachers to bring their class outside on that day and "Plant" their pinwheels somewhere around the school. At one school we focused the pinwheels around the school sign and at the other we put them all the way around the school.
 At the end of the day we had an all-school meeting (our name for an assembly) outside where we brought it all together. The school that planted them around the building created a parade around the school to check out all of the pinwheels, then walked around a second time to pick their pinwheel and take them home.
 It turned out great. EVERY pinwheel worked!
 I was a little nervous to do it with the kinders. The thought of giving them scissors on their very first visit to me made me cringe a little. It turned out great though! And now I know that all of them can handle scissors. If you're interested in participating in this project next year, you can print off the template at the Pinwheels for Peace website.
Saturday, September 25, 2010
It Stuck!
After school on Friday I was putting up a display in the hallway when one of the fourth grade teachers approached me and said that after art her class returned to her room and excitedly told her that she "is value!" She didn't understand, and asked "You mean I have value? I am valued?" Eventually they got her to understand that they had learned about value in art that day, and the sweater she was wearing showed value because it was dark blue on the bottom and light blue on the top. She was impressed that they taught her something she didn't know. I'm so proud :)
Friday, September 24, 2010
Organization
In my opinion, organization is the key to a successful elementary art program. I have taken ideas from many other art teachers and formed my own way of keeping everything organized. First, my tables are labeled by color, and each table has a folded piece of paper of the same color that I refer to as their "table folder." Secondly, each class has a "class folder," where we put all of the class' table folders. The class folders are then stored on a shelf designated for the class.

An example of "table folders."
 "Class folders" simply have the grade and teacher's name on the outside of the folder.
 I also like to have a spot for everything, and everything in it's spot. I am constantly reminding students to put things exactly where they belong, or we won't be able to find them when we need them later. I have labeled every cabinet, drawer, and container with photo labels so even the children that don't read yet can figure out where to put whatever supply they have.
 I also have a helper table each class period. We work on a six day cycle, so I change the color of a piece of paper on my white board every Day 1. The paper represents which table is my helper table.
 I have magnetic letters that spell "ART" on my whiteboard as well. When a class is off task, I will move a letter to the other side of the board. If all three letters are moved, they must be silent for the rest of that art period.
 For every letter that remains in it's original spot for the whole art class, I color a square on my chart. When the colored blocks reach the dark line the students get a treat. Last year I let them sit wherever they wanted for a class, which is a great treat for them but completely messes up my organization! This year I have a bucket of candy, plastic rings, and pencil grips.
 For better or worse, there is a Yakker Trakker in my room. I like the concept, but find that they settings are either too sensitive or not sensitive enough. If the light goes to red an alarm goes off and a magnetic letter is automatically moved. I make it clear, however that a letter can be moved without the alarm going off too.
 Tuesday, September 14, 2010
Art Room Laugh

While reviewing warm and cool colors with my 5th graders, a girl rose her hand. Upon being called on she asked "If I take a blue crayon and light it on fire, melting it-would it be a warm color?"
Subscribe to:
Posts (Atom)