
My second graders did an outstanding job on their Matisse project, so I decided to share it.
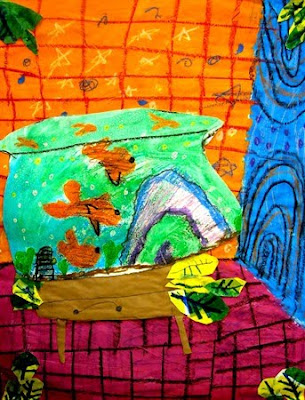
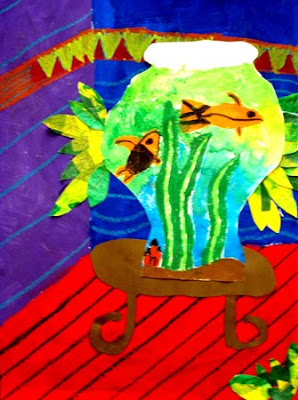
We then used a ruler and three lines to create a 3D room for our fish bowl. Students found the 6" mark on their ruler and put it on the edge of the paper, about a third of the way up on the right hand side and drew a diagonal line from the 6" to the end of the ruler. Next, they created a horizontal line from the end of the diagonal line to the end of the paper. Finally, a vertical line was added from the point where the first two met to the top of the page. Instant room! Then next class, students painted each wall a color, and the floor a third color. Finally, when the paint was dry they used oil pastels to add patterns on the walls and lines on the floor. I show them how to use parallel lines to create tile, brick, or hard wood floors.
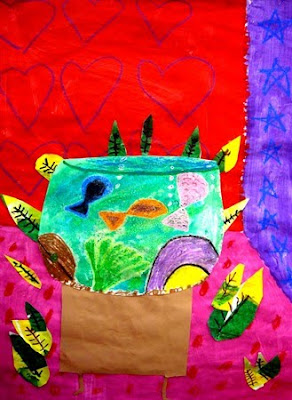
The next step is to create an imaginative bowl for the fish. I remind the kids that Matisse's bowl was unusual and theirs can be traditional or unique. I demonstrate how to add oil pastel to the fish and details in the bowl and watercolor over it. Some even added salt to create a texture that represents bubbles! I am currently teaching this lesson at one of my schools, and we also discovered that it's fun to use a broken pencil to scratch details such as scales into the oil pastels! They look stellar!
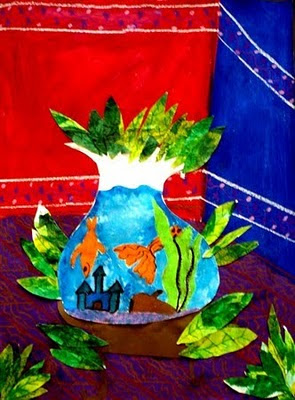 Finally, students created paper for the leaves by painting a 50/50 glue/water mixture over tissue paper in shades of green and yellow onto a piece of white paper. When dry, they drew leaves on the back and cut them out. The whole work of art was collaged together to create the final work of art. The finishing touch was to use green, black, or brown (or all three!) markers to add veins in the leaves.
LEARNING TARGETS:
~Know who Henri Matisse is, and that he had a big impact on the art world.
~Recognize the use of outlines.
~Know what collage is
~Create a successful work of art using Matisse as inspiration.
TERMS:
Henri Matisse:An artist that started as a painter, using bold colors, outlines, and patterns. Known for founding "fauvism" and inventing collage.
Collage: The art of cutting shapes out of paper and gluing them together to create a work of art.
Outline: A line around the contour of an image.
 Goldfish by Henri Matisse
We began with a PowerPoint of Matisse's life and work. We started with his paintings, and noticed his use of bright color, bold pattern, and outlines. The PowerPoint then lead into his invention of collage and finished off with a more detailed discussion of his painting Goldfish. My observant students noticed all of the above aspects of the painting, and also the reflections of the fish, and use of a unique "bowl" for the fish.~Know who Henri Matisse is, and that he had a big impact on the art world.
~Recognize the use of outlines.
~Know what collage is
~Create a successful work of art using Matisse as inspiration.
TERMS:
Henri Matisse:An artist that started as a painter, using bold colors, outlines, and patterns. Known for founding "fauvism" and inventing collage.
Collage: The art of cutting shapes out of paper and gluing them together to create a work of art.
Outline: A line around the contour of an image.
Goldfish by Henri MatisseWe then used a ruler and three lines to create a 3D room for our fish bowl. Students found the 6" mark on their ruler and put it on the edge of the paper, about a third of the way up on the right hand side and drew a diagonal line from the 6" to the end of the ruler. Next, they created a horizontal line from the end of the diagonal line to the end of the paper. Finally, a vertical line was added from the point where the first two met to the top of the page. Instant room! Then next class, students painted each wall a color, and the floor a third color. Finally, when the paint was dry they used oil pastels to add patterns on the walls and lines on the floor. I show them how to use parallel lines to create tile, brick, or hard wood floors.
The next step is to create an imaginative bowl for the fish. I remind the kids that Matisse's bowl was unusual and theirs can be traditional or unique. I demonstrate how to add oil pastel to the fish and details in the bowl and watercolor over it. Some even added salt to create a texture that represents bubbles! I am currently teaching this lesson at one of my schools, and we also discovered that it's fun to use a broken pencil to scratch details such as scales into the oil pastels! They look stellar!
Finally, students created paper for the leaves by painting a 50/50 glue/water mixture over tissue paper in shades of green and yellow onto a piece of white paper. When dry, they drew leaves on the back and cut them out. The whole work of art was collaged together to create the final work of art. The finishing touch was to use green, black, or brown (or all three!) markers to add veins in the leaves.ASSESSMENT: Because this is such an involved project, it takes a long time and makes talking with the kids about it easier. Students are focused on the same learning targets for a number of weeks, and during class discussions, 99% of hands are raised with the answers to questions about Matisse and his work. I also look at the final projects for craftsmanship, creativity, and attention to detail. These always turn out amazing, and I have gotten a lot of positive feedback from parents, other teachers, and people on Artsonia.com.


