Monday, January 25, 2010

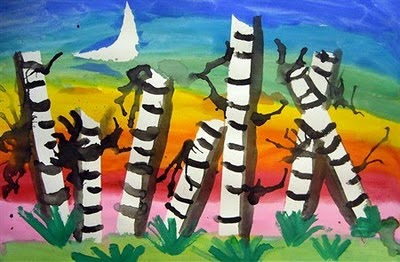
Wolf Kahn Trees


LEARNING TARGETS:
-Recognize a landscape.
-Experience masking.
-Experience wet-on-wet watercolor technique.

TERMS:
-Wolf Kahn: A living artist that paints primarily landscape paintings.
-Landscape: An image of outside.
-Masking: Blocking off a portion of the paper/canvas and painting over it to leave the area the original color.
-Wet-on-wet: Applying wet paint to wet paper by applying water to the paper first.

MATERIALS:
12" X 18" Watercolor paper
Rolls of painter's tape for each table
Scissors
Watercolor paints
Paint brushes
Water containers/Water
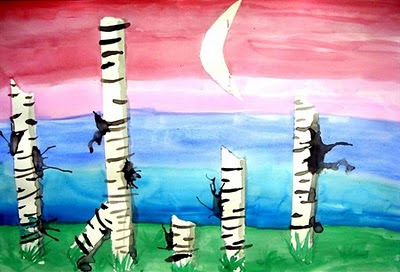

After talking about Landscapes and Wolf Kahn, viewing a slideshow of each we started the project. Students were asked to first put down at least 5 strips of painter's tape, near the bottom of the page. Next, they put pieces of tape together by overlapping them to create a larger piece of adhesive and cut out a moon. When all pieces needed are masked off, the painting begins! Start with the ground, because when the sky is added it will draw the water upwards, making the horizon line look like grass/bushes. I encouraged my students to use not only green, but also yellow and brown in the ground. When the ground is complete, cover the rest of the paper with plain water. Add stripes of color, which should blend into each other on the wet paper. If the paint is not blending, there is not enough water. Students can even lift the paper in different directions to make the paint run.
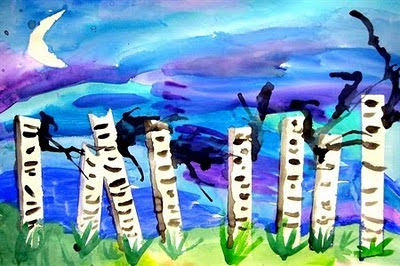

When the sky is dry, the teacher should remove the masked areas to reveal the white paper beneath. Next class, students should be taught additional watercolor techniques to complete the details of the painting. First, they should add the clumps of grass, pressing the brush down at the base of the grass, and lifting it as the blade gets higher. This will cause the brushstroke to get thinner. Next, we talked about the moon being a light source and that a shadow is the absence of light. The kids reasoned that if a shadow is the absence of light, it should be on the side of the tree opposite the moon! I showed them how to use a lot of water and a little bit of black paint to create a gray shadow. TROUBLESHOOTING: if the shadow is too dark, add more water and spread the paint out. If it is already spread out, add more water and dab with a paper towel. Curved black lines should be added along the trees; some longer than others. Finally, the last step is to add a watery dab of paint to the side of a tree and use a straw to blow the paint to look like branches.


ASSESSMENT: While the kids are painting the sky, be sure to circulate the room making sure students are comprehending the wet-on-wet technique. Many will need to be encouraged to use more water and some will forget to use it at all! Completed works of art should be assessed for completion of all steps and craftsmanship.

Twisted Trees

LEARNING TARGETS:
-Students will understand the difference between two-dimensional and three-dimensional works of art.
-Discuss the differences between spring, summer, fall, and winter trees.

TERMS:
-Three Dimensional: The object has three dimensions, or characteristics; Height, Width, and Depth.
-Form: A three dimensional work of art.

Materials:
Small paper bag
Scissors
Mat board or cardboard base
Glue
OPTIONAL:
Colored/white tissue paper to represent leaves/snow
Glitter


After introducing the Element of Design: FORM and discussing how trees look different in different seasons, I have the kids cut five lines in their paper bag (bigger bags can support more lines; I predraw the lines for them). Next, they should open the bag. Some kids need help getting it open without ripping it. Once it is open, they should squish the whole bag and twist to create a trunk. Next, twist each individual cut piece at the top. I stress twisting tight, and twisting all the way to the end of the paper.

When all pieces of the tree are twisted, the bag should be glued to the cardboard base. NOTE, it is easier to have them write their name on the cardboard before they glue the bag to it. Details can be added, such as tissue paper for leaves/snow and glitter for the shimmering of a fresh snowfall.


ASSESSMENT: Completed works of art are assessed for completion; I check that there are enough details to make it look done, that all the pieces of paper are fully twisted, etc. and craftsmanship.

Thiebaud Gumball Machines


LEARNING TARGETS:
-Understand that printmaking can produce multiple copies of an image.
-Know that Thiebaud painted desserts, such as gumball machines.

TERMS:
-Printmaking: Using a plate (in this case, a stamp) to create images, often multiple images.
-Wayne Thiebaud: A Pop Artist most famous for his paintings of desserts.

MATERIALS:
8 1/2" X 11" white paper with a circle pretraced by the teacher (ice cream lid works perfectly)
Circle stamps (I bought wooden circles and small spindles at Jo-Ann and glued them together to make stamps with handles)
Paint in red, orange, yellow, green, blue, and purple.
8 1/2" X 11" red paper
4" X 6" grey paper
Scissors
Glue/ Glue sticks
Paintbrushes
Pencils


We once again began with a PowerPoint, this time highlighting paintings by Wayne Thiebaud; focusing on his gumball machines. Next, demonstrated how to stamp the circles. I asked them to start with yellow and work their way to the darker colors. We talked about how the darker colors change the color of a lighter color and we don't want to have funny colored gumballs. In hindsight, I think I would just have a stamp and paintbrush for each color to eliminate the cleaning the stamp between each color (I had them wipe them with a papertowel). I also asked them to stamp 1-3 circles outside of the pencil circle for the gumballs that have been purchased in the final picture.


Next class, I passed out the paintings first and while they were cutting those out I passed out the red paper, gray paper, and glue. I showed them how to fold the red paper the "hot dog" way and make the red base of the machine by drawing a small horizontal line and then a long diagonal line to the top of the page. I also showed them how to trace the top of the circle (with it flipped over, in case they get pencil on it) to make the lid, and use the corner of the paper to make a rectangle. I showed them all the pieces, and layed it out how they should glue it down and then gave them time to work.


ASSESSMENT: In addition to circulating the classroom, looking for success and redirecting misguided students I review the completed works of art for use of all the colors in the gumballs, cutting and gluing skills, and craftsmanship.

Friday, January 22, 2010

CALL FOR LOCAL ARTISTS!

My school will be having an annual art show/silent auction in APRIL. Start creating, and plan to submit some art to out great show! It is led by a parent/artist with the silent auction in the Media Center, a student art exhibit in the atruim, and live music by our talented students. Come check out the festivities! More info to come as it is available.

Sunday, January 17, 2010

Thank You

On Friday I had a fourth grader come into my room before school. He handed me a potholder and told me he wanted to give it to me. I thanked him, and he explained that "I want to give you this because you taught me how to weave and if you hadn't, I wouldn't have understood the instructions. So this is just my thank you to you." Honestly, this is why I teach. To have a student recognize the connection between what we created in class and something happening in his personal life and use his knowledge. I admit, when he left I was a little choked up. What a great way to start the day!