Showing posts with label Collage. Show all posts

Saturday, December 13, 2014

People Wearing Kimonos-Third Grade


My third graders are starting to finish up these People in Kimonos that we created based on Cassie Stephen's blog post. We did them mostly the same as Cassie, with the exception of the backgrounds, which we used bubble wrap to print and some of my students added drink umbrellas as parasols. Other than that, Cassie has great info on her blog and that's where I learned most of what I taught my students, just click the link above. 


Tuesday, February 22, 2011

Eric Carle's Mr. Seahorse

My Kindergarteners have finished their Art Show project! This is a project that I have done several times over the years, but I have always thought that there's a way to make it just a little better. I think I finally figured out how to really make them exceptional.
Materials:
Eric Carle's Mr. Seahorse
2 12" X 18" watercolor (or equally thick) paper per student
Florescent paint in pink, red, orange, yellow
Paint in a variety of blues (we used light blue, dark blue, and turquoise)
Foam brushes
Paint brushes
Water containers & water
Pallets
Pencils
Seahorse tracers
Scissors
Glue
Green paper (4" X 6")
Round sequins
Thin line Sharpies (for signing at the end)
We started by reading Eric Carle's Mr. Seahorse, which the kids love. There are clear plastic pages here and there, and the author asks the students to find fish that are "hiding" behind the objects on that page. To avoid lost time and chaos, I tell the kids to let me know they've found the fish by giving me a thumbs up when they see it. I usually have all thumbs up before I finish the first sentence! Next, students went to their seats and used a foam brush to cover a paper with warm colored florescent paint. We talked about texture (how something feels, or looks like it feels), and I showed them how dabbing the brush creates an interesting texture, but wiping it, like a paint brush does not.
Next class, student used a variety of blue paints and covered a second piece of watercolor paper with shades of blue. We used regular paint brushes this time, and a medium size-so they wouldn't be able to get through it too fast.
The third class, we ripped up green pieces of paper and glued them to the bottom of the blue paper from the previous class. I talked about seaweed, and we noticed that seaweed does not have any straight edges. When many students were done with their seaweed, I showed them how to carefully trace a seahorse on the back of their florescent paper. We did it on the back in case of any mistakes. The kids love when I point out no one will know they made a mistake when it's on the back, so just try. I they have lots of trouble, I'll get a colored pencil out and trace it for them, so they can ignore all the pencil lines and just cut on my colored line. Some kids need help cutting the tail-but I'm always impressed with how far they've come with their cutting skills by this time of the year! Just think, when we started the year many of them had never used scissors, and now they're doing complicated shapes like seahorses! They glued their seahorse to their blue & seaweed paper and then brought it and their florescent scraps to me. I paperclipped the scraps to their project and put them on the drying rack.
Finally, the fourth class, I showed them how to use their scraps to add details to their seahorse. We cut a rectangle out of the corner of one scrap, and at least 10 triangles to glue along the seahorse's back. They also cut a circle for the eye, but put the glue on the colored side to make a white eye. I gave them markers to add a mouth, pupil in the eye, and lines on their tail, if they wanted to. Finally, I asked them to glue 5-10 "eggs" on the seahorse's belly. I showed them how to put a dot of glue on the seahorse and drop the sequin onto the glue dot so they wouldn't get their fingers all glue-y, have the sequin stick to their fingers, and get frustrated. Their last step was to use a fine point Sharpie to sign their name and 2011 in the corner of their work of art. I explained that most artists sign their work, and in the art room they are all artists.
As I assess their completed projects, I am looking for following of directions. I count the number of triangles (I told them 10 or more), and sequins (5-10). I check for craftsmanship in cutting, ripping, and gluing, and I look for the thoroughness in painting both with the florescent colors and the blues. I must say, these pictures really don't do them justice, they are amazing! Bright, vibrant, and really well-made. I am so happy with how hard they worked on them, and how well they turned out. They will be stunning at the art show, labeled and mounted! Each class period they came in excitedly asking if they get to work on their seahorses again. I love that. One of my favorite things about teaching is their enthusiasm.


If you'd like to see more of these, check out our Artsonia site!

Friday, April 9, 2010

In the Tall Tall Grass

After reading "In the Tall Tall Grass" by Denise Fleming, my first grade students made these adorable collage images for the art show. We started by drawing a self portrait cartoon using guided drawing. I asked them to draw a large U for their face, and rainbows with curved lines below them for the eyes. They added two rainbows inside the eye shape for the pupils. A simple C shape created the nose. Next, we reviewed the many critters that were in the book that they could put in their picture. I asked them to imagine they were crawling through the grass and came upon the critter they chose. How would they feel? Happy? Amazed? Scared? Then I demonstrated some of those expressions on the board and asked them to create a face that displayed emotion. They colored these with colored pencil, very dark.


Next class, they drew the caterpillar. I gave them a smaller piece of paper and asked them to fill the page, so they wouldn't end up too small. I asked them to draw a teardrop shape for the head and showed them how to draw the body. They could create their own colors and patterns for their caterpillar.

The third class we designed the "critter" that would accompany the caterpillar and self portrait. I made up drawing sheets that helped the kids draw each of the critters step by step and demonstrated how to follow the sheets to create their desired critter. They also colored these with colored pencil.

We were finally ready to start putting it all together! First they needed to choose what time of day they wanted it to portray. Some of the critters required a certain time; such as fireflies or bats, and others didn't matter as much. I put out yellow (for daytime), light blue (for "dinner time") and dark blue (evening) paper for the kids. They sponge painted 3-5 blades of grass first, then I had them paint Art Paste under and over pieces of tissue paper for another 3-5 blades of grass (a 50/50 glue/water mixture would also work, I just like the ease of Art Paste). I showed them how to glue a section of the tissue and then fold it over, creating grass like in the book. I instructed them to glue their face and critters whenever it made sense for their picture. For example, if they wanted the critter hiding in the grass, they should glue it down after painting the grass but before using the Art Paste. If they wanted the critters very easy to find, they should glue them last.

The final step was to add "extras." I showed them how to make 3D flowers by wrapping a strip of tissue paper around three fingers and folding the end over. I told them it was just like "folding a sock or a cuff on your sleeve." Next, they wrapped Twisteez wire around a sharpened stick to get a spiral for the pistols. I told them they could use zero, one, two, or three pistols in each flower. They added glue in the middle of the tissue paper, put the wires in, and twisted the bottom of the tissue paper. They could have as many flowers as they wanted. I also showed them how to use the Art Paste to add a long tongue on a frog, or sponge paint yellow at the bottom of a firefly to make it look like it was glowing.

They turned out adorable, and I can really see each child's personality come through in their image-which is my favorite part about teaching art!

Saturday, March 27, 2010

Egg Carton Lions

I got the idea for this project from a work of art that was displayed at the Capitol for Wisconsin Art Education Association's Youth Art Month Exhibit in 2009 and modified it, adding a bit of my own ideas to create these. They are for our recycling themed art show.


LEARNING TARGETS:
-Create a work of art using recycled materials.
-Students will recognize art by Henri Rousseau.

TERMS:
Henri Rousseau: An artist most known for his paintings of jungles.

MATERIALS:9" X 10" Foamcore Board
Tissue Paper; strips of greens and browns, small squares of many colors.
Construction paper in greens
Egg Cartons
Paint; I used Pear, Golden Brown, and King's Gold Acrylic paints for lions and green Tempera Cakes for the background.Paint Brushes
Water/Containers
Garland
Glue
Brown/Black Markers
Twisteez Wire
Wiggle Eyes


We began with a discussion of paintings by Henri Rousseau. Students noticed how full the images are, and that often, the animals are partialy hidden in the plants. Next, we painted the foamcore board solid green, and the egg cartons any of the "lion colors" that I had poured. Students were asked to have three or four lions in their picture and they put them on a paper plate with their name on it to dry.


Next class, students used brown or black marker to draw the mouth and nose on the lions and glued them to the foamcore board. Then they worked on making tissue paper flowers. I asked them to have at least three flowers.

During the third class period, they glued eyes on each lion. They were allowed to have different sizes of eyes on different lions, but I told them to make sure that each lion had they same size eyes. I showed them how to cut long triangles out of green paper to make a strip of "grass." They were given the option of having a "tree" in their image, or not, but asked to make sure the whole board looked full. They used strips of tissue paper and twisted them to make the trees, branches, and vines. They glued their trees, vines, flowers, and grass into the picture.

Lastly, Students were given old Christmas garland and they glued it around each of their lions to create a mane. They turned out wonderful!

Tuesday, December 29, 2009

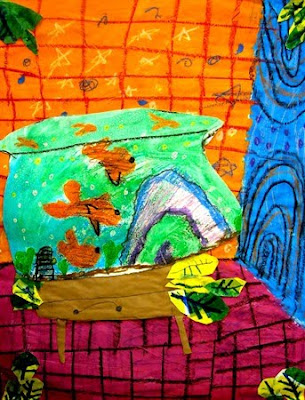
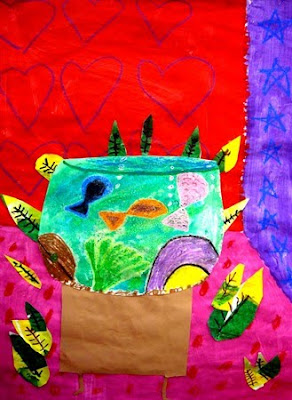
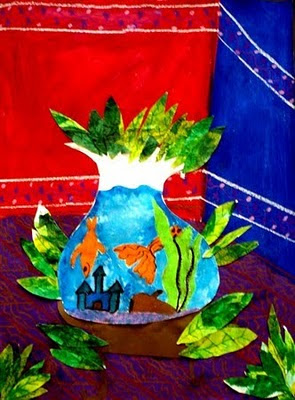
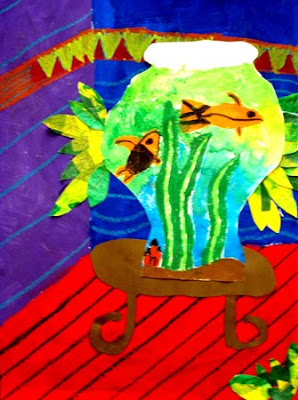
Matisse's Goldfish

My second graders did an outstanding job on their Matisse project, so I decided to share it.

LEARNING TARGETS:
~Know who Henri Matisse is, and that he had a big impact on the art world.
~Recognize the use of outlines.
~Know what collage is
~Create a successful work of art using Matisse as inspiration.

TERMS:
Henri Matisse:An artist that started as a painter, using bold colors, outlines, and patterns. Known for founding "fauvism" and inventing collage.
Collage: The art of cutting shapes out of paper and gluing them together to create a work of art.
Outline: A line around the contour of an image.

Goldfish by Henri Matisse


We began with a PowerPoint of Matisse's life and work. We started with his paintings, and noticed his use of bright color, bold pattern, and outlines. The PowerPoint then lead into his invention of collage and finished off with a more detailed discussion of his painting Goldfish. My observant students noticed all of the above aspects of the painting, and also the reflections of the fish, and use of a unique "bowl" for the fish.


We then used a ruler and three lines to create a 3D room for our fish bowl. Students found the 6" mark on their ruler and put it on the edge of the paper, about a third of the way up on the right hand side and drew a diagonal line from the 6" to the end of the ruler. Next, they created a horizontal line from the end of the diagonal line to the end of the paper. Finally, a vertical line was added from the point where the first two met to the top of the page. Instant room! Then next class, students painted each wall a color, and the floor a third color. Finally, when the paint was dry they used oil pastels to add patterns on the walls and lines on the floor. I show them how to use parallel lines to create tile, brick, or hard wood floors.


The next step is to create an imaginative bowl for the fish. I remind the kids that Matisse's bowl was unusual and theirs can be traditional or unique. I demonstrate how to add oil pastel to the fish and details in the bowl and watercolor over it. Some even added salt to create a texture that represents bubbles! I am currently teaching this lesson at one of my schools, and we also discovered that it's fun to use a broken pencil to scratch details such as scales into the oil pastels! They look stellar!


Finally, students created paper for the leaves by painting a 50/50 glue/water mixture over tissue paper in shades of green and yellow onto a piece of white paper. When dry, they drew leaves on the back and cut them out. The whole work of art was collaged together to create the final work of art. The finishing touch was to use green, black, or brown (or all three!) markers to add veins in the leaves.


ASSESSMENT: Because this is such an involved project, it takes a long time and makes talking with the kids about it easier. Students are focused on the same learning targets for a number of weeks, and during class discussions, 99% of hands are raised with the answers to questions about Matisse and his work. I also look at the final projects for craftsmanship, creativity, and attention to detail. These always turn out amazing, and I have gotten a lot of positive feedback from parents, other teachers, and people on Artsonia.com.