Saturday, November 21, 2015

Clay Scarab Beetles


My kindergartner are in the middle of creating these adorable Ancient Egyptian Scarab Beetles. So far they are sculpted by not painted. Here's the process we used.


I chose to use air dry clay for this project because I wanted the kids to be able to press the legs and eyes into the clay. I have a bunch of old Model Magic at my other school, so I am using that there but it's a little more limiting. It is already in colors, so there goes the painting step and the white doesn't take paint as well as clay either. Although, air dry doesn't take watercolor as nicely as bisque ware does either. I used my earthenware wire cutter to cut the clay into small pieces for each kid. 


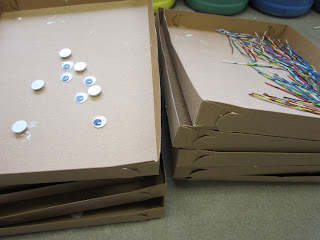
Here are the supplies we used. I got these great cardboard trays from the cafeteria ladies. They have "Yogurt Parfaits" once a month and the yogurt containers come on these trays, which they save for me. I made a tray of eyes and a tray of legs for each table. I also got these odd cardboard things donated (pictured below) and cut them in half so each kid got one half. 


Their first step was to roll the clay into a ball. We discussed the shape of a beetle's body and that they are more oval than circle and I showed them how to use a little bit of water to smooth out the clay. They then used the cardboard to press the lines of the beetle into the clay. Finally, they pressed the eyes in and six legs. 

Here's what they look like right now, as they are drying. 


I picked up some bottles of Crayola mediums-some pearl for this project and the other texture for our third grade clay project (post to come). Next art class, we will first paint the watercolor on the beetles and then start a new project. While painting my samples, I discovered how slowly the paint dries on air dry clay compared to bisque fired clay. We will definitely need time for them to dry before adding the pearl medium. 


Friday, November 13, 2015

Anansi the Spider; An Ashanti Folktale


My kindergartners just finished painting these cute Anansi spiders. Anansi is the an Ashanti folkstory from Ghana, Africa. I began this lesson by reading the book to the kids. Anansi has six sons, who each have a special talent. There is See Trouble, Road Builder, River Drinker, Game Skinner, Stone Thrower, and Cushion. Each son has a different shape on his body to show his talent. When Anansi gets into trouble the sons use their talents to save his life. 


After reading the story, students were given pencils and white paper. I used guided drawing on the SmartBoard to show them how to draw a triangle (they insisted it's upside down) with an oval on top for the head. I asked them to show me on their fingers how many legs a spider has. They all showed me five on one hand and three on the other so I asked them to add one to the three and subtract the thumb on the hand with five. I showed them with my hands that I now had four fingers up on both hands and that's how a spider's legs are arranged on their body. I showed them how Anansi's legs overlap and asked them to draw four legs on each side. 
While they were finishing up their drawings I passed out pallets of black paint, but no brushes yet. I then demonstrated how to use the edge of a flat brush to make a smooth line around the shape before filling in the insides. They had the option of using the same flat brush for the legs or using a detail brush. I showed them tricks for both brushes. Finally, I gave them brushes and asked them to paint in their drawings. 


The next class period we looked at a picture of Anansi on the SmartBoard and talked about the web behind him. It is created with pattern instead of traditional spiderwebs. I showed them how to make both a patterned web like the book or a traditional web and let them decide how to fill in the background with marker. Finally, I gave them pallets with red, orange, yellow, blue, and purple and used my document camera to walk them through painting the face and other details on their spider. We started with orange and painted a V for the lower lip and a triangle like the body for the top lip. Then it was a T for the nose and bottom of the headband with a strip a little above it. Next, we skipped to blue and painted the triangles above the eyes and the nostrils. Yellow was next for the eyes and then a red stripe on the headband. Last, we talked about and looked at the images of the six sons and noticed the different shapes on the bodies. They used purple to add any shape on their spider's body. 


Desert Landscapes


True confessions here, this project did not go completely as planned. However, it's the process not the product-right?! 

If that's the standard, this project was a complete success. And some of them did turn out super cute. We started by learning a bit about the Sahara Desert and focusing on foreground, middle ground, and background. The kids then created a template of sand dunes out of construction paper and used chalk to create the dunes. This turned out to be much more challenging for them than I expected. Some of them kept cutting the dune apart instead of ending up with one template 6" X 12" they ended up with a bunch of triangles. I asked them to start at the top of the page with their medium brown and mix it with a light brown to get a light color for the foreground. The concept of starting a project upside down was just too much for many of them and I walked around flipping the pages around as they got started. The middle ground was created with just the medium brown, and they added a darker brown for the last row of sand dunes. I showed them how to blend one color into the color next to it instead of rubbing the whole sky together to get mush and most of the skys turned out pretty vibrant. 


Now we moved on to the printmaking portion of our story...Yikes.
In my mind, I was thinking camels are pretty hard to draw and some kids won't be able to do it, but some will want them. I gave them the choice between camels, cacti, and pyramids. They could do the same or different items in their deserts. We used foam to create our prints and they were asked to print the largest item in the foreground, the medium item in the middle ground, and the smallest item in the background. I made stations for them to go to for printing and it worked pretty smoothly. Finally they did an assessment. The one I previously blogged about didn't work well with my third graders so I didn't try it with these kids. Instead, I created a color sheet of a desert and asked them to color the foreground brown, the middle ground green, and the background blue. Most of them got 3/3 on the assessment, which validated the project for me a bit. At least they learned! They also got to use chalk (which I don't pull out very often) and printmaking. 


Outside My Classroom

I forgot that one of my classes was scheduled for a field trip today. So I had an unexpected 45 minutes to do anything I needed to get done. I decided to get some stuff done in the hallway that I keep putting of for more pressing things. 

First, I painted my window of my door. We are asked to cover the window in case of a lockdown situation. I choose to paint it instead, it provides a bit of a stained glass appearance and I'm able to do it quickly and change it annually to go with the continent we are studying. I added "Karibu Wasanii," which is Swahili for "Welcome Artists."


I had this idea last spring and put a call out to families to bring in old unneeded frames without the glass. I didn't want to ask the custodians to make holes for the frames as it's a concrete wall and they'd have a TON of work to get them in. I got some of the 3M Command picture hanging velcro for the larger/heavier frames and used poster putty for the lighter ones. I plan on putting artwork of students and professionals in the frames. 


This has actually been up for a while, but this is my wall for awards that students have earned on Artsonia. It's above the area where they line up before and after class so they can see which of their friends have earned the awards while waiting for their classroom teacher to arrive. It has brought a lot of attention to my Artsonia program. I took a closer picture, but the kids' first and last names are on the awards so I decided it shouldn't get posted here. 


Monday, November 9, 2015

African Baskets

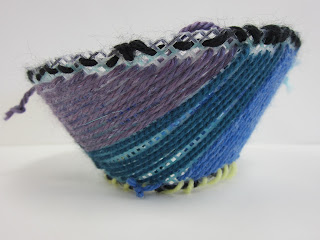
While studying Morocco, fifth graders created these baskets with plastic canvas and yarn. Full disclosure, I would not do this project again. I thought it would take 3-4 class periods, but there are kids that are STILL not done and it was our first project of the year! It's never ending and making me crazy. However, some turned out very cool. 

I made a template and cut out a plastic canvas. Next, I used a permanent marker to make the canvas dark and photocopied it for each kid to use to design their basket. I also traced this template three times on each sheet of canvas and roughly cut them out. The kids cut them out neatly and then started sewing. My yarn needles were too big to fit through the holes, so they had to use a tiny bit of masking tape to make a needle on the end of their yarn. 

When they finished sewing, they sewed the two ends together and then added a circle of plastic canvas for the bottom. 


See our galleries here and here.