
Last week at one of my schools I did Shibori (Japanese Indigo Dying) with first through fifth graders. It was only two days of art classes, and ten classes. True Shibori is done with Indigo, which is extracted from the Indigo plant. There are many ways to bind fabric prior to dying it to create different patterns on the finished piece. My favorite part of teaching it was reliving the wonder of the process every time a new class came to art. When a fabric is dipped into the vat, it comes out green. A weird, ugly, puce-y lime green. As it oxidizes, the oxygen turns it blue before students' very eyes. I love the "oooh!" I heard around the room all day when demonstrating. One dip will leave the fabric a very light shade of blue, and each dip and oxidation after that will make it a shade darker.
I had two vats going. It was so much fun, but also very messy and stinky! I thought I would take a moment to share how I apoached the project and what I will do differently when I do the same project with my other school after Winter Break.
 To begin, I purchased Indigo kits from Sax. At the school that has already done this, I have about 230 kids, and we used two kits; one for each vat. I also added some gloves that I got from the nurse because there is only one set in each box. However, I told the kids they only needed one glove, and only if they were using the marble technique.
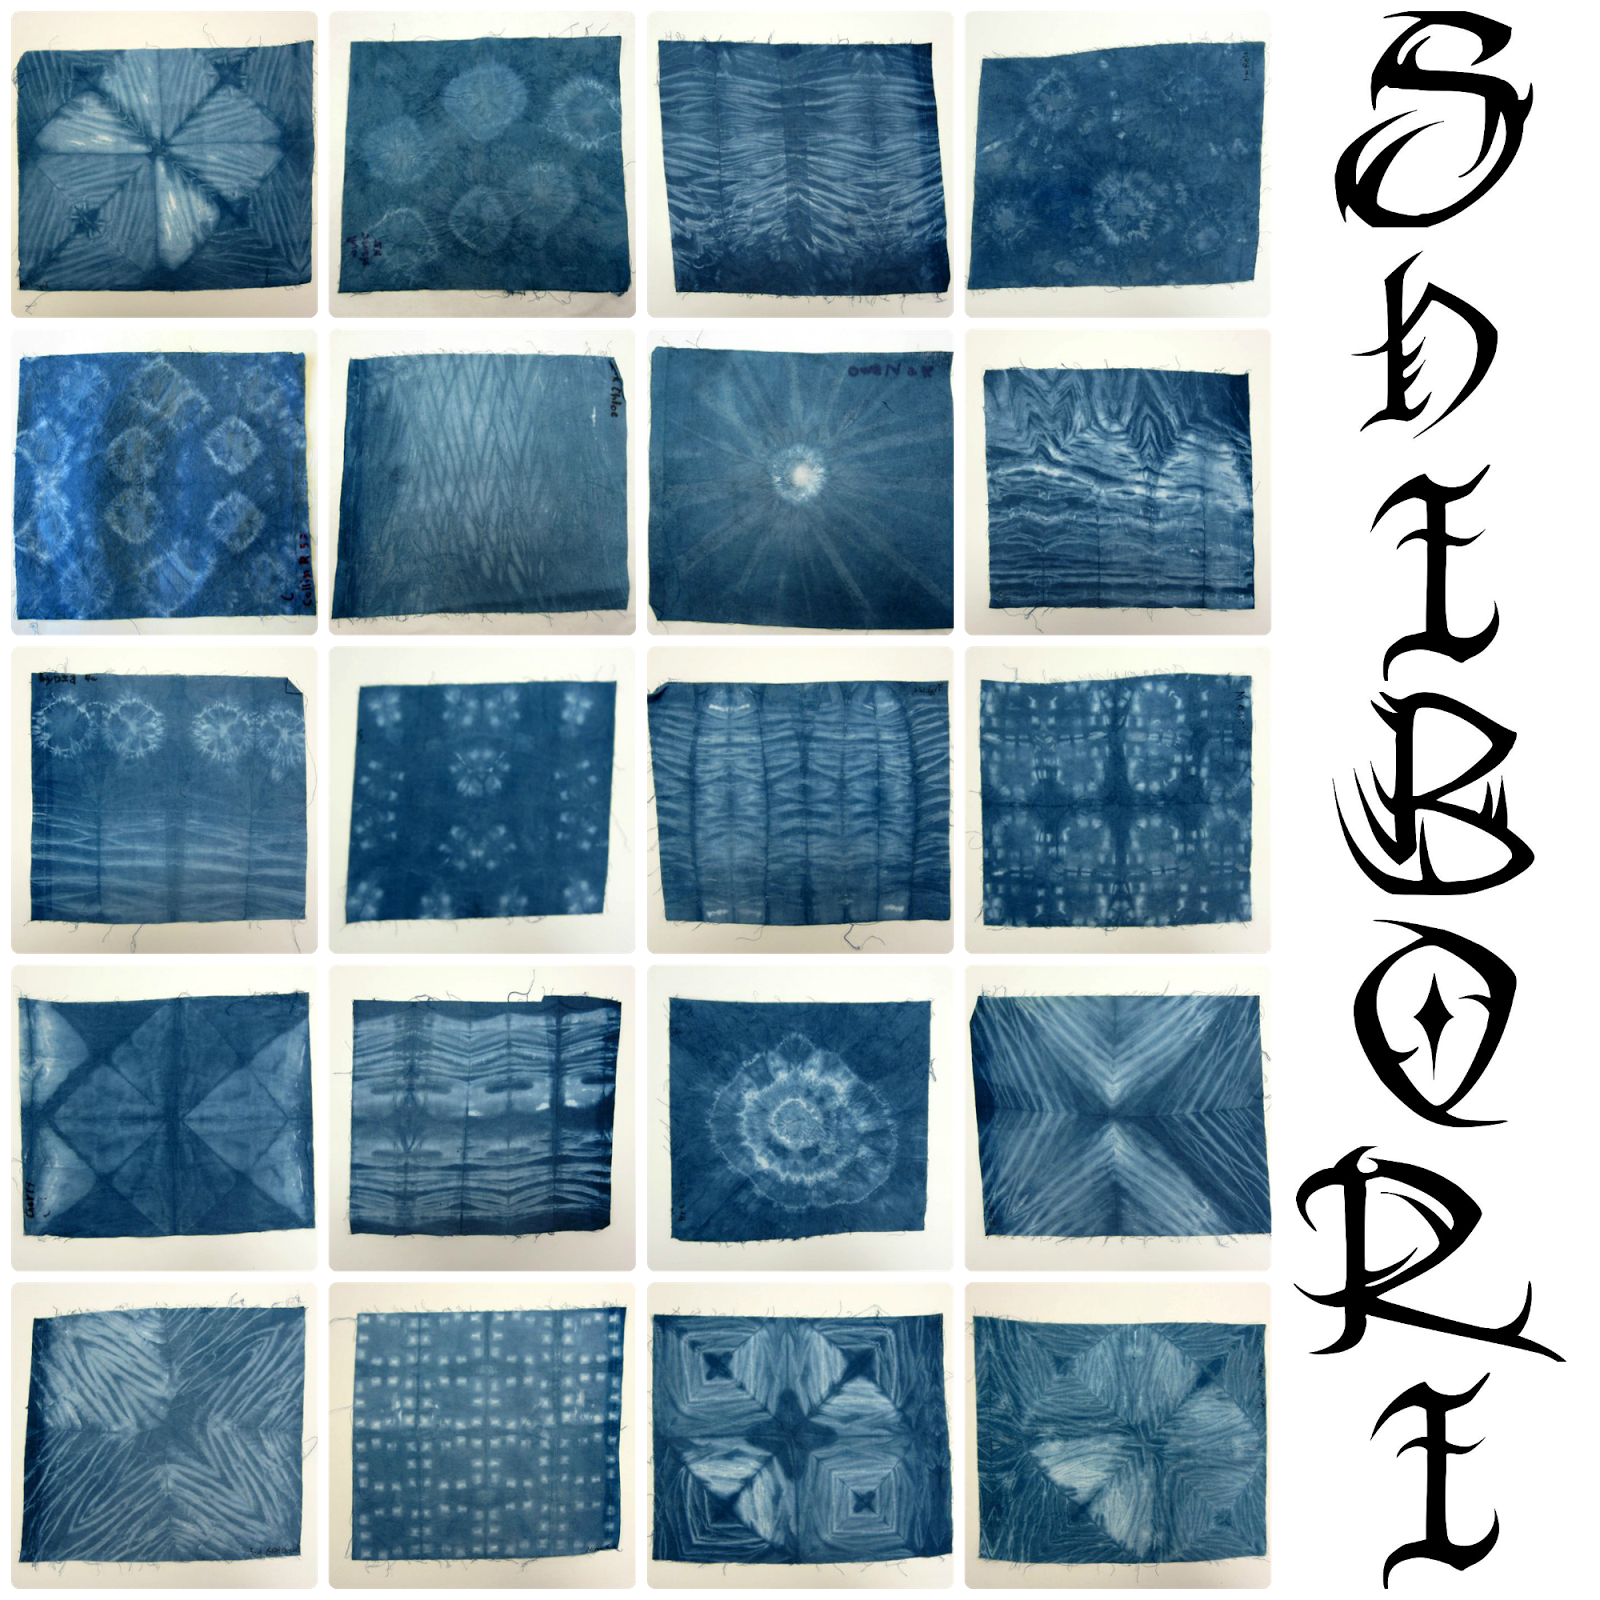
Next, I decided on which Shibori techniques I wanted to teach the kids. There are so many to choose from, I decided to limit it a bit and showed them three. First was using rubber bands to hold marbles in the fabric. It doesn't matter if they are actually floral gems, which aren't round and won't cause students to be running after rolling marbles all class period. When dyed and rinsed, this technique leaves white circle/square shapes on the fabric.

I also talked about using clamps. I explained that a Shibori artist would have a variety of shapes and sizes to chose from and showed examples of different ways to fold the fabric to get different results. We used clothespins as clamps.

Finally, I knew I wanted to do Irashi. It's my favorite type of Shibori. A month or so before the project I sent out a request to parents, asking if anyone had any scraps of PVC pipe they'd like to donate. I wasn't expecting results, but a dad brought in a grocery bag of pipes! I was (and still am!) completely excited about it. I showed the kids different ways to fold their fabric and how to wrap it around the pipe and scrunch it down, emphasizing that the tighter they wraps the string the more defined the white lines would be in the end.


All in all we used clothespins, rubber bands, floral marbles, string, and PVC pipe for binding the fabric. I kept these in a Rubbermaid style bin that is designed to go under a bed-it was perfect with how long it was.
Now that you have your supplies, consider your room. Indigo vats are stinky, messy, and have to be kept in an air tight container when not in use. I dug around in our storage area and found some empty containers. The ones with lids were just too big to use as the vat and the smaller ones didn't have any lids. Of course. So I created the vats in the smaller containers and stored the smaller containers in the larger ones with the lids. I just put all the binding supplies in another container and stacked them all in the corner for the two days I was not at that school (I share a room at that school and wanted them out of the way for the music teacher).

While considering your room, consider how you will direct traffic to minimize mess. I only have one sink in each of my classrooms, so unbinding at the sink was not an option. There was enough of a buildup of people just waiting to rinse. I put an empty tub next to each of the vats and instructed the kids to transfer their bound fabric to the empty tub and unbind them in the tub, leaving all the wet binding materials in the tub. They then should give the fabric another good squeeze over the vat before moving to the sink.
Next consider how to protect your room. I bought a cheap plastic dropcloth and taped it to the counter and spread it out onto the floor. The vats and tubs for unbinding were on these counters and then they moved to the sink in the photo. The rinsed fabric then got put onto a laundry drying rack that my principal donated, as my drying rack has too big of holes between the wires for these pieces. I was diligent in talking about how to make sure there was no dye left in the fabric before putting it on the rack, and also with wiping under the rack throughout each class.

My classes are all back to back, so my final challenge was figuring out how to unload the drying rack between classes-especially as one class is typically waiting to come in as the last one is leaving. I solved this by having a clothing iron in the room. By the time the first few pieces were done oxidizing I had finished helping the kids that needed additional support with binding and I had some kids finished with the project. The kids that were done were now my "experts," and were available to help the kids that had questions dying while I kept an eye on the drying rack. As pieces turned completely blue I pulled them off the rack and ironed them. They were still a little damp, but were dry enough to stack and keep off the drying rack. As a bonus, the kids loved seeing what theirs looked like after it was ironed!
Now that everything is in place, as soon as you set the dates for dying, inform parents! I didn't think to do this until it was too late, and has a few upset (but very supportive, "don't change your teaching!") parents. I have already sent out the dates we will be doing Shibori with my other school, and it isn't until January. I requested that they make note of the dates their children will be dying and dress them in clothing that would not be upsetting to stain. I also have aprons, but they never seem to cover enough of the kids' bodies to make much of a difference-and they're cloth too so sometimes things just go right through them. I asked our office staff to put the dates in our school newsletter, emailed the classroom teachers the dates and asked them to put them in their class "peek of the week" letters and sent out an Artsonia newsletter. When we get back from Winter Break, I will also put the dates on my art class Facebook page and my school class pages. I figure I'm covered with all these communications.
It was a fabulous project. I loved how when the kids would enter the room all I would hear is comments about how it smelled. But every single class answered the same as they left and I asked, "well, was it worth the smell?" Every class unanimously yelled, "YES!"
1 comment:
They look really amazing am keen to try it next year with my new class. Thank you for the detailed instructions and helpful hints. You sound very well organised.
Post a Comment