Wednesday, January 18, 2017

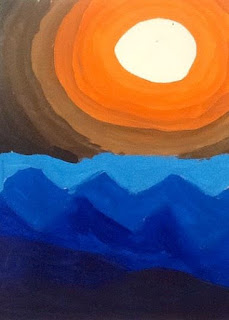
Value Landscapes-Fifth Grade


My SLO this year is focusing a bit closer on the Elements of Art than I have in the past several years. Previously I had all the elements included in my assessment and this year I am focused only on color, space, and value. My PLC decided to tackle value first. I chose to go with this project with my fifth graders. 


As a pre-assessment, I gave the kids a blank value scale and asked the kids to fill it out without giving them any information on what a value scale is or how to fill it in. Next, we discussed value, value scales, and atmospheric perspective. I showed them this presentation and they were amazed that all the images are photos.


Students drew five layers of land and traced a circle in the sky. I explained and demonstrated how to mix tints and shades and how to find complementary colors on the color wheel. Students chose a set of complementary colors and then started with the land. Their closest layer of land is the darkest value and the layers get lighter as they move backwards. 


Next, they did the opposite to create the sky. They started with the lightest color closest to the sun and the shades got darker as the colors moved away from the sun.


Finally, students took an assessment in Google Classroom and filled in another value scale. This time I told them that I would be looking for five or more values in their value scale. 

Tiny Seed-First Grade


Eric Carle's Tiny Seed is a wonderful book for young kids. They love catching on that it's a circle story and enjoy how big the flower gets in the story. I read it to my first graders prior to making these cute Tiny Seed flowers.


Students received two pieces of paper. On the first one, they traced on stem, one circle, two leaves, and seven petals. We discussed analogous colors and they used three sets to paint their traced shapes. Yellow and green for the stem and leaves, yellow and orange for the circle, and orange and red for the petals. 


The next class, while students were cutting out their shapes they took turns coming up to a painting station to splatter paint their second piece of paper with cool colors. 


Finally, on the third class period they laid their pieces out on the splatter painted paper and glued them into a flower shape. I pointed out that the circle should be on top of the petals.


I do have a storyboard for part of the process. Students filled out this assessment to determine their understanding of analogous colors. 
See the full lesson plan here. 

Monday, January 16, 2017

Primary Line Study-Kindergarten


For this project, kindergartners started by listening to me read Straight Line Wonder  by Mem Fox. The story is about three straight lines that are best friends when one day one of the lines is tired of being straight. He tries lots of different styles, to the frustration of his friends when he is discovered by a famous director and becomes a movie star. This perfectly introduces students to a class discussion of line, using this presentation to show examples of lines used by different famous artists. 


After the line discussion, I demonstrated how to paint, as this was our first painting project together. I like that we started with just black so the kids could focus on lines and the steps to painting.  I showed the students how to keep the paint in the "hair" of the brush and "tickle" the paper with the tip of the brush. I prepped paper by taping watercolor paper to a piece of construction paper for each student. This gives them a colorful outline as a guide for their painting and also provides the finished painting with a nice white border. Students were asked to paint different types of lines from one tape line across the paper to another tape line. 


The next class, I introduced the students to the color wheel. We talked about how artists use the color wheel to remember color groups. We then talked about the primary colors and why they are so important to artists. 


Finally, I reminded students of the painting steps from the previous class (keep the paint in the "hair" of the brush, tickle the paper) and then demonstrated how to change colors to keep the color clear on the paper. I informed the students that I would be looking for clean colors on their final paintings. Because this was our first painting project together, I also made this storyboard to remind the students of the steps after my demo. 


When finished with the project, students completed this assessment by making different types of lines with markers. See the full lesson plan here.


Sunday, January 15, 2017

Raven: A Trickster Tale-Fourth Grade


Fourth graders focused on shape, balance, and symmetry while creating drawings of Raven: A Trickster Tale. 


After hearing the story, we used guided drawing to create the ravens. We talked about shape, balance, and symmetry. Students were asked to make the wings symmetrical and the body balanced using shapes.


With the birds fully designed, students chose a color scheme of four colors of crayons to color their shapes and detail on their raven.


When the birds were completely colored students used black watercolor to paint over the whole bird and make the crayon stand out. They cut out their birds when they were dry.


Finished projects were assessed for symmetry and balance. Students also filled out this assessment in Google Classroom.

Pattern Bracelets-Kindergarten


Students started by listening to A-B-A-B-A A Book of Pattern Play. Full disclosure, I did skip a few pages as it got a little bit to math-y for kinders, but in general it was a great book to talk about pattern with them. My lesson correlated with their classroom math introduction to pattern, so they already had a bit of knowledge about patterns.


Students created patterns with pony beads on pipecleaners to create their own bracelets. They could create their patterns as complicated as they wanted to, which made it easy for kids of all ability levels to create their patterns. Some used just two colors and some used up to five! 


I assessed their bracelets for the use of pattern. I grade on a four point scale, with a three being consistently meets grade level and a four being consistently exceeds grade level. Students that used two colors in a consistent pattern throughout the whole bracelet received a three and if they used more than two colors correctly they received a four. 


When they were finished putting the beads on their bracelets, they put a nametag on it and then they could twist them into bracelets, or I would twist if for them. 


The final assessment was for the kids to use this worksheet to draw a pattern with markers to transfer their knowledge from tactile beads to marker lines. 

Sugar Skulls-Fifth Grade


Fifth graders started the year by learning about the Day of the Dead. I created a Nearpod presentation that the students participated in with their Chromebooks. It included a pre-assessment on the first slide and a post assessment on the last slide to show that they already had learned about Dia de los Muertos. I found a super cute video that covers the basics of the holiday very well. I also created a short presentation to use for reviewing the symmetry and designs of sugar skulls each class. 


Students used plaster of paris and skull ice cube trays from the Dollar Store to create sugar skulls. They put a paperclip in the back of the plaster so they could string some yarn between them and make a garland of sugar skulls. 


Students were given options for adding the designs on their skulls. I found that paint or colored pencils are best. UltraFine tip Sharpies are too thin and create a lot of lines in the solid shapes and the plaster is quite dusty, which blocked the ink at times. After tying them together students filled out this assessment in their Google Classroom.

Saturday, January 14, 2017

Follow the Line-Fourth Grade


Fourth graders read Follow the Line by Laura Ljungkvist and talked about line in art. I created a quick presentation about cityscapes and discussed color. By fourth grade, they have been introduced to most of the color groups, so I reviewed primary, secondary, warm, cool, analogous, and monochromatic color groups and asked them to choose one group to use for their buildings. 


When the buildings were glued to the paper I demonstrated how to use one line to create all of the details for their row of buildings. We looked at the illustrations in the book again and then I showed them how to do a couple of buildings and some details in the sky. They used UltraFine Sharpies to draw their lines. 


Our district has gone 1:1 with Chromebooks in grades 3-8 this year, so I have been using Google Classroom for my assessments. It is the BEST thing that I have done for my classroom in years. I create the assessments in Google Forms, using the Quiz setting. This allows me to set the answer key and a points value to each question. After the first class takes the quiz I go back into the form and send the results to a spreadsheet. I then sort the data by first name and color code by class. Easy peasy and all graded for me! All I have to do is put the grades into my gradebook. I use iDoceo on my iPad for my grades, seating chart, and planner. Here is a copy of the assessment I created. Feel free to copy it and use it.


Ton Schulten Cityscapes-Third Grade


I stumbled upon this great lesson on Pinterest, which lead to this blog post and introduced me to Dutch artist Ton Schulten. I created this presentation about Schulten, which also introduces geometric and organic shapes, and warm and cool colors. 


Students started by using a ruler to create the buildings. They then created the grid in the sky. We reviewed warm and cool colors and tints and shades. I demonstrated how to mix colors cleanly and passes out the warm colors. Students chose if they wanted to use the warm colors in their sky or buildings and mixes as many tints and shades as they could.


After a couple of classes they finished the warm colors and were given cool colors to repeat the steps with the other half of the painting. 


The final touches came with black paint outlines around the buildings and the addition of details such as windows, doors, birds, clock towers, etc.


Over all these turned out amazing! Oh, and the kids learned a lot. ;)


Matisse's Goldfish-Second Grade


I've done this project with my second graders many times over the years. They always turn out extremely well, and the kids get a lot out of the process. There are many children's books about Henri Matisse, and the kids enjoyed learning about him. My favorite Matisse book is When Pigasso Met Mootise by Nina Laden. The kids find it fun and silly, but are also learning about both Matisse and Picasso.


Students begin  by learning about perspective and how to make a 3D room. They painted it with tempera paint and then used oil pastels to add tile, brick, or wood planks on the floor and a pattern on the walls.


They designed a unique fishbowl (really, they did. These all happen to be the same shape, but there were aquariums, bowls, glasses like Matisse's, and completely made up shapes!) and then drew the details (fish, treasure chests, castles, rocks, etc) with oil pastels and used toothpicks to scrape detail into their objects. They used watercolor and salt to add the water. 


Finally, they designed a table and leaves and collaged the whole project together.
See the full lesson plan here. 


Scaredycrows-First Grade


When I discovered this adorable book, Scaredycrow at our public library it was just calling to become an art project! 


I did this project with my first graders, and they really loved it. They used paper, burlap, fabric, buttons, and yarn to create these cute little scarecrows.