Showing posts with label Grade: Fifth. Show all posts

Sunday, February 23, 2020

The New Plan

I have decided that full TAB is not my style. Although I have loved the deeper conversations the kids are having about their artistic decisions, the messy classroom and disrespectful behavior I was constantly battling has to go. So I have begun a project based class again, but with the intent to keep each project very open to allow for choice within the confines of the project. For example, second grade is making landscapes using warm and/or cool colors. I showed them an example using collage, drawing, and painting and they are required to show foreground, middle ground, and background.

For the third through fifth grade students, I have the luxury of being able to ask them to bring their Chromebooks and can use Google Classroom to push out content. Fifth grade's focus is contrast, emphasis, and value right now, so I created two different project options and pushed out a Google Slides presentation with step by step photos and a video for how to make each of the projects. Students are independently using the materials to teach themselves how to create one of the projects with me there to clear up any confusion or help when needed.  All four of my fifth grades have used this and although the first class had some technical difficulties, I can confidently say it worked better for all four than full DBAE or full TAB. I remembered to ask two of the classes to show me fist to five (fist being "I hated it" and five being "loved it, let's do it every time!") how they felt about being self guided and saw mostly fives, with a few fours thrown it. I am currently working on materials for three different fourth grade projects using value and mixing tints, tones, and shades as the main concepts.

Here are the projects and resources for the fifth grade projects. We looked at Op Art, and I gave this full class presentation about the movement. At the end of the presentation, I talk about the new structure of the class and how they will access the presentations and videos through their Google Classroom link. If the teacher uploads the resources as "materials" they will be listed under "classwork" and you can create a unit title and even decide what order they are listed in under the title. This worked very well. I gave the two projects a title too and made sure the students knew which project matched each title. Here are the projects fifth grade had to choose from:

LINE DESIGN:
I got this lesson from Art with Mr. E, and he created a great step by step, which is where I got the photos from for the presentation.


Here is the presentation for this project, and here is the video I created for this project. 

CONES & SPHERES: 
I don't know where I originally got this lesson, as it's one I have done off and on for over ten years. It's a classic, but the kids love it. 


Here is the presentation for this project, and here is the video I created for this project. 

Thursday, November 30, 2017

Frank Stella

My fifth graders are just beginning this lesson about Frank Stella. After a quick pre-assessment and an introduction to Stella's work they began the project this week. Next week they will begin mixing colors and will use four different color groups. They will be using the hue, tints, tones, and shades.


Note: This project was inspired by a pin from Kids Artists which leads back to this blog post.

Wednesday, January 18, 2017

Value Landscapes-Fifth Grade


My SLO this year is focusing a bit closer on the Elements of Art than I have in the past several years. Previously I had all the elements included in my assessment and this year I am focused only on color, space, and value. My PLC decided to tackle value first. I chose to go with this project with my fifth graders. 


As a pre-assessment, I gave the kids a blank value scale and asked the kids to fill it out without giving them any information on what a value scale is or how to fill it in. Next, we discussed value, value scales, and atmospheric perspective. I showed them this presentation and they were amazed that all the images are photos.


Students drew five layers of land and traced a circle in the sky. I explained and demonstrated how to mix tints and shades and how to find complementary colors on the color wheel. Students chose a set of complementary colors and then started with the land. Their closest layer of land is the darkest value and the layers get lighter as they move backwards. 


Next, they did the opposite to create the sky. They started with the lightest color closest to the sun and the shades got darker as the colors moved away from the sun.


Finally, students took an assessment in Google Classroom and filled in another value scale. This time I told them that I would be looking for five or more values in their value scale. 

Sunday, January 15, 2017

Sugar Skulls-Fifth Grade


Fifth graders started the year by learning about the Day of the Dead. I created a Nearpod presentation that the students participated in with their Chromebooks. It included a pre-assessment on the first slide and a post assessment on the last slide to show that they already had learned about Dia de los Muertos. I found a super cute video that covers the basics of the holiday very well. I also created a short presentation to use for reviewing the symmetry and designs of sugar skulls each class. 


Students used plaster of paris and skull ice cube trays from the Dollar Store to create sugar skulls. They put a paperclip in the back of the plaster so they could string some yarn between them and make a garland of sugar skulls. 


Students were given options for adding the designs on their skulls. I found that paint or colored pencils are best. UltraFine tip Sharpies are too thin and create a lot of lines in the solid shapes and the plaster is quite dusty, which blocked the ink at times. After tying them together students filled out this assessment in their Google Classroom.

Friday, January 15, 2016

Papyrus Painting

The fifth graders are finishing up painting Egyptian symbols on papyrus. They were given a sheet with a variety of symbols on it and practiced on scratch paper before starting on their papyrus. Some kids have a lot of knowledge of Egyptian mythology and choose a different image than what was on the sheets.

I showed them how to mix colors and how to blend on the paper and we discussed the advantages and disadvantages of each technique. 

They were given the option of adding permanent marker once the paint dried and then were asked to mount them on colored construction paper. They chose the color that they thought made their artwork "pop" the most. 

Monday, November 9, 2015

African Baskets

While studying Morocco, fifth graders created these baskets with plastic canvas and yarn. Full disclosure, I would not do this project again. I thought it would take 3-4 class periods, but there are kids that are STILL not done and it was our first project of the year! It's never ending and making me crazy. However, some turned out very cool. 

I made a template and cut out a plastic canvas. Next, I used a permanent marker to make the canvas dark and photocopied it for each kid to use to design their basket. I also traced this template three times on each sheet of canvas and roughly cut them out. The kids cut them out neatly and then started sewing. My yarn needles were too big to fit through the holes, so they had to use a tiny bit of masking tape to make a needle on the end of their yarn. 

When they finished sewing, they sewed the two ends together and then added a circle of plastic canvas for the bottom. 


See our galleries here and here.

Saturday, April 4, 2015

Asian Art Study: Russia

I realize that I have posted some of these projects before, but in looking at my schools' Artsonia galleries, I am so proud and happy with the way this year went that I thought I would break up the year into the units of countries that we studied. If you don't already know, I decided to focus my teaching on one continent each year starting this year. I chose Asia to start with and honestly, I think I could have spent all year just in Japan! The curiosity and genuine interests the students have shown in each country has been remarkable. Here is the first country we "flew" to; Russia. 

This was my kinder's second project of the year, and their first time painting with me. They learned about Kandinsky, concentric circles, and watercolor painting techniques along with my painting expectations, and how to clean up in the art room.

After completing their Kandinsky paintings, my kinders used strips and squares of paper to create these Russian tiger collages inspired by an image I found on Pinterest. The full lesson is found here
First graders did two projects in Russia. This is their study of landscape and the focus of the lesson was foreground, middle ground, and background. For full instructions to teach this lesson, visit my inspiration here
First grade's second project was Babushka (aka Matryoshka) Doll Drawings. We looked at a set of dolls my parents brought me from Russia and noticed how they get smaller, that most of them are holding something and there is a lot of patterns on them. I got out a variety of sizes of bottle caps for them to use to trace the heads and gave them pointers for drawing the details. Students were asked to use at least three different drawing media to color their dolls. The full lesson can be found here.   

Second graders looked at Russian architecture and compared their traditional buildings to what they see in Wisconsin. They noticed the elaborate designs, dome tops, and bright colors. They then drew their own version of a Russian building and were asked to color it with crayons, colored pencils, markers and oil pastels using their "artist brains" to choose the best medium for each portion of their building. They then watercolored the sky.
Third grade looked at the art and life of Russian artist, Marc Chagall. They learned that his paintings are dream like interpretations of stories of his life in Vitbesk. They wrote a story with four parts and then illustrated it using four different perspectives and at least three different drawing supplies. 

Like first grade, fourth grade looked at Babushka Dolls. They created clay versions using two pinch pots and connecting them to make the hollow "peanut" form and then painting them. While the clay versions were drying and being fired the also created a drawing using colored pencils. They were allowed to use the drawing as practice for the sculpture, or to design the two project differently. 


The fifth graders learned about Kazimir Malevich. They looked at the progression of his art from realistic to Cubist to the creation of Suprematism. Next I tried my hand at a modified choice project. I allowed students to either create a Cubist image using oil pastels or a Suprematist collage. Regardless of the media, students were asked to show movement, balance, unity, shape, line, and color in their composition. 

Saturday, December 13, 2014

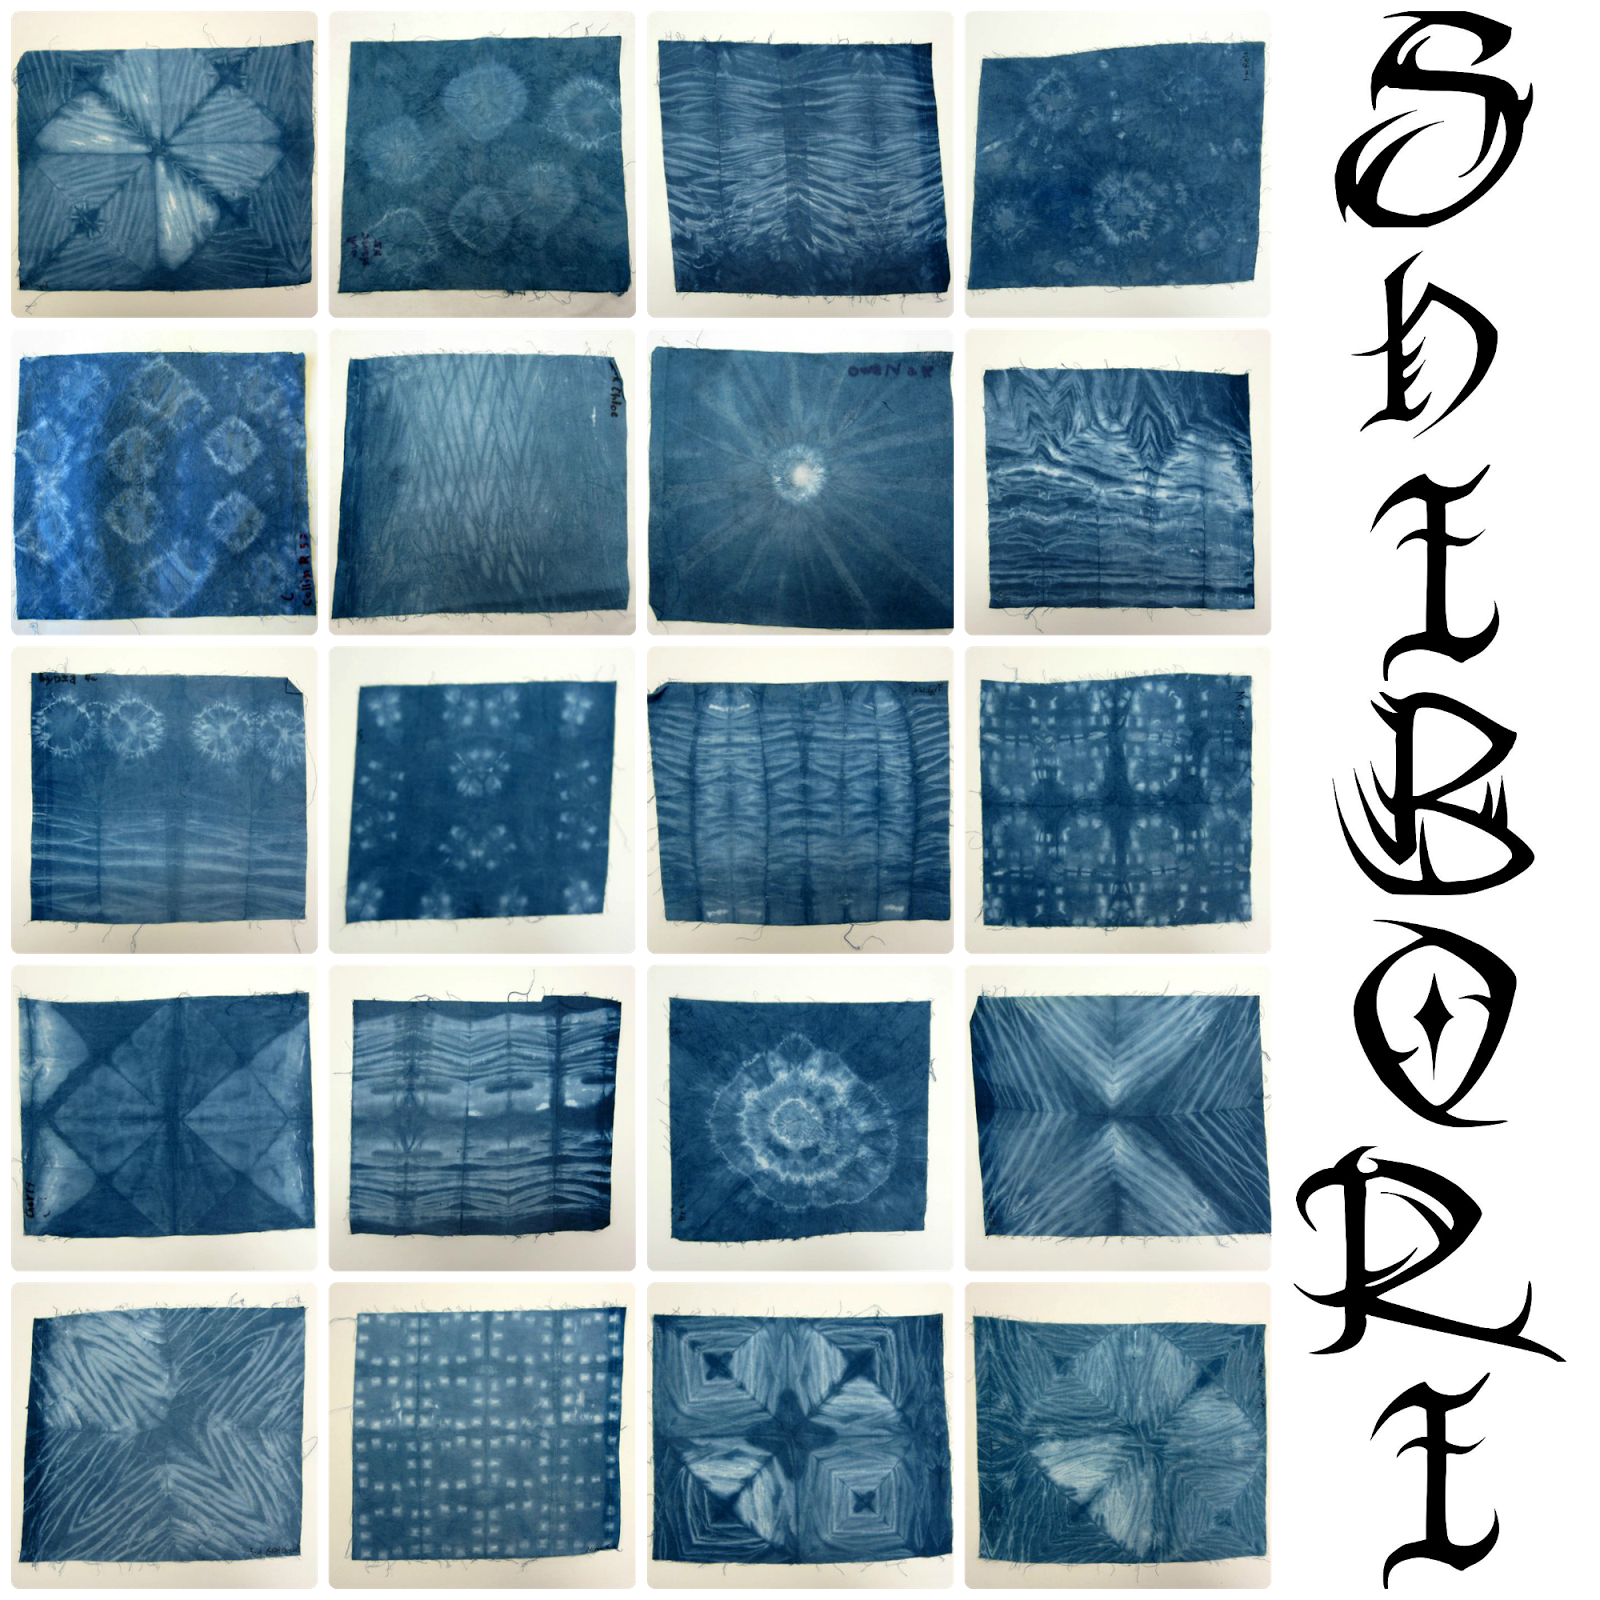
Indigo in Elementary


Last week at one of my schools I did Shibori (Japanese Indigo Dying) with first through fifth graders. It was only two days of art classes, and ten classes. True Shibori is done with Indigo, which is extracted from the Indigo plant. There are many ways to bind fabric prior to dying it to create different patterns on the finished piece. My favorite part of teaching it was reliving the wonder of the process every time a new class came to art. When a fabric is dipped into the vat, it comes out green. A weird, ugly, puce-y lime green. As it oxidizes, the oxygen turns it blue before students' very eyes. I love the "oooh!" I heard around the room all day when demonstrating. One dip will leave the fabric a very light shade of blue, and each dip and oxidation after that will make it a shade darker. 

I had two vats going. It was so much fun, but also very messy and stinky! I thought I would take a moment to share how I apoached the project and what I will do differently when I do the same project with my other school after Winter Break. 

To begin, I purchased Indigo kits from Sax. At the school that has already done this, I have about 230 kids, and we used two kits; one for each vat. I also added some gloves that I got from the nurse because there is only one set in each box. However, I told the kids they only needed one glove, and only if they were using the marble technique. 
Next, I decided on which Shibori techniques I wanted to teach the kids. There are so many to choose from, I decided to limit it a bit and showed them three. First was using rubber bands to hold marbles in the fabric. It doesn't matter if they are actually floral gems, which aren't round and won't cause students to be running after rolling marbles all class period. When dyed and rinsed, this technique leaves white circle/square shapes on the fabric. 


I also talked about using clamps. I explained that a Shibori artist would have a variety of shapes and sizes to chose from and showed examples of different ways to fold the fabric to get different results. We used clothespins as clamps.


Finally, I knew I wanted to do Irashi. It's my favorite type of Shibori. A month or so before the project I sent out a request to parents, asking if anyone had any scraps of PVC pipe they'd like to donate. I wasn't expecting results, but a dad brought in a grocery bag of pipes! I was (and still am!) completely excited about it. I showed the kids different ways to fold their fabric and how to wrap it around the pipe and scrunch it down, emphasizing that the tighter they wraps the string the more defined the white lines would be in the end. 


All in all we used clothespins, rubber bands, floral marbles, string, and PVC pipe for binding the fabric. I kept these in a Rubbermaid style bin that is designed to go under a bed-it was perfect with how long it was. 


Now that you have your supplies, consider your room. Indigo vats are stinky, messy, and have to be kept in an air tight container when not in use. I dug around in our storage area and found some empty containers. The ones with lids were just too big to use as the vat and the smaller ones didn't have any lids. Of course. So I created the vats in the smaller containers and stored the smaller containers in the larger ones with the lids. I just put all the binding supplies in another container and stacked them all in the corner for the two days I was not at that school (I share a room at that school and wanted them out of the way for the music teacher). 


While considering your room, consider how you will direct traffic to minimize mess. I only have one sink in each of my classrooms, so unbinding at the sink was not an option. There was enough of a buildup of people just waiting to rinse. I put an empty tub next to each of the vats and instructed the kids to transfer their bound fabric to the empty tub and unbind them in the tub, leaving all the wet binding materials in the tub. They then should give the fabric another good squeeze over the vat before moving to the sink. 

Next consider how to protect your room. I bought a cheap plastic dropcloth and taped it to the counter and spread it out onto the floor. The vats and tubs for unbinding were on these counters and then they moved to the sink in the photo. The rinsed fabric then got put onto a laundry drying rack that my principal donated, as my drying rack has too big of holes between the wires for these pieces. I was diligent in talking about how to make sure there was no dye left in the fabric before putting it on the rack, and also with wiping under the rack throughout each class. 


My classes are all back to back, so my final challenge was figuring out how to unload the drying rack between classes-especially as one class is typically waiting to come in as the last one is leaving. I solved this by having a clothing iron in the room. By the time the first few pieces were done oxidizing I had finished helping the kids that needed additional support with binding and I had some kids finished with the project. The kids that were done were now my "experts," and were available to help the kids that had questions dying while I kept an eye on the drying rack. As pieces turned completely blue I pulled them off the rack and ironed them. They were still a little damp, but were dry enough to stack and keep off the drying rack. As a bonus, the kids loved seeing what theirs looked like after it was ironed!

Now that everything is in place, as soon as you set the dates for dying, inform parents! I didn't think to do this until it was too late, and has a few upset (but very supportive, "don't change your teaching!") parents. I have already sent out the dates we will be doing Shibori with my other school, and it isn't until January. I requested that they make note of the dates their children will be dying and dress them in clothing that would not be upsetting to stain. I also have aprons, but they never seem to cover enough of the kids' bodies to make much of a difference-and they're cloth too so sometimes things just go right through them. I asked our office staff to put the dates in our school newsletter, emailed the classroom teachers the dates and asked them to put them in their class "peek of the week" letters and sent out an Artsonia newsletter. When we get back from Winter Break, I will also put the dates on my art class Facebook page and my school class pages. I figure I'm covered with all these communications.

It was a fabulous project. I loved how when the kids would enter the room all I would hear is comments about how it smelled. But every single class answered the same as they left and I asked, "well, was it worth the smell?" Every class unanimously yelled, "YES!"


Wednesday, January 22, 2014

Paul Klee Non-Objective Drawings


Here is a sampling of my latest project from the 5th graders at one of my schools. My other school is starting it next week. It is inspired by another former colleague. Check out her gallery here.
We started by looking at images by Paul Klee. We first focused on his abstract images such as Castle and Sun and talked about abstract paintings. We defined abstract as art that is based on a subject matter but converted into shapes. We then segued into his non-objective paintings and defined non-objective as art that has no subject matter. 
Next, the kids were asked to draw 4-7 large lines on their paper to break up the space. Finally, we talked about color theory and focused on analogous colors. I explained how to read the color wheel and quizzed them with questions such as "If I am on red, which two colors could I use?" I then demonstrated how to blend the oil pastels and leave a space around the pencil lines for black. I stressed saving the black for last and explained that we didn't want the black to smear into the colors. 
Most of them turned out amazing! Here is our gallery, but you can see some of them below.


Tuesday, February 19, 2013

Post It Mural

It's DONE! We actually got it done a bit faster than I thought we would. I don't have a photo of the whole thing finished yet, as it will be hung just before the art show, which is now officially scheduled for April 19th!


Not quite finished, it took two more classes after this photo was taken. The bottom strip is not photo'd, as it was already finished and in storage. 

 I couldn't get more red Post-Its, so I ended up making the sun a little bit smaller. It is going to be amazing, I can't wait to get it hung! 


FINISHED!