I simply love this project. These examples are first grade. We watched a video of Linnea in Monet's Garden on YouTube and then looked at photographs of Monet's house and paintings. Next, they followed the steps found on Mrs. Picasso's Art Room. They are all so unique and beautiful!
Showing posts with label Grade: First. Show all posts
Monday, April 29, 2019
Monday, December 11, 2017
Japanese Koinobori
I have done a Koinobori project in the past, with 4th grade using SmartFab and lino cut blocks as scales, but this time my first graders are learning about this Japanese tradition. I purchased some pre cut "Carp Windsocks" made of diffusing paper from School Specialty. Here is my demo video, which I will use with the kids starting tomorrow. I pause my videos a lot and add narration over the music (at least until the fab IT guys can figure out what is wrong with my internal microphone).
Labels:
Children's Day,
Grade: First,
Japanese Art,
Koinobori,
Medium: Fibers
Wednesday, January 18, 2017
Tiny Seed-First Grade
Eric Carle's Tiny Seed is a wonderful book for young kids. They love catching on that it's a circle story and enjoy how big the flower gets in the story. I read it to my first graders prior to making these cute Tiny Seed flowers.
Students received two pieces of paper. On the first one, they traced on stem, one circle, two leaves, and seven petals. We discussed analogous colors and they used three sets to paint their traced shapes. Yellow and green for the stem and leaves, yellow and orange for the circle, and orange and red for the petals.
The next class, while students were cutting out their shapes they took turns coming up to a painting station to splatter paint their second piece of paper with cool colors.
Finally, on the third class period they laid their pieces out on the splatter painted paper and glued them into a flower shape. I pointed out that the circle should be on top of the petals.
I do have a storyboard for part of the process. Students filled out this assessment to determine their understanding of analogous colors.
See the full lesson plan here.
Saturday, January 14, 2017
Scaredycrows-First Grade
When I discovered this adorable book, Scaredycrow at our public library it was just calling to become an art project!
I did this project with my first graders, and they really loved it. They used paper, burlap, fabric, buttons, and yarn to create these cute little scarecrows.
Labels:
2016-2017,
Grade: First,
Medium: Collage,
Scardeycrow
Friday, January 15, 2016
African Lions
I was inspired to do this project by this pin on Pinterest.
The full project took us four art classes. The first class we talked about color and then used warm colors to paint a paper that would be cut up for the mane. I showed the kids how to use paint scrapers and/or the back of their paintbrush to make lines in the wet paint to add interest.
The next class we created the lion faces. I used my document camera to show them step by step how to break down this complicated picture. We started with a medium sized circle for the main part of the head, I showed them how to use the natural curve of their wrists to get a nice curved line and turn the paper to make that curve continue until they had a full circle. They added a square with rounded corners on the bottom for the jaw. I had a completed example on the board for them to refer to as we drew. Next we drew the ears and then erased the parts of the circle that were where the square and ears were drawn. For the face, we began by drawing a large 7 on the left and a backwards 7 on the right. I reminded them how to use the curve of their wrists to make a nice curved line and showed them that I turned my paper to make the curve for the eyes. At the bottom of the 7s the added a shape for the nose and we talked about shapes that would make sense-rectangle, oval, or triangle came out of our discussions. They had the option of adding lines of a mouth or leaving it as is.
We then used chalk to add the color. I started by asking them if every single lion is the same color. They giggled and said no and we noticed that none of us had the exact same shade of skin either. I reminded them that the colors I was using to demo were not the only ones they could use, they just wanted to find "lion colors." We started with brown chalk and covered the whole faces except the eyes and tip of the nose. We added a little bit of darker brown in the ears, and on the cheeks to add definition to the faces. Once that was blended, we used oil pastels to color the eyes, tip of the nose, and important lines. They were also given the option of outlining their lion's face.
The third and fourth classes were spent collaging it all together. I had trays of precut colored paper and precut newspaper for them to use and they brought their painted paper to me to cut on the paper cutter. They cut out their faces and we talked about the reasons we think male lions have manes. They decided they have manes to distinguish male and female, to make the lion look bigger in conflicts, and to protect their necks in fights. (Such smart kids!) Whenever they asked me if their project was done I'd ask them if their lion's mane was thick enough to help him protect his pride.
See our gallery here (check back for Houlton's!).
Labels:
2015-2016,
Africa,
African Animals,
Grade: First,
Medium: Collage
Egyptian Collars
First graders looked at Ancient Egyptian collars. They noticed that the collars are symmetrical. We talked about color theory and focused on analogous colors. Students chose four analogous colors to work with and either made two of their shape or made their shape symmetrical.
I made a template of the collar shape and pre traced them all on the back of the gold paper. I got a roll of gold paper from School Specialty but in hindsight, it was a thin as wrapping paper and if I do this again I'd just wait and buy gold wrapping paper after Christmas and save some money. The kids cut the shape out and then folded their paper in half.
I show them how to glue one symmetrical shape on the fold to make the whole collar symmetrical. We talked about using two identical shapes to create symmetry and I showed them how to glue a shape on one side and match the second shape to the first. They added a bit of glue on top of the second shape and then folded their collar to make it transfer to the other side.
When finished, students chose a color that fit with their analogous color group for the background paper.
Friday, November 13, 2015
Desert Landscapes
| True confessions here, this project did not go completely as planned. However, it's the process not the product-right?! |
If that's the standard, this project was a complete success. And some of them did turn out super cute. We started by learning a bit about the Sahara Desert and focusing on foreground, middle ground, and background. The kids then created a template of sand dunes out of construction paper and used chalk to create the dunes. This turned out to be much more challenging for them than I expected. Some of them kept cutting the dune apart instead of ending up with one template 6" X 12" they ended up with a bunch of triangles. I asked them to start at the top of the page with their medium brown and mix it with a light brown to get a light color for the foreground. The concept of starting a project upside down was just too much for many of them and I walked around flipping the pages around as they got started. The middle ground was created with just the medium brown, and they added a darker brown for the last row of sand dunes. I showed them how to blend one color into the color next to it instead of rubbing the whole sky together to get mush and most of the skys turned out pretty vibrant.
Now we moved on to the printmaking portion of our story...Yikes.
In my mind, I was thinking camels are pretty hard to draw and some kids won't be able to do it, but some will want them. I gave them the choice between camels, cacti, and pyramids. They could do the same or different items in their deserts. We used foam to create our prints and they were asked to print the largest item in the foreground, the medium item in the middle ground, and the smallest item in the background. I made stations for them to go to for printing and it worked pretty smoothly. Finally they did an assessment. The one I previously blogged about didn't work well with my third graders so I didn't try it with these kids. Instead, I created a color sheet of a desert and asked them to color the foreground brown, the middle ground green, and the background blue. Most of them got 3/3 on the assessment, which validated the project for me a bit. At least they learned! They also got to use chalk (which I don't pull out very often) and printmaking.
Saturday, October 3, 2015
Assessment
I don't know about all of you, but the word assessment makes me cringe. I'm more open to it than I was when I first started teaching, and do find it useful at times but in general miss the time in education when I could just sit and create some fun artwork with my awesome students. However, with the teaching climate the way it is, it is necessary to show that our students are learning-even in art. With 650-700 students depending on enrollment, I had to find a way to easily organize all of these assessments. I used to have half sheets of paper for most projects, but have recently found even easier ways to organize assessment. I went to one of my media specialist and told her I was looking for an app that would allow my students to manipulate images and email the results to me. After looking at a few options, we found the perfect app for this process. PicCollage.
PicCollage allows the user to load as many pictures as desired and layer them as they see fit. I have two assessments currently ready for my students to use. The first one I will use with first graders to show that they learned foreground, middle ground, and background. We are touring Africa this year, and they are working on landscape chalk drawings of the Sahara. They will be putting three items into their landscapes; one in each plane of depth. They can choose from cactus plants, camels, or pyramids. For their PicCollage, I put a picture of sand dunes in first and tapped on "select as background" to lock it into place behind the other images. I then searched for each item, adding "with transparent background" after the name; for example, "camel with transparent background." This allowed me to find images that would fit easily with the picture. Once they were put onto one iPad, they were in the camera roll for all of them and it was just a matter of pre-loading the images I needed. Here's what the image looks like when the kids go into the app:
They can increase and decrease the image size by pinching and move the items to the foreground, middle ground, and background. We talked about how things in the foreground look larger than things in the background, so they will be able to move them to something like this:
Here's another one I will be using for third and fourth grade, both of which are learning about radial symmetry of Moroccan mosaics and tiles (more on those later).
![]() |
| Before |
![]() |
| After |
When complete, students can simply email me their finished image and type their name in the subject line of the email. I can grade them whenever I have time, from any device that has internet!
The other new assessment tool I am using is Google Classroom. I am very new to this, but have been getting my 3rd-5th graders set up on it. I will post on that once we finish our first projects, so I can give some tried and true tips.
Labels:
Action Research,
Assessment,
Grade: First,
Grade: Fourth,
Grade: Third,
iPad,
PicCollage
Saturday, April 4, 2015
Asian Art Study: Russia
I realize that I have posted some of these projects before, but in looking at my schools' Artsonia galleries, I am so proud and happy with the way this year went that I thought I would break up the year into the units of countries that we studied. If you don't already know, I decided to focus my teaching on one continent each year starting this year. I chose Asia to start with and honestly, I think I could have spent all year just in Japan! The curiosity and genuine interests the students have shown in each country has been remarkable. Here is the first country we "flew" to; Russia.
![]() |
| After completing their Kandinsky paintings, my kinders used strips and squares of paper to create these Russian tiger collages inspired by an image I found on Pinterest. The full lesson is found here. |
![]() |
| First graders did two projects in Russia. This is their study of landscape and the focus of the lesson was foreground, middle ground, and background. For full instructions to teach this lesson, visit my inspiration here. |
![]() |
| First grade's second project was Babushka (aka Matryoshka) Doll Drawings. We looked at a set of dolls my parents brought me from Russia and noticed how they get smaller, that most of them are holding something and there is a lot of patterns on them. I got out a variety of sizes of bottle caps for them to use to trace the heads and gave them pointers for drawing the details. Students were asked to use at least three different drawing media to color their dolls. The full lesson can be found here. |
Saturday, December 13, 2014
Indigo in Elementary
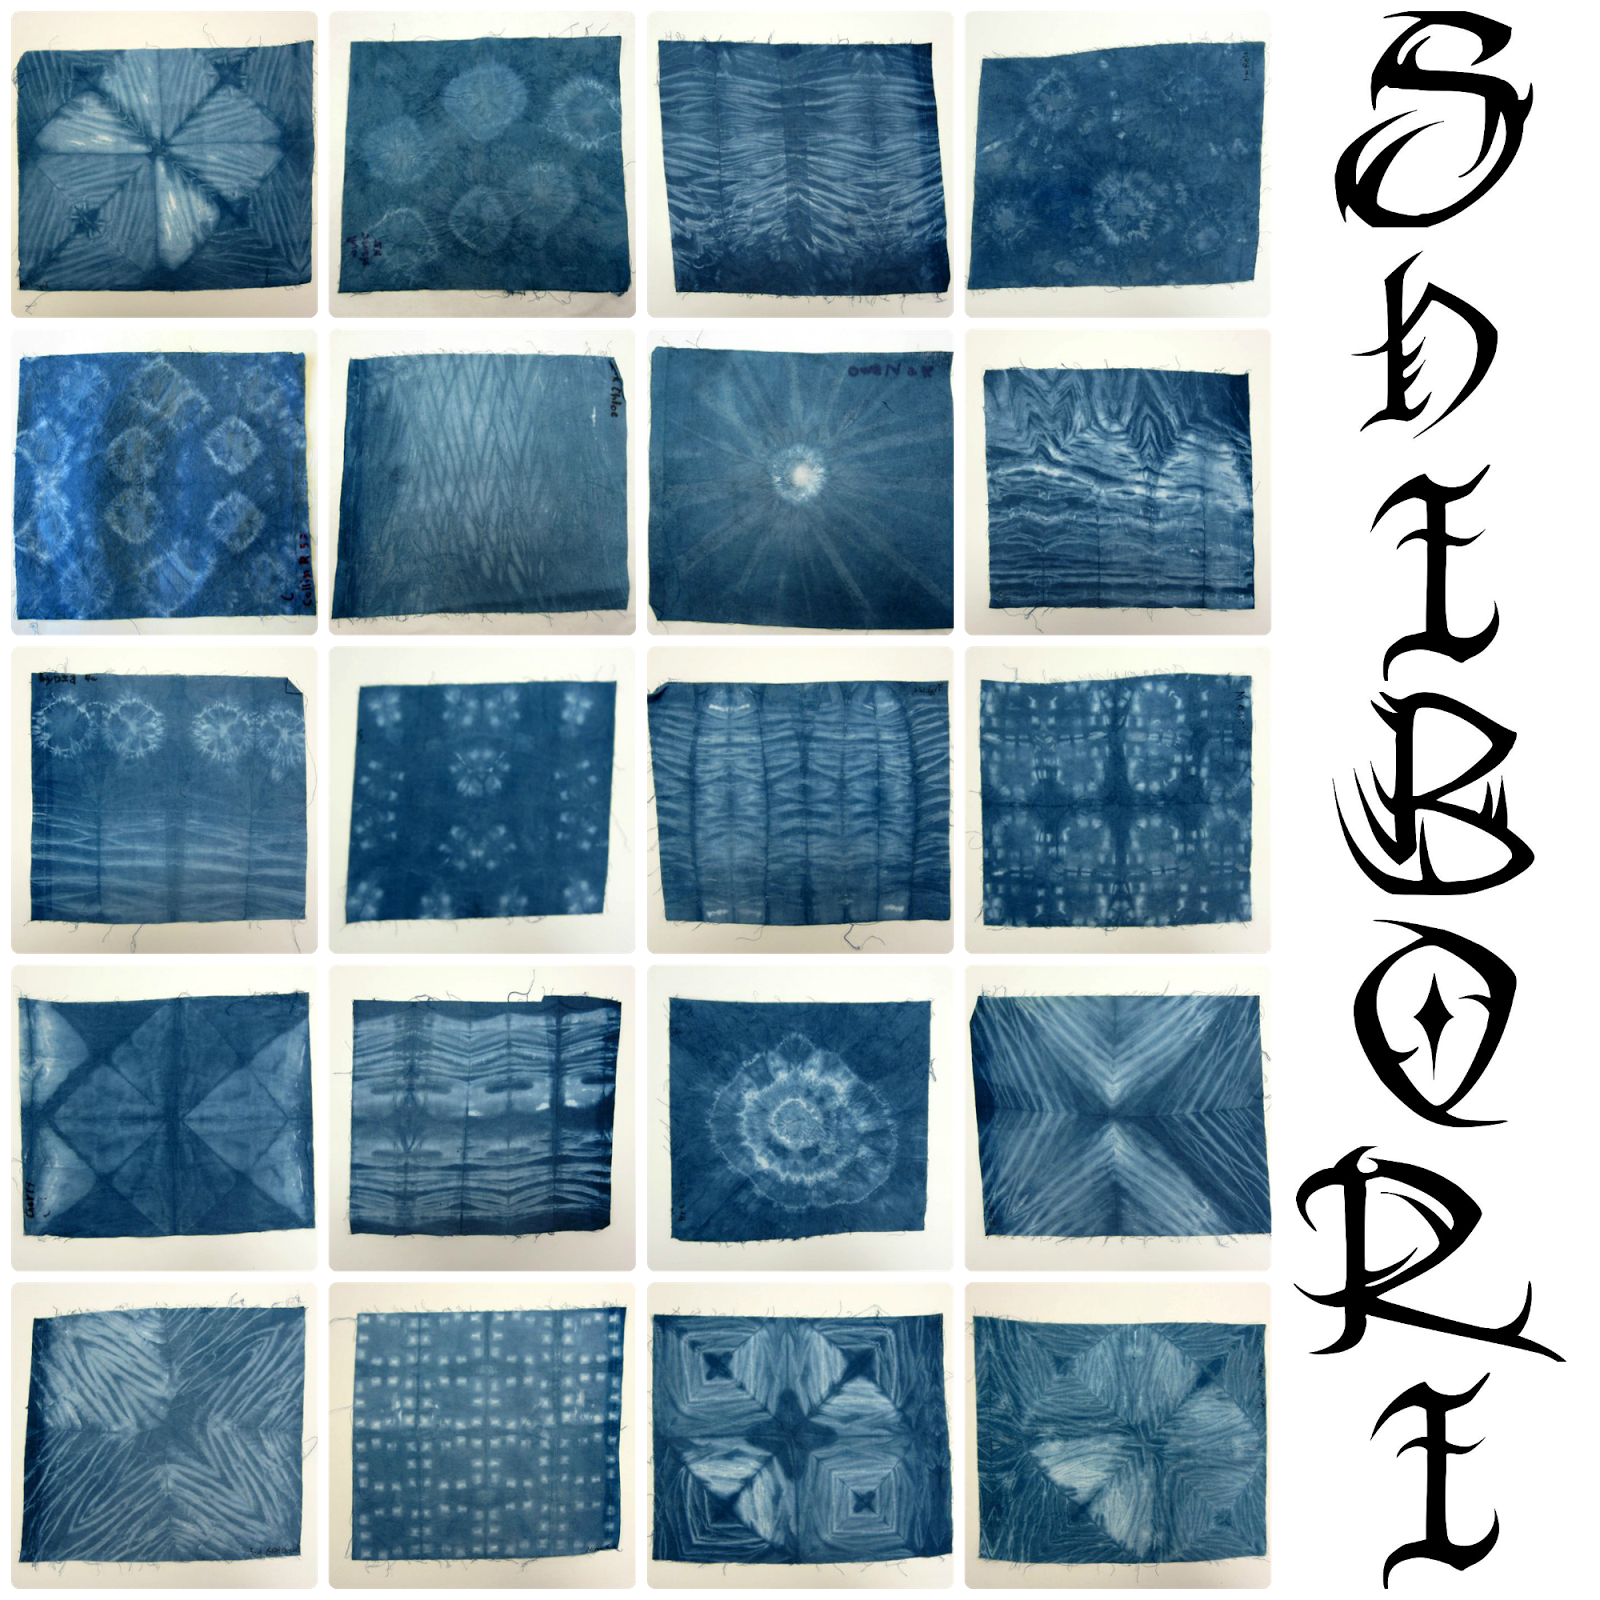
Last week at one of my schools I did Shibori (Japanese Indigo Dying) with first through fifth graders. It was only two days of art classes, and ten classes. True Shibori is done with Indigo, which is extracted from the Indigo plant. There are many ways to bind fabric prior to dying it to create different patterns on the finished piece. My favorite part of teaching it was reliving the wonder of the process every time a new class came to art. When a fabric is dipped into the vat, it comes out green. A weird, ugly, puce-y lime green. As it oxidizes, the oxygen turns it blue before students' very eyes. I love the "oooh!" I heard around the room all day when demonstrating. One dip will leave the fabric a very light shade of blue, and each dip and oxidation after that will make it a shade darker.
I had two vats going. It was so much fun, but also very messy and stinky! I thought I would take a moment to share how I apoached the project and what I will do differently when I do the same project with my other school after Winter Break.
To begin, I purchased Indigo kits from Sax. At the school that has already done this, I have about 230 kids, and we used two kits; one for each vat. I also added some gloves that I got from the nurse because there is only one set in each box. However, I told the kids they only needed one glove, and only if they were using the marble technique.
Next, I decided on which Shibori techniques I wanted to teach the kids. There are so many to choose from, I decided to limit it a bit and showed them three. First was using rubber bands to hold marbles in the fabric. It doesn't matter if they are actually floral gems, which aren't round and won't cause students to be running after rolling marbles all class period. When dyed and rinsed, this technique leaves white circle/square shapes on the fabric.
I also talked about using clamps. I explained that a Shibori artist would have a variety of shapes and sizes to chose from and showed examples of different ways to fold the fabric to get different results. We used clothespins as clamps.
Finally, I knew I wanted to do Irashi. It's my favorite type of Shibori. A month or so before the project I sent out a request to parents, asking if anyone had any scraps of PVC pipe they'd like to donate. I wasn't expecting results, but a dad brought in a grocery bag of pipes! I was (and still am!) completely excited about it. I showed the kids different ways to fold their fabric and how to wrap it around the pipe and scrunch it down, emphasizing that the tighter they wraps the string the more defined the white lines would be in the end.
All in all we used clothespins, rubber bands, floral marbles, string, and PVC pipe for binding the fabric. I kept these in a Rubbermaid style bin that is designed to go under a bed-it was perfect with how long it was.
Now that you have your supplies, consider your room. Indigo vats are stinky, messy, and have to be kept in an air tight container when not in use. I dug around in our storage area and found some empty containers. The ones with lids were just too big to use as the vat and the smaller ones didn't have any lids. Of course. So I created the vats in the smaller containers and stored the smaller containers in the larger ones with the lids. I just put all the binding supplies in another container and stacked them all in the corner for the two days I was not at that school (I share a room at that school and wanted them out of the way for the music teacher).
While considering your room, consider how you will direct traffic to minimize mess. I only have one sink in each of my classrooms, so unbinding at the sink was not an option. There was enough of a buildup of people just waiting to rinse. I put an empty tub next to each of the vats and instructed the kids to transfer their bound fabric to the empty tub and unbind them in the tub, leaving all the wet binding materials in the tub. They then should give the fabric another good squeeze over the vat before moving to the sink.
Next consider how to protect your room. I bought a cheap plastic dropcloth and taped it to the counter and spread it out onto the floor. The vats and tubs for unbinding were on these counters and then they moved to the sink in the photo. The rinsed fabric then got put onto a laundry drying rack that my principal donated, as my drying rack has too big of holes between the wires for these pieces. I was diligent in talking about how to make sure there was no dye left in the fabric before putting it on the rack, and also with wiping under the rack throughout each class.
My classes are all back to back, so my final challenge was figuring out how to unload the drying rack between classes-especially as one class is typically waiting to come in as the last one is leaving. I solved this by having a clothing iron in the room. By the time the first few pieces were done oxidizing I had finished helping the kids that needed additional support with binding and I had some kids finished with the project. The kids that were done were now my "experts," and were available to help the kids that had questions dying while I kept an eye on the drying rack. As pieces turned completely blue I pulled them off the rack and ironed them. They were still a little damp, but were dry enough to stack and keep off the drying rack. As a bonus, the kids loved seeing what theirs looked like after it was ironed!
Now that everything is in place, as soon as you set the dates for dying, inform parents! I didn't think to do this until it was too late, and has a few upset (but very supportive, "don't change your teaching!") parents. I have already sent out the dates we will be doing Shibori with my other school, and it isn't until January. I requested that they make note of the dates their children will be dying and dress them in clothing that would not be upsetting to stain. I also have aprons, but they never seem to cover enough of the kids' bodies to make much of a difference-and they're cloth too so sometimes things just go right through them. I asked our office staff to put the dates in our school newsletter, emailed the classroom teachers the dates and asked them to put them in their class "peek of the week" letters and sent out an Artsonia newsletter. When we get back from Winter Break, I will also put the dates on my art class Facebook page and my school class pages. I figure I'm covered with all these communications.
It was a fabulous project. I loved how when the kids would enter the room all I would hear is comments about how it smelled. But every single class answered the same as they left and I asked, "well, was it worth the smell?" Every class unanimously yelled, "YES!"
Subscribe to:
Posts (Atom)