Showing posts with label Grade: Second. Show all posts

Saturday, March 7, 2020

Spring Animals

     My new technique has been going pretty well so far. I am getting some push back from a few students in each grade, but keep reminding them that TAB wasn't working for us for several reasons; behavior, waste, and cleanliness being the biggest. I recently began a lesson with second grade that is going pretty well so far. I found an image online of a cute little bunny in a patch of flowers and followed the links to Mrs. Filmore's blog. The link there is a different post about the same project, but the post I saw only had a bunny or a bear as options. I loved the project, but not the fact that these students used a printed version of the animal and just added texture lines, cut it out and glued it down. So I used the idea but modified it for my classroom.


   I made three videos-one for the background, one for the bunny, and one for the bear. I then told my students that they could modify one of those animals to create a different animal if they'd like. I used the examples of modifying the bunny into a squirrel by changing the shape and size of the ears or making the bear into a cat by changing the shape of the nose and ears and adding whiskers. Well, the kids got a bit carried away in my first class and started wanting to make things like lizards and spiders so I had to change how I was saying it to be "any furry animal that might live or hide in a garden." It still backfired a little, and I do have a bee and a bird being worked on as I couldn't talk them out of it. If I do this again, I guess I'll have to say any furry mammal that may live or hide in a garden!

   First the students were shown the beginning of this presentation and the background video so that they all knew how to do the background.


   Then I told the students that when I say the magic word (it was pineapple) they would split into two groups. If they wanted to create or modify the bunny they'd sit by the SmartBoard and if they wanted to create or modify the bear they'd sit at one of the other two tables. On the way to the bunny table they were to pick up a piece of 9X12 white construction paper, a pencil, and an eraser. On the way to the other tables they were to pick up a piece of 9X12 watercolor paper and a marker block. The kids who wanted to do the bear would start the bear the next class and work on the garden the first class while the bunny group worked with me and the video to draw their bunnies with pencil.


   We had just enough time to get that done in our 35 minute class period. Then next class, regardless of where they left off students switched groups. If they were working on their garden last class they met by the SmartBoard to make their bear and if they were drawing their bunny they started their garden. 


  Again, just BEARly enough time to get that done in 35 minutes. Next class all the students will be shown the Sharpie step and start working on that. They will also have the option of finishing their garden. The fourth class period they will cut out their animal and glue it to the background and mount the artwork on a colored border paper. They will then use iPads to upload their finished spring animal to our Artsonia gallery. 


Thursday, November 30, 2017

Laurel Burch Cats

I think this is one of my current favorite projects. The final piece is so colorful and vibrant, just like Burch's work. Students began by watching an interview with Burch that was held by 30 minutes, Bay Area and viewing some of her work. We focused on her Fantastic Felines and flowers. I pointed out her use on one single line to create the top of each eye and the nose, blended color, use of pattern, and gold accents. Students then began by painting the flowers they designed in Burch's style. 


Note: I have a different Laurel Burch cat lesson that uses chalk and oil pastels that is also lovely.

CREDIT: This project is adapted from a pin I found that took me back to Deep Space Sparkle.

Saturday, January 14, 2017

Matisse's Goldfish-Second Grade


I've done this project with my second graders many times over the years. They always turn out extremely well, and the kids get a lot out of the process. There are many children's books about Henri Matisse, and the kids enjoyed learning about him. My favorite Matisse book is When Pigasso Met Mootise by Nina Laden. The kids find it fun and silly, but are also learning about both Matisse and Picasso.


Students begin  by learning about perspective and how to make a 3D room. They painted it with tempera paint and then used oil pastels to add tile, brick, or wood planks on the floor and a pattern on the walls.


They designed a unique fishbowl (really, they did. These all happen to be the same shape, but there were aquariums, bowls, glasses like Matisse's, and completely made up shapes!) and then drew the details (fish, treasure chests, castles, rocks, etc) with oil pastels and used toothpicks to scrape detail into their objects. They used watercolor and salt to add the water. 


Finally, they designed a table and leaves and collaged the whole project together.
See the full lesson plan here. 


Friday, January 15, 2016

Second Grade Egyptian Art: Clay Cartouche & Cat Mummies


Second graders created their name or initials in a clay cartouche. We discussed Egyptian written language and they practiced on a drawing of a cartouche. They learned that when looking at hieroglyphics, if they come across a cartouche it means the person whose name is inside the cartouche is royalty. I showed them how to neatly carve into the clay to make the image or sculpt it and use the Score-Slip-Squish method to add it. They also had the option of adding a border.

I typically don't glaze with kids, as my kiln isn't in my classroom and it's two elevators to get to my kiln. BUT, I decided these beauties deserved some glaze. 

See our galleries here and here.

While our cartouches were drying and firing we created cat mummies. I found this project on Pinterest and thought it was super cute. Add in that my paper towel rolls were getting a bit out of control, and we just had to make them. I cut paper towel rolls in half instead of using TP rolls because they were a little taller. The TP rolls were just a bit too short to give them enough space to use line on the body. 

After folding the top of the roll they covered the whole roll with masking tape and then painted them either gold, bronze, or silver. 

When dry, we looked at the heavily lined eyes of traditional Egyptian style and then used permanent markers to add the face and a line design on the body. 

See our galleries here and here


Friday, October 23, 2015

Egyptian Sneak Peek!

I've been working on samples for my Egyptian lessons and am very excited to get started! Here is a sneak peek, we are currently flying to Egypt, learning about the country and designing the concepts for the projects. 


Friday, October 16, 2015

Moroccan Khamsas


Second graders are finishing up their Moroccan Khamsas. Students learned about Morocco and we talked about their largest religion, Islam. The Khamsa, or Hand of Fatima is a symbol of protection in their religion. Students then learned how to use a ruler to create an even border by matching it with the edge of the paper and drawing on the other side of the ruler. They traced their thumb, index, middle, and ring fingers of one hand and then worked with a partner to trace their thumb of their other hand to create a full Khamsa shape. 


Next, students learned about the Element of Art: Color by focusing on warm and cool colors. We played a game to measure understanding. I called out a color and if they thought it was a cool color they would wrap their arms around themselves like they were shivering. If they thought it was a warm color they would fan themselves. It worked really well! They chose warm or cool colors for the hand and border and the opposite color group for around the hand. 

When they were done painting they used any extra time to practice some patterns in their sketchbooks. The next class period they used those patterns to finish up the project. They were asked to draw an eye on the hand and fill the hand, the space around the hand, and the border with patterns. 

Saturday, April 4, 2015

Asian Art Study: Russia

I realize that I have posted some of these projects before, but in looking at my schools' Artsonia galleries, I am so proud and happy with the way this year went that I thought I would break up the year into the units of countries that we studied. If you don't already know, I decided to focus my teaching on one continent each year starting this year. I chose Asia to start with and honestly, I think I could have spent all year just in Japan! The curiosity and genuine interests the students have shown in each country has been remarkable. Here is the first country we "flew" to; Russia. 

This was my kinder's second project of the year, and their first time painting with me. They learned about Kandinsky, concentric circles, and watercolor painting techniques along with my painting expectations, and how to clean up in the art room.

After completing their Kandinsky paintings, my kinders used strips and squares of paper to create these Russian tiger collages inspired by an image I found on Pinterest. The full lesson is found here
First graders did two projects in Russia. This is their study of landscape and the focus of the lesson was foreground, middle ground, and background. For full instructions to teach this lesson, visit my inspiration here
First grade's second project was Babushka (aka Matryoshka) Doll Drawings. We looked at a set of dolls my parents brought me from Russia and noticed how they get smaller, that most of them are holding something and there is a lot of patterns on them. I got out a variety of sizes of bottle caps for them to use to trace the heads and gave them pointers for drawing the details. Students were asked to use at least three different drawing media to color their dolls. The full lesson can be found here.   

Second graders looked at Russian architecture and compared their traditional buildings to what they see in Wisconsin. They noticed the elaborate designs, dome tops, and bright colors. They then drew their own version of a Russian building and were asked to color it with crayons, colored pencils, markers and oil pastels using their "artist brains" to choose the best medium for each portion of their building. They then watercolored the sky.
Third grade looked at the art and life of Russian artist, Marc Chagall. They learned that his paintings are dream like interpretations of stories of his life in Vitbesk. They wrote a story with four parts and then illustrated it using four different perspectives and at least three different drawing supplies. 

Like first grade, fourth grade looked at Babushka Dolls. They created clay versions using two pinch pots and connecting them to make the hollow "peanut" form and then painting them. While the clay versions were drying and being fired the also created a drawing using colored pencils. They were allowed to use the drawing as practice for the sculpture, or to design the two project differently. 


The fifth graders learned about Kazimir Malevich. They looked at the progression of his art from realistic to Cubist to the creation of Suprematism. Next I tried my hand at a modified choice project. I allowed students to either create a Cubist image using oil pastels or a Suprematist collage. Regardless of the media, students were asked to show movement, balance, unity, shape, line, and color in their composition. 

Saturday, December 13, 2014

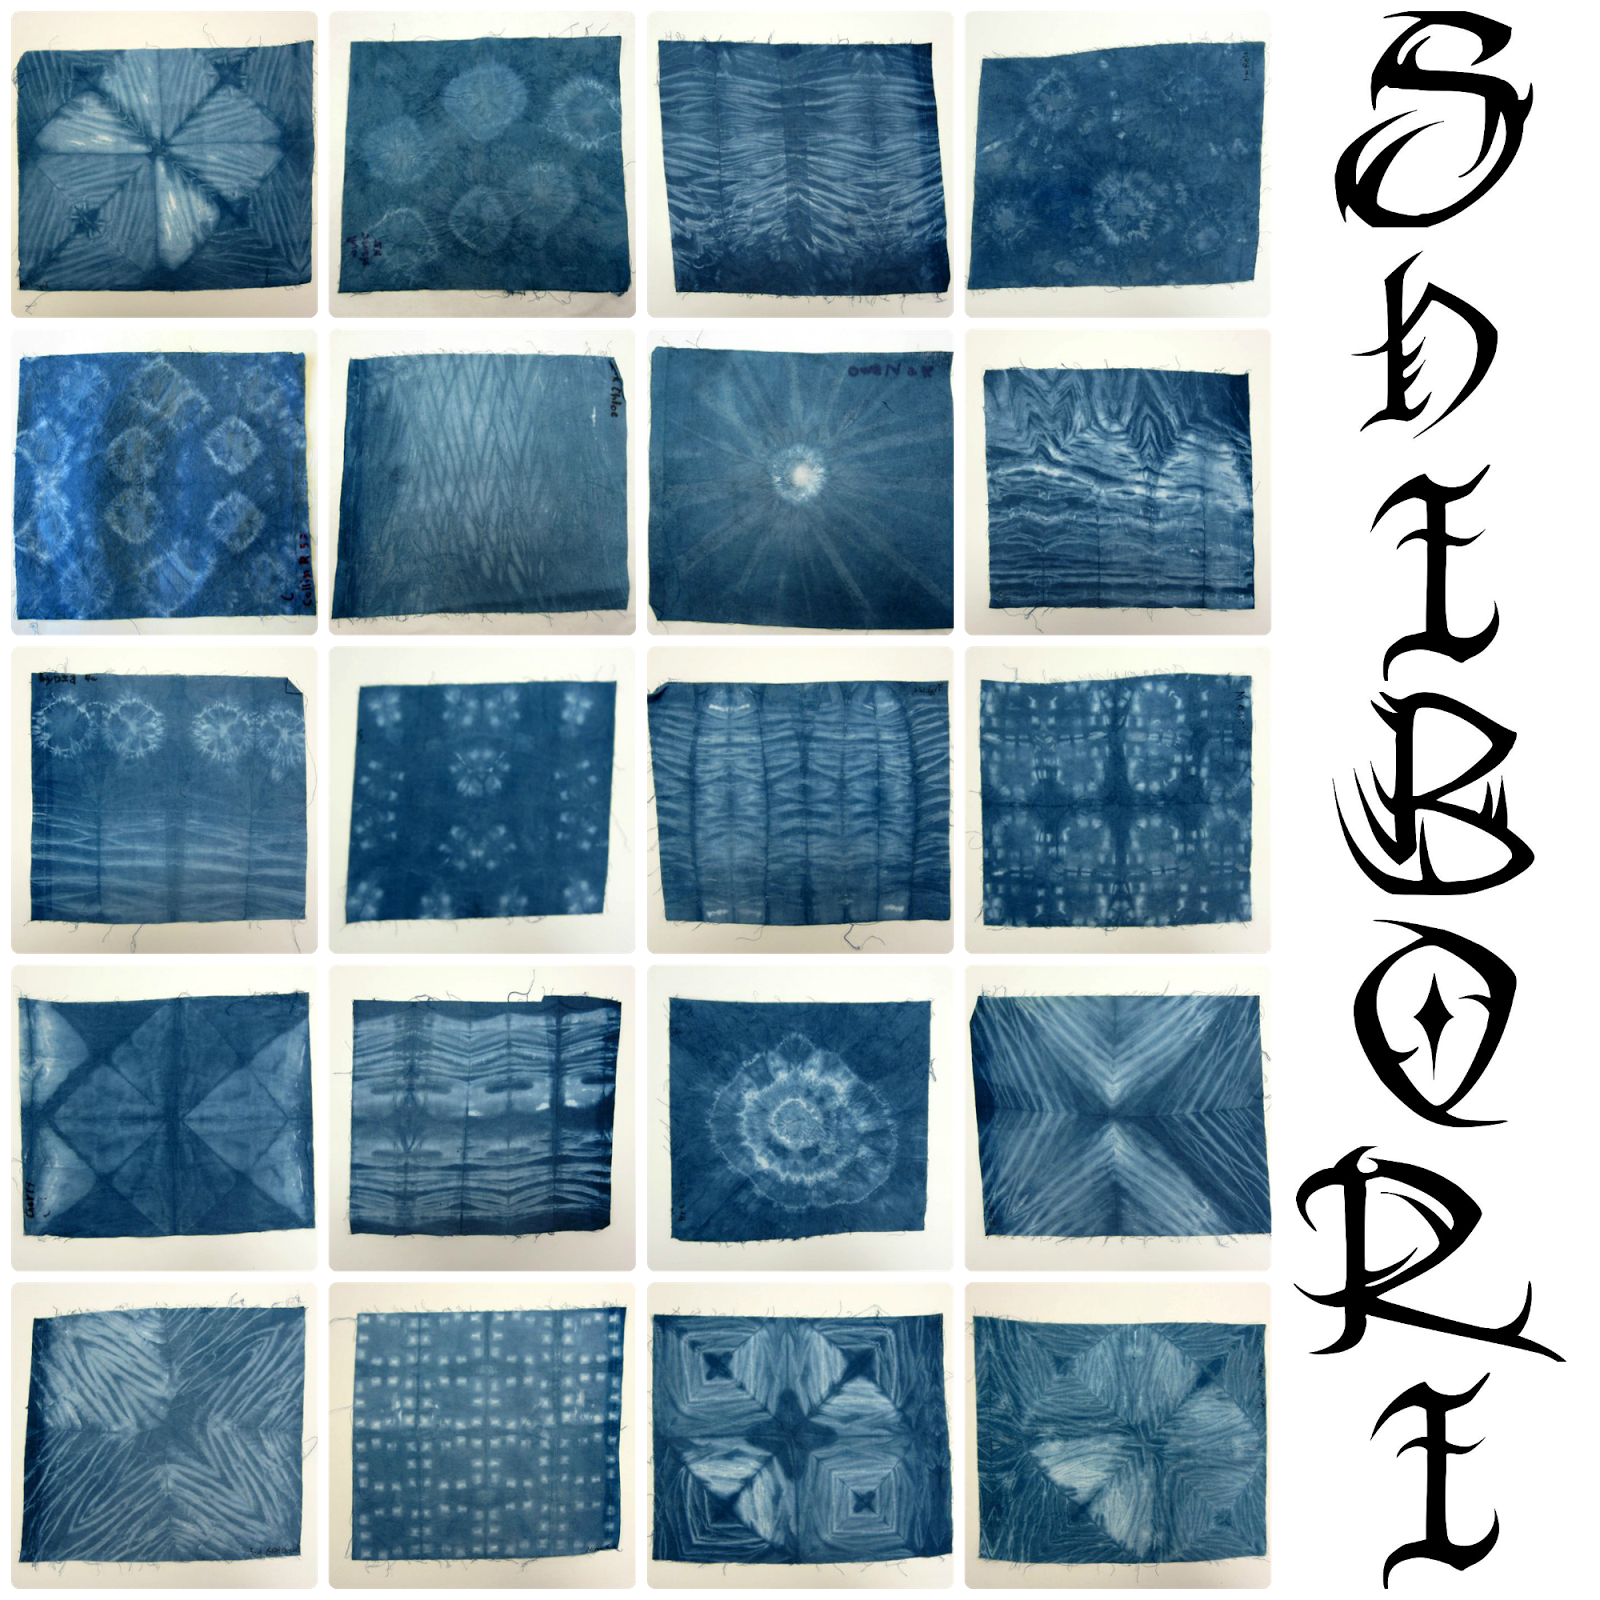
Indigo in Elementary


Last week at one of my schools I did Shibori (Japanese Indigo Dying) with first through fifth graders. It was only two days of art classes, and ten classes. True Shibori is done with Indigo, which is extracted from the Indigo plant. There are many ways to bind fabric prior to dying it to create different patterns on the finished piece. My favorite part of teaching it was reliving the wonder of the process every time a new class came to art. When a fabric is dipped into the vat, it comes out green. A weird, ugly, puce-y lime green. As it oxidizes, the oxygen turns it blue before students' very eyes. I love the "oooh!" I heard around the room all day when demonstrating. One dip will leave the fabric a very light shade of blue, and each dip and oxidation after that will make it a shade darker. 

I had two vats going. It was so much fun, but also very messy and stinky! I thought I would take a moment to share how I apoached the project and what I will do differently when I do the same project with my other school after Winter Break. 

To begin, I purchased Indigo kits from Sax. At the school that has already done this, I have about 230 kids, and we used two kits; one for each vat. I also added some gloves that I got from the nurse because there is only one set in each box. However, I told the kids they only needed one glove, and only if they were using the marble technique. 
Next, I decided on which Shibori techniques I wanted to teach the kids. There are so many to choose from, I decided to limit it a bit and showed them three. First was using rubber bands to hold marbles in the fabric. It doesn't matter if they are actually floral gems, which aren't round and won't cause students to be running after rolling marbles all class period. When dyed and rinsed, this technique leaves white circle/square shapes on the fabric. 


I also talked about using clamps. I explained that a Shibori artist would have a variety of shapes and sizes to chose from and showed examples of different ways to fold the fabric to get different results. We used clothespins as clamps.


Finally, I knew I wanted to do Irashi. It's my favorite type of Shibori. A month or so before the project I sent out a request to parents, asking if anyone had any scraps of PVC pipe they'd like to donate. I wasn't expecting results, but a dad brought in a grocery bag of pipes! I was (and still am!) completely excited about it. I showed the kids different ways to fold their fabric and how to wrap it around the pipe and scrunch it down, emphasizing that the tighter they wraps the string the more defined the white lines would be in the end. 


All in all we used clothespins, rubber bands, floral marbles, string, and PVC pipe for binding the fabric. I kept these in a Rubbermaid style bin that is designed to go under a bed-it was perfect with how long it was. 


Now that you have your supplies, consider your room. Indigo vats are stinky, messy, and have to be kept in an air tight container when not in use. I dug around in our storage area and found some empty containers. The ones with lids were just too big to use as the vat and the smaller ones didn't have any lids. Of course. So I created the vats in the smaller containers and stored the smaller containers in the larger ones with the lids. I just put all the binding supplies in another container and stacked them all in the corner for the two days I was not at that school (I share a room at that school and wanted them out of the way for the music teacher). 


While considering your room, consider how you will direct traffic to minimize mess. I only have one sink in each of my classrooms, so unbinding at the sink was not an option. There was enough of a buildup of people just waiting to rinse. I put an empty tub next to each of the vats and instructed the kids to transfer their bound fabric to the empty tub and unbind them in the tub, leaving all the wet binding materials in the tub. They then should give the fabric another good squeeze over the vat before moving to the sink. 

Next consider how to protect your room. I bought a cheap plastic dropcloth and taped it to the counter and spread it out onto the floor. The vats and tubs for unbinding were on these counters and then they moved to the sink in the photo. The rinsed fabric then got put onto a laundry drying rack that my principal donated, as my drying rack has too big of holes between the wires for these pieces. I was diligent in talking about how to make sure there was no dye left in the fabric before putting it on the rack, and also with wiping under the rack throughout each class. 


My classes are all back to back, so my final challenge was figuring out how to unload the drying rack between classes-especially as one class is typically waiting to come in as the last one is leaving. I solved this by having a clothing iron in the room. By the time the first few pieces were done oxidizing I had finished helping the kids that needed additional support with binding and I had some kids finished with the project. The kids that were done were now my "experts," and were available to help the kids that had questions dying while I kept an eye on the drying rack. As pieces turned completely blue I pulled them off the rack and ironed them. They were still a little damp, but were dry enough to stack and keep off the drying rack. As a bonus, the kids loved seeing what theirs looked like after it was ironed!

Now that everything is in place, as soon as you set the dates for dying, inform parents! I didn't think to do this until it was too late, and has a few upset (but very supportive, "don't change your teaching!") parents. I have already sent out the dates we will be doing Shibori with my other school, and it isn't until January. I requested that they make note of the dates their children will be dying and dress them in clothing that would not be upsetting to stain. I also have aprons, but they never seem to cover enough of the kids' bodies to make much of a difference-and they're cloth too so sometimes things just go right through them. I asked our office staff to put the dates in our school newsletter, emailed the classroom teachers the dates and asked them to put them in their class "peek of the week" letters and sent out an Artsonia newsletter. When we get back from Winter Break, I will also put the dates on my art class Facebook page and my school class pages. I figure I'm covered with all these communications.

It was a fabulous project. I loved how when the kids would enter the room all I would hear is comments about how it smelled. But every single class answered the same as they left and I asked, "well, was it worth the smell?" Every class unanimously yelled, "YES!"


Thursday, March 6, 2014

Monoprint Making


I am very fortunate to have an extremely supportive parent group at both of my schools. Last spring Dick Blick's Art Room Aid program had a Youth Art Month promotion of matching funds. I jumped on the chance at getting something out of my regular price range and asked both of my principals the best way to proceed. We asked the parent group at one school, and the other principal used funds reserved for using on things many kids will use. I ended up getting a printing press, bed, blankets, and litho supplies for each school! Once it arrived, I was a little overwhelmed. I haven't done printmaking since college-with a trained professor looking over my shoulder. Lucky for me, one of our very active parents also happens to be a professional printmaking artist. Genie Castro came in and worked with my second graders on creating monotypes and reminded me of the joy of printmaking (and how to run a press!). The results are completely blowing me away! I am about halfway done putting them on Artsonia, as Genie is taking them home and pressing them. Here's how we proceeded: 


Day 1: I introduced Genie and she demonstrated how to ink a plate. She showed them how to add more than one color to a brayer and cover the plate completely. She added yarn, string, ric rak, plastic yard fencing-anything thin on top of the plate and then showed the kids how to run it through the press. Please note, I brought the press from my other school AND I have a student teacher (who happens to be amazing at printmaking) right now-so there were three adults in the room. Two of us manned the presses while the third circulated to help kids that needed more color or had questions. If/when I do this again, with only me, I think I'd start another project that the kids can do solo and take small groups to the press. The kids formed a line at each press after washing their hands. They were in charge of writing their name on the paper (Stonehenge) and dipping it in the waterbath (I borrowed a large shallow pan from our kitchen staff.) and letting it drip while the adult reset the press. Once the press was engaged, the kids did the work of running their print through the press. 

Day 2: Genie came back and taught the kids how to sign a print. She went over how to come up with a creative title, use the 1/1 for a monoprint, sign it, add a copyright symbol, and the year. She even encouraged them to write it on scrap paper first so they know they are spelling everything correctly. Then the kids signed the print from the previous class and worked on printing more. All the kids printed two on Stonehenge paper, and some had time to print extras on cheap paper too. 


The kids loved this whole process! 
When they saw Genie was back for the second day there was a lot of celebrating!


This is our second grade Art Show project.


Tuesday, January 21, 2014

Picasso's Blue Portraits

I am starting a new project with my second graders soon. I decided to use a presentation App on my iPad called Flowboard to introduce the lesson. Here is the intro, and I will post about the project once we get started. Here's the link to the Picasso Flowboard.


View on Flowboard - Presentation and Storytelling Platform for iPad

CREDIT: The portrait template on the last slide was created by Tricia Fuglestad. I received it when I purchased the eBook for her Master Class at Education Closet.

Friday, November 1, 2013

Phantasy Zebras


My second graders are about 2/3 of the way through this project. I will post the how-to drawing guide I used with them on Monday, as it's saved on a work drive that I don't have access to from home. (Here it is!) So far, they used the drawing tutorial to draw the head of a zebra after looking closely at photographs of zebras to notice details about their faces. We talked about the shape of their noses, how wide their head gets around their eyes, and that their heads get more narrow above their eyes. We looked at the shape of their ears, and even their Mohawks before starting our drawings. I love using drawing tutorials with a presentation remote for many reasons. First, selfishly, I don't have to draw it six times. More importantly, however are the benefits for the kids. I can be out with them, checking their progress and giving tips instead of being stuck near the board. Also, I had a kid absent and I was able to keep the rest of the class on task and give her the remote to work at her own pace. She not only caught up to the rest of the class (because she didn't have to wait on me at all), but her zebra looks stellar!

Once they were done drawing their zebras, I showed them how to distinguish between chisel tip, fine tip, and extra fine tip Sharpies. My sub called them "Daddy, Momma, and Baby, " which the kids had fun with. I even heard some role playing with markers. "I love you Momma, I'm going to use you on these stripes!" I gave them tips on when to use each size marker and how to color thoroughly without looking scribbly and set them to work. 

The next class period, we finished up the Sharpie and then used watercolors for the background. I asked them to go around the zebra head using rainbow order. We reviewed primary and secondary colors and talked about how when the colors go in rainbow order they mix to form the intermediate colors.

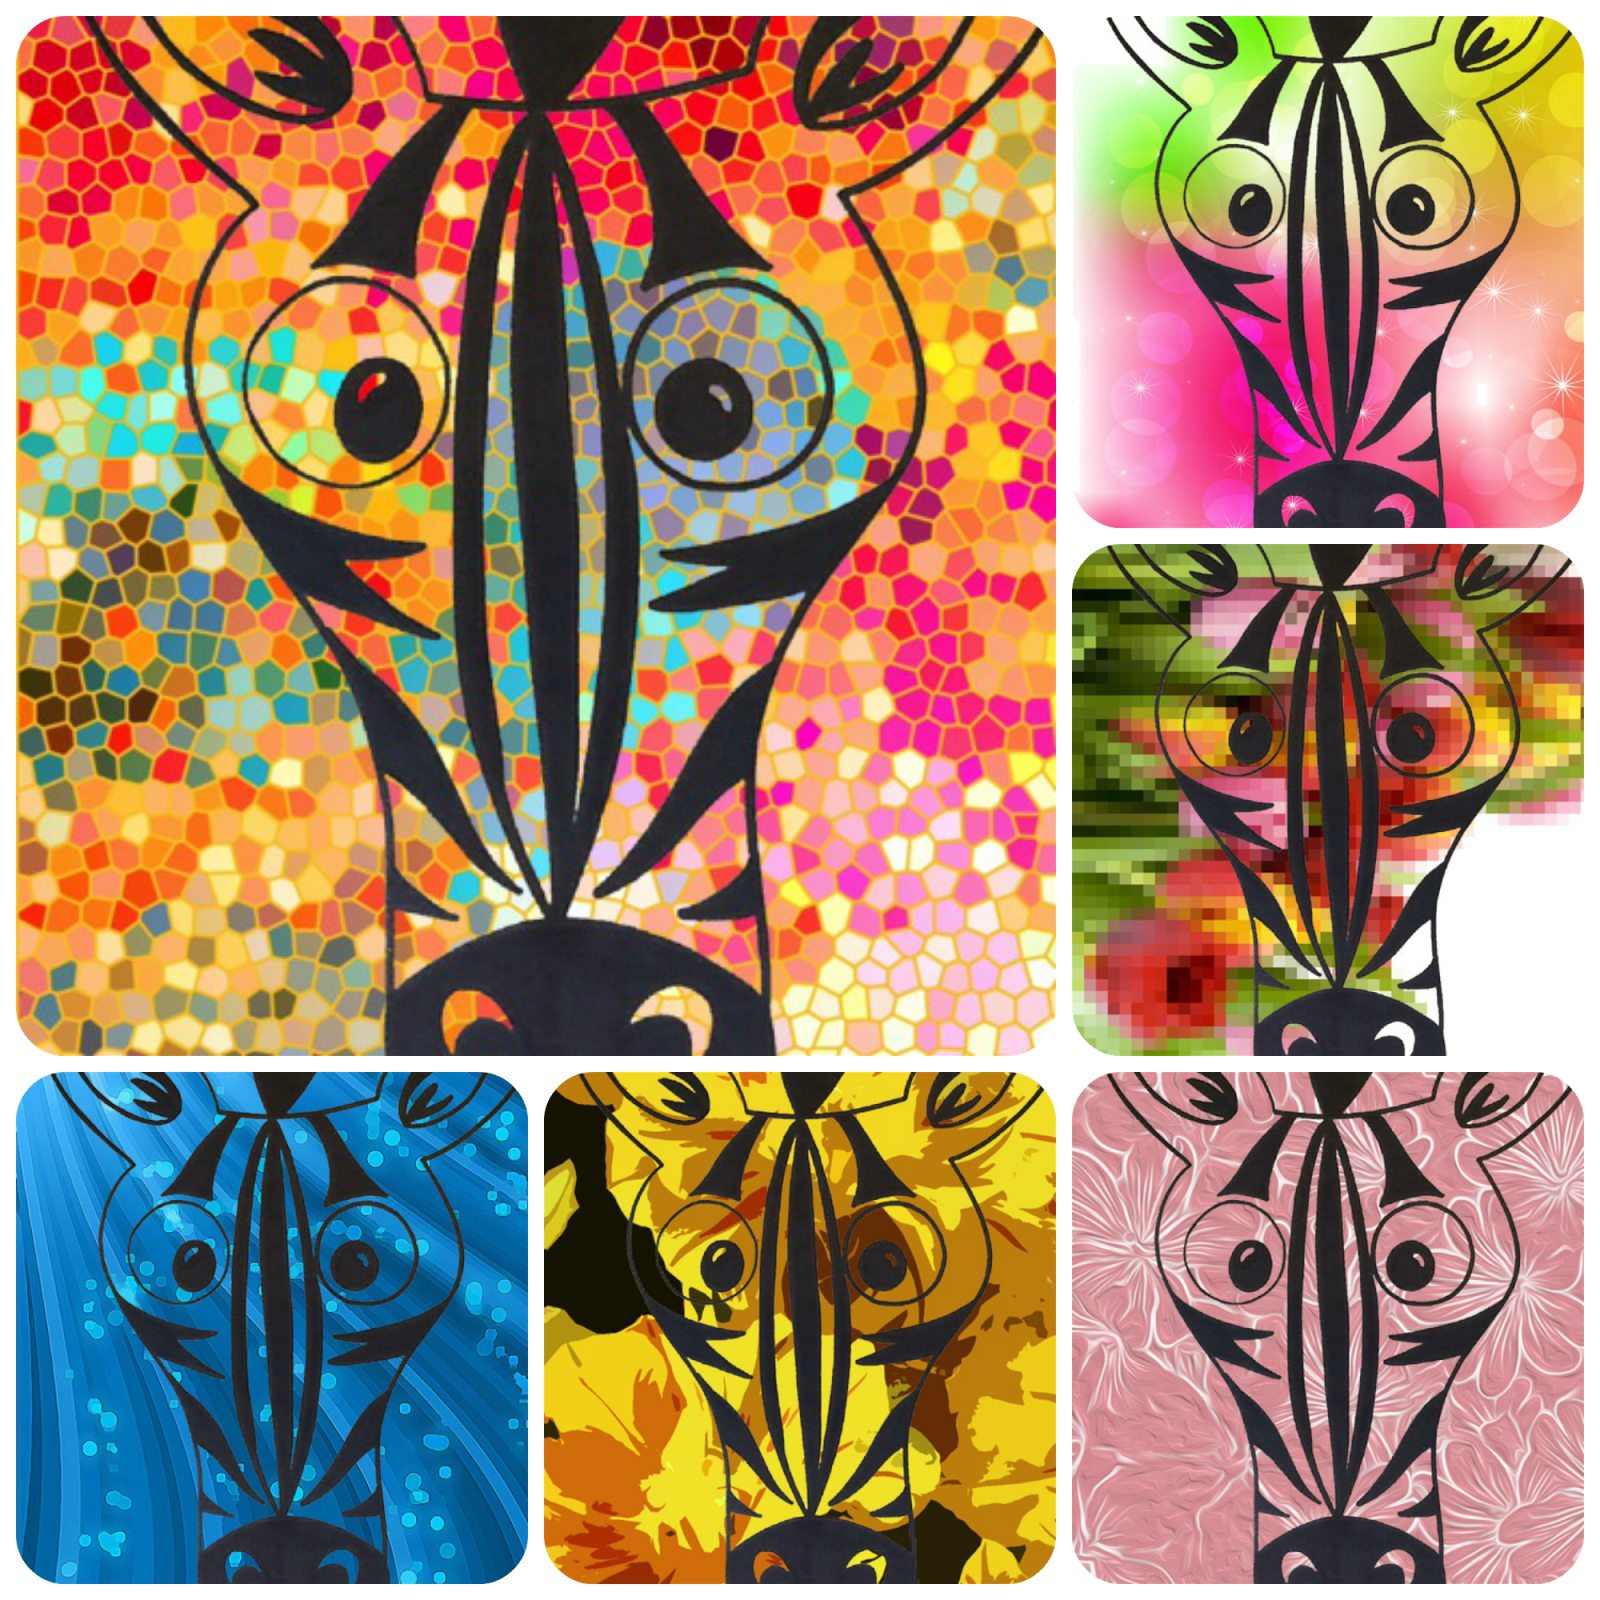
Next cycle, I will be borrowing iPads and having the students manipulate the image they drew and painted. They will use the Phantasy App, which changes the background of the image into something new. There are many images to choose from. Here are just a few examples using my sample zebra. 


Wednesday, October 24, 2012

Gelatin Printmaking

When I came across this blog post on Pinterest, I was a bit intrigued. Admittidly, it took me over a year to get back to it and thoroughly check it out. I am in love with this process! There is a product called Gelli Art that mimics the gelatin printmaking technique, but I have too small of a budget to invest in those. Enter gelatin. Notice I didn't say Jell-O. I used Knox Gelatin, which I found at WalMart in a box with four packages in it. I used two cups of boiling water and all four packets of gelatin to create one cookie sheet of gelatin to play with. When I do this with students, I plan on using disposible tins that I already have on hand. They are brownie pan sized. After mixing the gelatin, I poured it into the pan and let is sit overnight. The next morning I had a flexible, rubbery surface for printmaking.

I like the lesson that is found on the blog post linked above, so I decided to try that one. Luckily, in Wisconsin in October, there are plenty of leaves to be found! I inked the gelatin with black ink and layed the leaves out on the gelatin, vein side down. Time for the first print. This one will give students an image focusing on the negative space.

Negative image, next to the printing pan.

Next, I removed the leaves. Most of the ink around the leaves was removed with the first print, but the leaves blocked off an areas with a great vein pattern. Once the leaves are removed, I created the second print. I LOVE these! They are simply stunning!

Pulling the second print.

Side by side; negative and positive space.


Negative space.

Positive space.
I plan on having the students mount these side by side. We will look at some Andy Warhol prints and talk about dyptichs. I love that there are so many concepts in this one, simple project! Students will be learning printmaking, negative/positive space, Pop Art, and dyptichs!

Friday, September 7, 2012

The Dot~Collaborative Art

You may have noticed from my last post that I have changed a lot of my classroom around this year.  I moved classrooms last year and have purged a lot of "junk" and extra furniture. My main goal is to make sure that there is plenty of room for my students to create without a ton of clutter everywhere. It has been very freeing to get rid of so much stuff! The photo is of the bulletin board I am now using for my project samples and Learning Targets. It only has one project on it right now because the whole school is going to do the same project for the start of the year.


We began with an explaination of all the classroom management changes, which I reviewed in the last post (linked above, if you missed it!). Once the students expressed that all my expectations were clear to them we started the first project. First was a video animation of Peter Reynold's book, The Dot (except when the technology failed me, then it was a good old fashioned book reading. Complete with fifth graders sitting on the floor around me!) We discussed the lessons to be learned through the book; to try, believe in yourself, "make a mark and see where it takes you" and that these lessons are not only found in art. With the younger kids I then segued into the creation process but with the older kids we then talked about the Elements of Art. They watched this video on the Elements, and then we briefly talked about them. The younger kids have one Learning Target for this project: "Create a work of art using craftsmanship." The older kids also have that one, and also to "Use three or more of the Elements of Art in a work of art."

Kids were given a paper with a quarter of a circle photocopied on it. I had to make two versions because I didn't want to have to cut all the papers into squares. I have a post-it on the top of each pile where I am keeping track of which classes have used that version and how many kids are in the classes. I'll get them as close to even as I can and possibly add my samples in if needed to even it out when I display them. I also gave the students a ruler and circles to trace. I asked them to design first with their pencils and then fill in the shapes with oil pastels. Younger kids got a demo on some oil pastel techniques, and older kids had a verbal refresher of techniques they should already be used to using. Finally, they set to work. Some of them are really amazing! I will be sure to post the final work of art all hung together in our Atrium, as well as a link to their individual quarter dots on Artsonia!

This project was inspired by this Pinterest Pin.