Showing posts with label Medium: Painting. Show all posts

Monday, April 29, 2019

Monet's Garden

I simply love this project. These examples are first grade. We watched a video of Linnea in Monet's Garden on YouTube and then looked at photographs of Monet's house and paintings. Next, they followed the steps found on Mrs. Picasso's Art Room. They are all so unique and beautiful!


Thursday, November 30, 2017

Frank Stella

My fifth graders are just beginning this lesson about Frank Stella. After a quick pre-assessment and an introduction to Stella's work they began the project this week. Next week they will begin mixing colors and will use four different color groups. They will be using the hue, tints, tones, and shades.


Note: This project was inspired by a pin from Kids Artists which leads back to this blog post.

Wednesday, January 18, 2017

Value Landscapes-Fifth Grade


My SLO this year is focusing a bit closer on the Elements of Art than I have in the past several years. Previously I had all the elements included in my assessment and this year I am focused only on color, space, and value. My PLC decided to tackle value first. I chose to go with this project with my fifth graders. 


As a pre-assessment, I gave the kids a blank value scale and asked the kids to fill it out without giving them any information on what a value scale is or how to fill it in. Next, we discussed value, value scales, and atmospheric perspective. I showed them this presentation and they were amazed that all the images are photos.


Students drew five layers of land and traced a circle in the sky. I explained and demonstrated how to mix tints and shades and how to find complementary colors on the color wheel. Students chose a set of complementary colors and then started with the land. Their closest layer of land is the darkest value and the layers get lighter as they move backwards. 


Next, they did the opposite to create the sky. They started with the lightest color closest to the sun and the shades got darker as the colors moved away from the sun.


Finally, students took an assessment in Google Classroom and filled in another value scale. This time I told them that I would be looking for five or more values in their value scale. 

Monday, January 16, 2017

Primary Line Study-Kindergarten


For this project, kindergartners started by listening to me read Straight Line Wonder  by Mem Fox. The story is about three straight lines that are best friends when one day one of the lines is tired of being straight. He tries lots of different styles, to the frustration of his friends when he is discovered by a famous director and becomes a movie star. This perfectly introduces students to a class discussion of line, using this presentation to show examples of lines used by different famous artists. 


After the line discussion, I demonstrated how to paint, as this was our first painting project together. I like that we started with just black so the kids could focus on lines and the steps to painting.  I showed the students how to keep the paint in the "hair" of the brush and "tickle" the paper with the tip of the brush. I prepped paper by taping watercolor paper to a piece of construction paper for each student. This gives them a colorful outline as a guide for their painting and also provides the finished painting with a nice white border. Students were asked to paint different types of lines from one tape line across the paper to another tape line. 


The next class, I introduced the students to the color wheel. We talked about how artists use the color wheel to remember color groups. We then talked about the primary colors and why they are so important to artists. 


Finally, I reminded students of the painting steps from the previous class (keep the paint in the "hair" of the brush, tickle the paper) and then demonstrated how to change colors to keep the color clear on the paper. I informed the students that I would be looking for clean colors on their final paintings. Because this was our first painting project together, I also made this storyboard to remind the students of the steps after my demo. 


When finished with the project, students completed this assessment by making different types of lines with markers. See the full lesson plan here.


Saturday, January 14, 2017

Ton Schulten Cityscapes-Third Grade


I stumbled upon this great lesson on Pinterest, which lead to this blog post and introduced me to Dutch artist Ton Schulten. I created this presentation about Schulten, which also introduces geometric and organic shapes, and warm and cool colors. 


Students started by using a ruler to create the buildings. They then created the grid in the sky. We reviewed warm and cool colors and tints and shades. I demonstrated how to mix colors cleanly and passes out the warm colors. Students chose if they wanted to use the warm colors in their sky or buildings and mixes as many tints and shades as they could.


After a couple of classes they finished the warm colors and were given cool colors to repeat the steps with the other half of the painting. 


The final touches came with black paint outlines around the buildings and the addition of details such as windows, doors, birds, clock towers, etc.


Over all these turned out amazing! Oh, and the kids learned a lot. ;)


Friday, January 15, 2016

African Masks

This was a quick project for my kindergartners, but taught them a lot. We began by looking at a variety of African masks and noticing that they were all symmetrical. Next, each student got a mask template that was donated to me by the music teacher. I showed them how to fold the mask down the center and then paint on one side and create symmetry. 

The next class, I had all of the masks stapled into the mask shape and showed the kids how to use a hand held hole punch. I gave them the option of no hair, rope hair, or raffia for hair. The kids punched the holes and I walked around writing "rope" or "raffia" on the back of their masks. After class I tied all the rope and raffia for them. 


See our gallery here (Houlton to come!).

Papyrus Painting

The fifth graders are finishing up painting Egyptian symbols on papyrus. They were given a sheet with a variety of symbols on it and practiced on scratch paper before starting on their papyrus. Some kids have a lot of knowledge of Egyptian mythology and choose a different image than what was on the sheets.

I showed them how to mix colors and how to blend on the paper and we discussed the advantages and disadvantages of each technique. 

They were given the option of adding permanent marker once the paint dried and then were asked to mount them on colored construction paper. They chose the color that they thought made their artwork "pop" the most. 

Friday, November 13, 2015

Anansi the Spider; An Ashanti Folktale


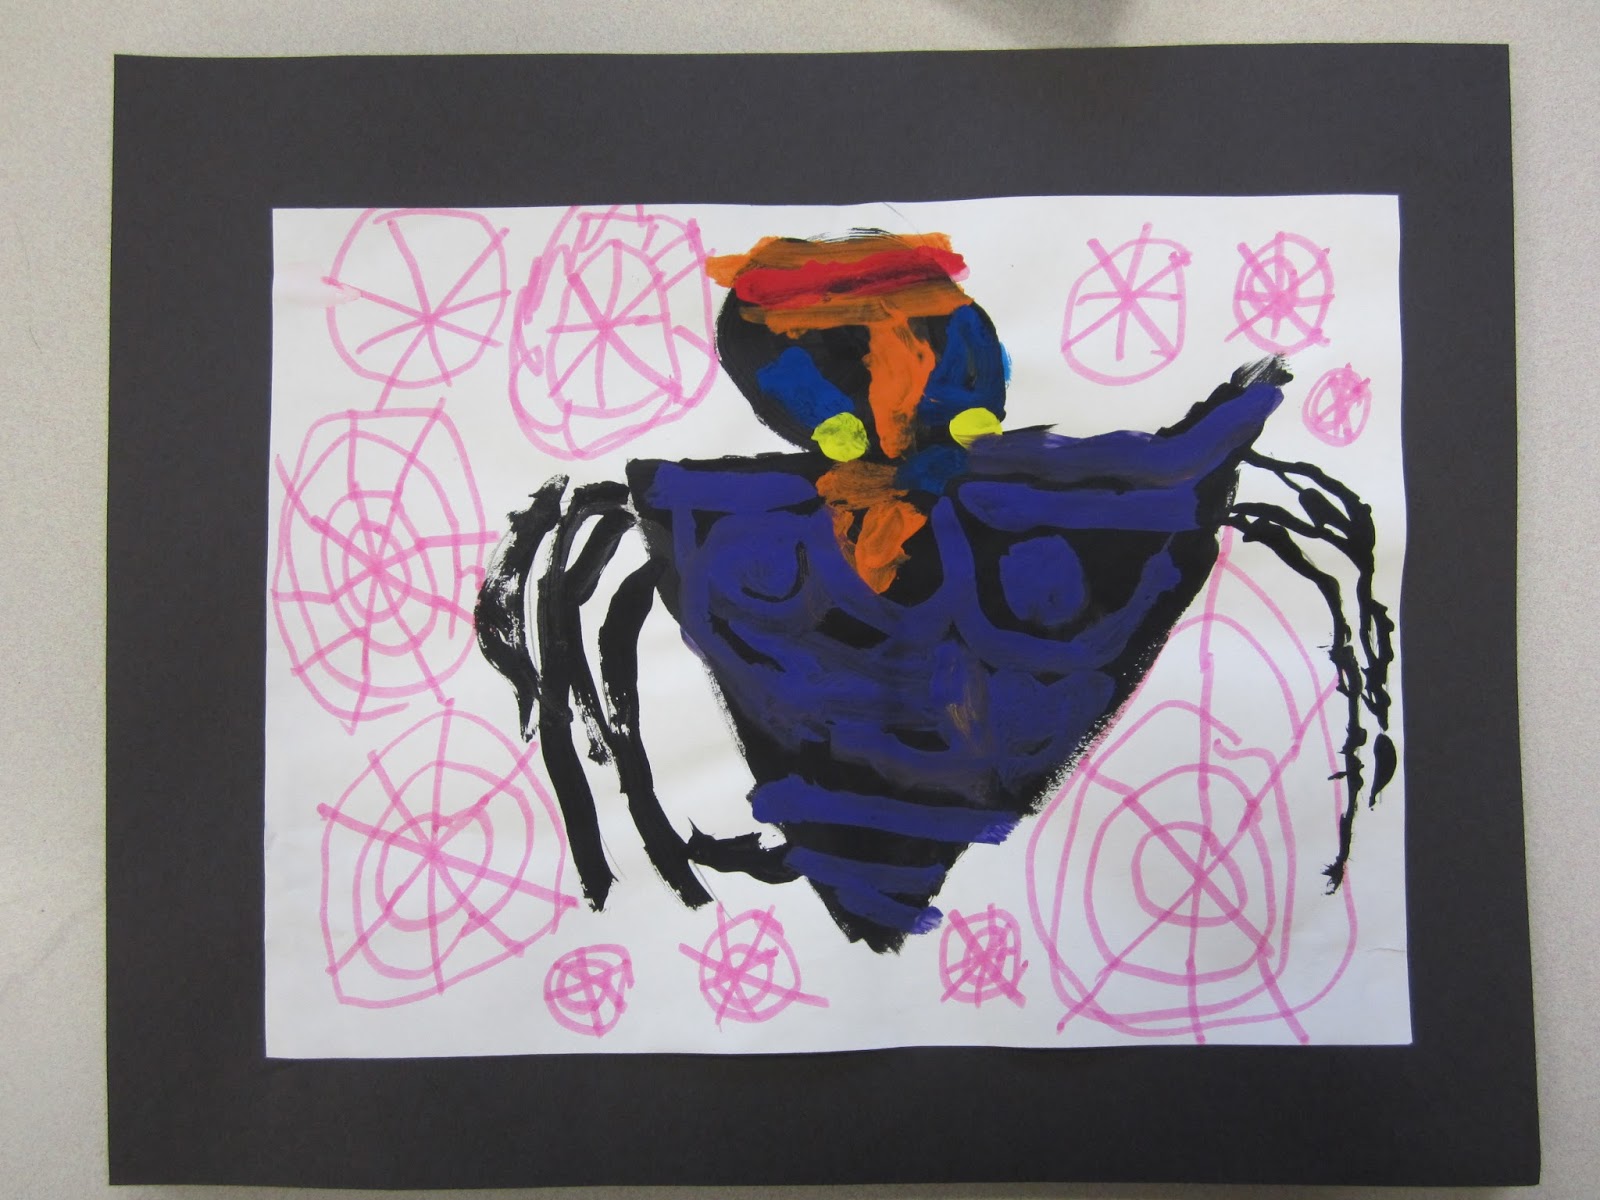
My kindergartners just finished painting these cute Anansi spiders. Anansi is the an Ashanti folkstory from Ghana, Africa. I began this lesson by reading the book to the kids. Anansi has six sons, who each have a special talent. There is See Trouble, Road Builder, River Drinker, Game Skinner, Stone Thrower, and Cushion. Each son has a different shape on his body to show his talent. When Anansi gets into trouble the sons use their talents to save his life. 


After reading the story, students were given pencils and white paper. I used guided drawing on the SmartBoard to show them how to draw a triangle (they insisted it's upside down) with an oval on top for the head. I asked them to show me on their fingers how many legs a spider has. They all showed me five on one hand and three on the other so I asked them to add one to the three and subtract the thumb on the hand with five. I showed them with my hands that I now had four fingers up on both hands and that's how a spider's legs are arranged on their body. I showed them how Anansi's legs overlap and asked them to draw four legs on each side. 
While they were finishing up their drawings I passed out pallets of black paint, but no brushes yet. I then demonstrated how to use the edge of a flat brush to make a smooth line around the shape before filling in the insides. They had the option of using the same flat brush for the legs or using a detail brush. I showed them tricks for both brushes. Finally, I gave them brushes and asked them to paint in their drawings. 


The next class period we looked at a picture of Anansi on the SmartBoard and talked about the web behind him. It is created with pattern instead of traditional spiderwebs. I showed them how to make both a patterned web like the book or a traditional web and let them decide how to fill in the background with marker. Finally, I gave them pallets with red, orange, yellow, blue, and purple and used my document camera to walk them through painting the face and other details on their spider. We started with orange and painted a V for the lower lip and a triangle like the body for the top lip. Then it was a T for the nose and bottom of the headband with a strip a little above it. Next, we skipped to blue and painted the triangles above the eyes and the nostrils. Yellow was next for the eyes and then a red stripe on the headband. Last, we talked about and looked at the images of the six sons and noticed the different shapes on the bodies. They used purple to add any shape on their spider's body. 


Friday, October 16, 2015

Moroccan Khamsas


Second graders are finishing up their Moroccan Khamsas. Students learned about Morocco and we talked about their largest religion, Islam. The Khamsa, or Hand of Fatima is a symbol of protection in their religion. Students then learned how to use a ruler to create an even border by matching it with the edge of the paper and drawing on the other side of the ruler. They traced their thumb, index, middle, and ring fingers of one hand and then worked with a partner to trace their thumb of their other hand to create a full Khamsa shape. 


Next, students learned about the Element of Art: Color by focusing on warm and cool colors. We played a game to measure understanding. I called out a color and if they thought it was a cool color they would wrap their arms around themselves like they were shivering. If they thought it was a warm color they would fan themselves. It worked really well! They chose warm or cool colors for the hand and border and the opposite color group for around the hand. 

When they were done painting they used any extra time to practice some patterns in their sketchbooks. The next class period they used those patterns to finish up the project. They were asked to draw an eye on the hand and fill the hand, the space around the hand, and the border with patterns. 

Saturday, October 10, 2015

Mbuti Bark Paintings from DR Congo

Images are all student examples.
I tend to start my Kindergartners off very slowly. The first class I gave them a piece of cardstock with six shapes on it. We talked about the Element of Art: Shape and they named each shape. Next, I taught them how to hold and use a pair of scissors and asked them to cut out all six shapes. They put them in an envelope until next class. The next class, we practiced using little dots of glue on a worksheet with a picture of a glue bottle with dots on it. When the passed the glue "test," they were asked to arrange their shapes into an image and glue them down. They added marker details to complete their picture. This simple lesson lets me assess their cutting, gluing, drawing, and creativity baseline in one activity. Once I have this information, I am able to more easily plan lessons and projects that fit their skills and require them to develop new skills. 

My Kindergartners then learned about the Element of Art: Line by learning about bark paintings from the artisans in DR Congo. I cut a roll of craft paper in half and then cut that into 15" pieces, leaving each student with a piece of brown paper that was 15" X 15". Due to the curl in the rolled paper, I taped the pieces to the table at one school (the Kinders at that school meet right after my lunch break) and to drawing boards at my other school. That was especially fun because I taught them how to lean the boards against the edge of the table to make enough room for four boards at each of the cafeteria style tables. They looked and felt like "real" artists as they painted for the first time. I taught them how to "tickle" the paper with the tip of the brush and never mash the brush in the paint or on the paper. I showed them how to flip the brush to use all the paint on the brush before getting more paint. Students were asked to paint at least three (math connection!!) different types of lines. We talked about what "at least" means and I quizzed them before letting them go on their own with questions like "Could I paint two different kinds of lines? How about six?" until I felt they had a clear grasp of what was expected of them. 

When they filled the paper with lines, they were asked to fill out a paper with three boxes on it, one box for each new type of line. 


Saturday, April 4, 2015

Asian Art Study: Russia

I realize that I have posted some of these projects before, but in looking at my schools' Artsonia galleries, I am so proud and happy with the way this year went that I thought I would break up the year into the units of countries that we studied. If you don't already know, I decided to focus my teaching on one continent each year starting this year. I chose Asia to start with and honestly, I think I could have spent all year just in Japan! The curiosity and genuine interests the students have shown in each country has been remarkable. Here is the first country we "flew" to; Russia. 

This was my kinder's second project of the year, and their first time painting with me. They learned about Kandinsky, concentric circles, and watercolor painting techniques along with my painting expectations, and how to clean up in the art room.

After completing their Kandinsky paintings, my kinders used strips and squares of paper to create these Russian tiger collages inspired by an image I found on Pinterest. The full lesson is found here
First graders did two projects in Russia. This is their study of landscape and the focus of the lesson was foreground, middle ground, and background. For full instructions to teach this lesson, visit my inspiration here
First grade's second project was Babushka (aka Matryoshka) Doll Drawings. We looked at a set of dolls my parents brought me from Russia and noticed how they get smaller, that most of them are holding something and there is a lot of patterns on them. I got out a variety of sizes of bottle caps for them to use to trace the heads and gave them pointers for drawing the details. Students were asked to use at least three different drawing media to color their dolls. The full lesson can be found here.   

Second graders looked at Russian architecture and compared their traditional buildings to what they see in Wisconsin. They noticed the elaborate designs, dome tops, and bright colors. They then drew their own version of a Russian building and were asked to color it with crayons, colored pencils, markers and oil pastels using their "artist brains" to choose the best medium for each portion of their building. They then watercolored the sky.
Third grade looked at the art and life of Russian artist, Marc Chagall. They learned that his paintings are dream like interpretations of stories of his life in Vitbesk. They wrote a story with four parts and then illustrated it using four different perspectives and at least three different drawing supplies. 

Like first grade, fourth grade looked at Babushka Dolls. They created clay versions using two pinch pots and connecting them to make the hollow "peanut" form and then painting them. While the clay versions were drying and being fired the also created a drawing using colored pencils. They were allowed to use the drawing as practice for the sculpture, or to design the two project differently. 


The fifth graders learned about Kazimir Malevich. They looked at the progression of his art from realistic to Cubist to the creation of Suprematism. Next I tried my hand at a modified choice project. I allowed students to either create a Cubist image using oil pastels or a Suprematist collage. Regardless of the media, students were asked to show movement, balance, unity, shape, line, and color in their composition.