Friday, February 26, 2010

Floppy Disk Flowers

LEARNING TARGETS:
-Understand that art can be made out of anything
-Use recycling to create a work of art

TERMS:
-Pinch Pot: Creating a pot out of a pliable material by pinching with the fingers.

MATERIALS:
Floppy Discs
Jazz Paint
Paint Brushes
Newspaper
Water/Water Containers
Toaster Oven/Polymer Clay Oven
Crayola Model Magic in a variety of colors
Twisteez Wire
Pony Beads
Potting Soil
Glue
Green Construction paper
Scissors
Black Sharpies


This summer when I entered my new school for the first time and opened one of the desk drawers, I found hundreds of floppy disks. I knew it was a project waiting to happen, but didn't know what project. Our First Annual Art Show has a recycling theme so I knew it was time to get those Floppy Disks out. I cracked them open and pulled out the information disks. The kids got to choose three or four flowers, and they painted them whichever color they wanted with the Jazz paints on newspaper.


Next, I showed the children how to create a pinch pot out of Crayola Model Magic. Because it's an Art Show project I didn't show them that they can create a marbled look with two colors, or mix them to get a secondary color. I was going for simplicity so they got to choose red, yellow, blue, or white for their pot. I stressed making sure that their pot would stand before adding wires (although, I still had to add a cardboard base to a few of them). When the pot was shaped, they needed to add a wire for each flower that they painted.


Before the next class, I melted each disk in the toaster oven. I pushed them into the top of a coffee mug and put them in at about 250 degrees; it only took about ten seconds for each one to melt into the form. When the kids came in, I showed them how to create a leaf on a folded piece of paper, so the fold kept them attached. They were asked to glue zero, one, or two leaves to each wire. We wrapped the wire around a pencil to get a "spring" at the top of each wire and twisted one disk onto the wire. I stressed stopping in the middle of the spring so the flower wouldn't fall all the way down. A pony bead was added, and then the spring was squished shut. When all the flowers were added, they added a bit of potting soil on the top of the pot to make it look like the flowers are actually growing. They turned out adorable!

ASSESSMENT:
In addition to circulating the room, completed projects are assessed for the shape of their pot, thoroughness of painting their disks, and craftsmanship.

Sunday, February 21, 2010

SMARTboard Links

How ironic that the day after I posted about my SMARTboard use, an art education blog that I follow had a similiar post! Here are some more ideas of how to use a SMARTboard in an Art classroom.

Saturday, February 20, 2010

SMARTboards for Clean Up Transition

One of my constant delimas since becoming an art teacher has been monitoring the transition from project work time to clean up time. I'm sure many can relate to my stories of the kids that wander and goof off during clean up time, letting the other kids at their table clean up all of their messes. Often we'd get to the end of class time, their teacher would be waiting, and the room was not up to my standards. Many times, I'd end up cleaning the remainder of the mess when all my classes were done, thus enforcing the idea that if they goof off they won't have to clean the mess-there would always be someone else to do it for them.

Then I found The Teaching Palette. If you're an art teacher, and haven't utilized this resource, I strongly recommend it. I found an article on their site about using a clean up map to motivate students to work as a team and quickly clean the room. While I liked the author's ideas, I don't have any open wall space in my tiny classrooms to put a large map. I decided I'd like to utilize my SMARTboard for this idea but having no expericence with SMARTboards, had no idea how to make my thoughts into reality.

Then I took a weekend class through my district on how to use a SMARTboard. Since then, I have implimented a plan for clean up that is working so well, I decided to share it. If you search the gallery for a "timer," you will find a stick of dynamite that counts down seconds until it "explodes." I set it for either 180 seconds (three minutes) or 300 seconds (five minutes), depending on how much work is required for clean up. I use a split screen, so the bomb is on one side, and a list of clean up expectations is on the other side.

While introducing this concept to the kids, I started by talking about how they can "help us reach our goal" of beating the bomb. I asked questions like "will standing, and counting down help us reach our goal?" They answered with a resounding NO! "Would checking the floor help us reach our goal?" YES! The first time or two, it was a little loud, but I started walking around, quietly mentioning things like "Ooooh, I see a marker under the red table." They noticed that if they listen while they clean, I will mention everything that needs to be done by the time the bomb explodes. I also made sure that the last item on every clean up list is that they are sitting quietly in their seats. This avoids the while class counting down at the top of their lungs.

If the kids "beat the bomb," they get a point on their scoreboard; if not, I get a point. I also found the scoreboard in the gallery, and the HOME and AWAY labels can be changed to whatever you want it to say.

I have a SMART Notebook file for each day, and have the bomb, clean up lists for drawing, painting, and clay which can be moved within the slideshow depending on which materials we are using that day. Then I have a slide for each class' scoreboard. At the end of the day, I hit save and we continue each time the class meets. I told the kids they would get a "mystery prize" at the end of the year if they have more points than I do.

Since starting this, the kids have gotten very excited about clean up. Half way through the class I'll get "are we going to do the bomb again today?!" The kids are excited, and working as a team in a way I never imagined they would! It's astounding! My biggest issue now is getting them to slow down so they don't get hurt!

I've also found some interesting ways to get them lined up using my SMARTboard, and keep these slides at the end of each day's slideshow. There is a "color chooser" which shows a different color every time it is touched. I tell them if they are wearing the color it shows, they can line up. There's also letter dice that I changed to have only vowels; then I select either their first or last name as say if they have that letter in the chosen name they can line up. Finally, there is a coin flip. I have them choose heads (put their hands on their head) or tails (put their hands on their butt) and flip the coin. The correct guess lands them in line.

Monday, January 25, 2010

Wolf Kahn Trees


LEARNING TARGETS:
-Recognize a landscape.
-Experience masking.
-Experience wet-on-wet watercolor technique.

TERMS:
-Wolf Kahn: A living artist that paints primarily landscape paintings.
-Landscape: An image of outside.
-Masking: Blocking off a portion of the paper/canvas and painting over it to leave the area the original color.
-Wet-on-wet: Applying wet paint to wet paper by applying water to the paper first.

MATERIALS:
12" X 18" Watercolor paper
Rolls of painter's tape for each table
Scissors
Watercolor paints
Paint brushes
Water containers/Water


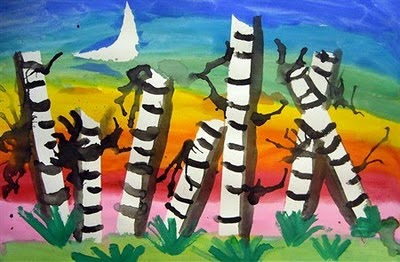
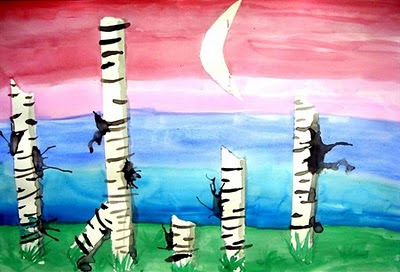
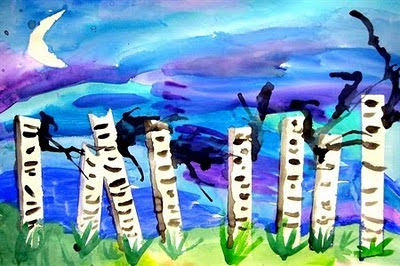
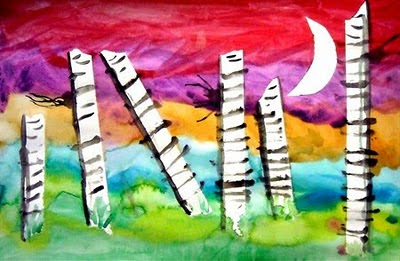
After talking about Landscapes and Wolf Kahn, viewing a slideshow of each we started the project. Students were asked to first put down at least 5 strips of painter's tape, near the bottom of the page. Next, they put pieces of tape together by overlapping them to create a larger piece of adhesive and cut out a moon. When all pieces needed are masked off, the painting begins! Start with the ground, because when the sky is added it will draw the water upwards, making the horizon line look like grass/bushes. I encouraged my students to use not only green, but also yellow and brown in the ground. When the ground is complete, cover the rest of the paper with plain water. Add stripes of color, which should blend into each other on the wet paper. If the paint is not blending, there is not enough water. Students can even lift the paper in different directions to make the paint run.


When the sky is dry, the teacher should remove the masked areas to reveal the white paper beneath. Next class, students should be taught additional watercolor techniques to complete the details of the painting. First, they should add the clumps of grass, pressing the brush down at the base of the grass, and lifting it as the blade gets higher. This will cause the brushstroke to get thinner. Next, we talked about the moon being a light source and that a shadow is the absence of light. The kids reasoned that if a shadow is the absence of light, it should be on the side of the tree opposite the moon! I showed them how to use a lot of water and a little bit of black paint to create a gray shadow. TROUBLESHOOTING: if the shadow is too dark, add more water and spread the paint out. If it is already spread out, add more water and dab with a paper towel. Curved black lines should be added along the trees; some longer than others. Finally, the last step is to add a watery dab of paint to the side of a tree and use a straw to blow the paint to look like branches.


ASSESSMENT: While the kids are painting the sky, be sure to circulate the room making sure students are comprehending the wet-on-wet technique. Many will need to be encouraged to use more water and some will forget to use it at all! Completed works of art should be assessed for completion of all steps and craftsmanship.

Twisted Trees

LEARNING TARGETS:
-Students will understand the difference between two-dimensional and three-dimensional works of art.
-Discuss the differences between spring, summer, fall, and winter trees.

TERMS:
-Three Dimensional: The object has three dimensions, or characteristics; Height, Width, and Depth.
-Form: A three dimensional work of art.

Materials:
Small paper bag
Scissors
Mat board or cardboard base
Glue
OPTIONAL:
Colored/white tissue paper to represent leaves/snow
Glitter


After introducing the Element of Design: FORM and discussing how trees look different in different seasons, I have the kids cut five lines in their paper bag (bigger bags can support more lines; I predraw the lines for them). Next, they should open the bag. Some kids need help getting it open without ripping it. Once it is open, they should squish the whole bag and twist to create a trunk. Next, twist each individual cut piece at the top. I stress twisting tight, and twisting all the way to the end of the paper.

When all pieces of the tree are twisted, the bag should be glued to the cardboard base. NOTE, it is easier to have them write their name on the cardboard before they glue the bag to it. Details can be added, such as tissue paper for leaves/snow and glitter for the shimmering of a fresh snowfall.


ASSESSMENT: Completed works of art are assessed for completion; I check that there are enough details to make it look done, that all the pieces of paper are fully twisted, etc. and craftsmanship.

Thiebaud Gumball Machines


LEARNING TARGETS:
-Understand that printmaking can produce multiple copies of an image.
-Know that Thiebaud painted desserts, such as gumball machines.

TERMS:
-Printmaking: Using a plate (in this case, a stamp) to create images, often multiple images.
-Wayne Thiebaud: A Pop Artist most famous for his paintings of desserts.

MATERIALS:
8 1/2" X 11" white paper with a circle pretraced by the teacher (ice cream lid works perfectly)
Circle stamps (I bought wooden circles and small spindles at Jo-Ann and glued them together to make stamps with handles)
Paint in red, orange, yellow, green, blue, and purple.
8 1/2" X 11" red paper
4" X 6" grey paper
Scissors
Glue/ Glue sticks
Paintbrushes
Pencils


We once again began with a PowerPoint, this time highlighting paintings by Wayne Thiebaud; focusing on his gumball machines. Next, demonstrated how to stamp the circles. I asked them to start with yellow and work their way to the darker colors. We talked about how the darker colors change the color of a lighter color and we don't want to have funny colored gumballs. In hindsight, I think I would just have a stamp and paintbrush for each color to eliminate the cleaning the stamp between each color (I had them wipe them with a papertowel). I also asked them to stamp 1-3 circles outside of the pencil circle for the gumballs that have been purchased in the final picture.


Next class, I passed out the paintings first and while they were cutting those out I passed out the red paper, gray paper, and glue. I showed them how to fold the red paper the "hot dog" way and make the red base of the machine by drawing a small horizontal line and then a long diagonal line to the top of the page. I also showed them how to trace the top of the circle (with it flipped over, in case they get pencil on it) to make the lid, and use the corner of the paper to make a rectangle. I showed them all the pieces, and layed it out how they should glue it down and then gave them time to work.


ASSESSMENT: In addition to circulating the classroom, looking for success and redirecting misguided students I review the completed works of art for use of all the colors in the gumballs, cutting and gluing skills, and craftsmanship.

Friday, January 22, 2010

CALL FOR LOCAL ARTISTS!

My school will be having an annual art show/silent auction in APRIL. Start creating, and plan to submit some art to out great show! It is led by a parent/artist with the silent auction in the Media Center, a student art exhibit in the atruim, and live music by our talented students. Come check out the festivities! More info to come as it is available.

Sunday, January 17, 2010

Thank You

On Friday I had a fourth grader come into my room before school. He handed me a potholder and told me he wanted to give it to me. I thanked him, and he explained that "I want to give you this because you taught me how to weave and if you hadn't, I wouldn't have understood the instructions. So this is just my thank you to you." Honestly, this is why I teach. To have a student recognize the connection between what we created in class and something happening in his personal life and use his knowledge. I admit, when he left I was a little choked up. What a great way to start the day!

Tuesday, December 29, 2009

Matisse's Goldfish

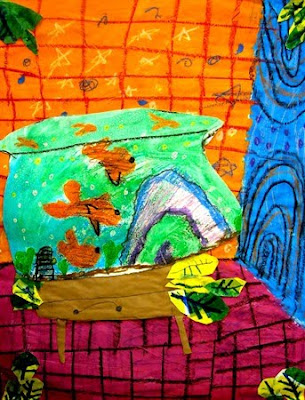
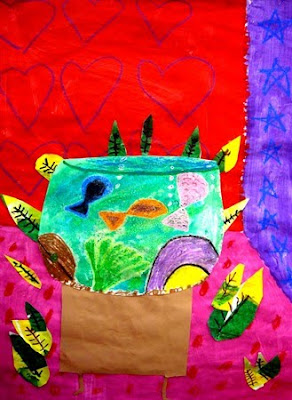
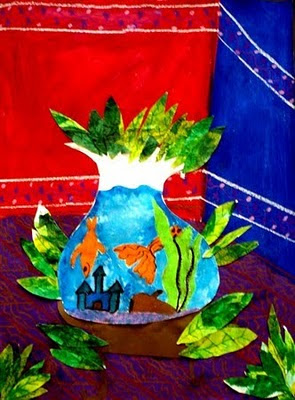
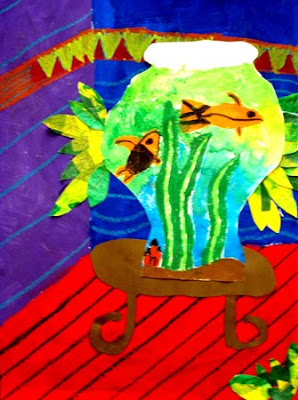
My second graders did an outstanding job on their Matisse project, so I decided to share it.

LEARNING TARGETS:
~Know who Henri Matisse is, and that he had a big impact on the art world.
~Recognize the use of outlines.
~Know what collage is
~Create a successful work of art using Matisse as inspiration.

TERMS:
Henri Matisse:An artist that started as a painter, using bold colors, outlines, and patterns. Known for founding "fauvism" and inventing collage.
Collage: The art of cutting shapes out of paper and gluing them together to create a work of art.
Outline: A line around the contour of an image.

Goldfish by Henri Matisse


We began with a PowerPoint of Matisse's life and work. We started with his paintings, and noticed his use of bright color, bold pattern, and outlines. The PowerPoint then lead into his invention of collage and finished off with a more detailed discussion of his painting Goldfish. My observant students noticed all of the above aspects of the painting, and also the reflections of the fish, and use of a unique "bowl" for the fish.


We then used a ruler and three lines to create a 3D room for our fish bowl. Students found the 6" mark on their ruler and put it on the edge of the paper, about a third of the way up on the right hand side and drew a diagonal line from the 6" to the end of the ruler. Next, they created a horizontal line from the end of the diagonal line to the end of the paper. Finally, a vertical line was added from the point where the first two met to the top of the page. Instant room! Then next class, students painted each wall a color, and the floor a third color. Finally, when the paint was dry they used oil pastels to add patterns on the walls and lines on the floor. I show them how to use parallel lines to create tile, brick, or hard wood floors.


The next step is to create an imaginative bowl for the fish. I remind the kids that Matisse's bowl was unusual and theirs can be traditional or unique. I demonstrate how to add oil pastel to the fish and details in the bowl and watercolor over it. Some even added salt to create a texture that represents bubbles! I am currently teaching this lesson at one of my schools, and we also discovered that it's fun to use a broken pencil to scratch details such as scales into the oil pastels! They look stellar!


Finally, students created paper for the leaves by painting a 50/50 glue/water mixture over tissue paper in shades of green and yellow onto a piece of white paper. When dry, they drew leaves on the back and cut them out. The whole work of art was collaged together to create the final work of art. The finishing touch was to use green, black, or brown (or all three!) markers to add veins in the leaves.


ASSESSMENT: Because this is such an involved project, it takes a long time and makes talking with the kids about it easier. Students are focused on the same learning targets for a number of weeks, and during class discussions, 99% of hands are raised with the answers to questions about Matisse and his work. I also look at the final projects for craftsmanship, creativity, and attention to detail. These always turn out amazing, and I have gotten a lot of positive feedback from parents, other teachers, and people on Artsonia.com.